BoldGrid Crio provides several options for your WordPress website’s header style and location. These options are found in the WordPress Customizer.
- In the Dashboard navigate to Appearance → Customize
- In the Customizer menu navigate to Design → Header → Site Header Layout
Crio Pro includes Custom Page Headers with more customization options than the Customizer created header. In the Customizer menu navigate to Design → Header → Site Header Layout → Header Templates to get started.
Crio Pro users also have the ability to enable a Sticky Header. The Sticky Header makes the header portion of the site remain fixed at the top of the screen when scrolling up and down the page. In the Customizer menu navigate to Design → Header → Sticky Header Layout.
To use a pre-designed layout, choose Select Layout, click the toggle to enable the Sticky Header, and then choose your desired layout. To create a custom template, choose Sticky Header Templates.
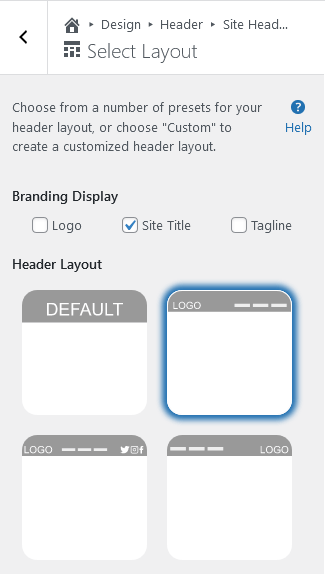
Select a Header Layout
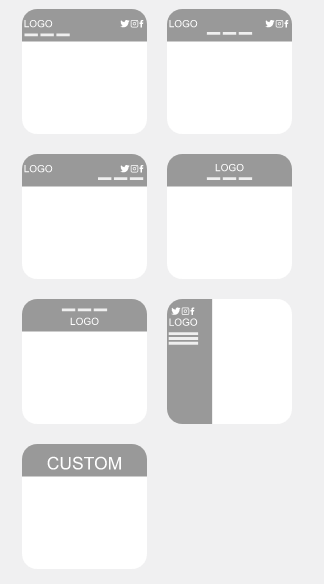
BoldGrid Crio, our newest WordPress theme, includes 9 pre-designed header layouts to choose from. Simply click on one and the live preview will update so you can see what works best with your site. Each layout can be further customized by choosing what Branding elements appear (Site Title, Logo, and/or Tagline).
How to Create a Custom WordPress Header Layout
If you prefer to create your own header using the Customizer, click the CUSTOM option at the bottom of the panel to open all available options.
Below is Crio’s initial header design, there is one row with two elements in it – Branding and Menu. Since each is set to use half of the space, the Branding would appear on the left half of the header and the Menu on the right half. You can drag and drop elements around and see the changes in real time with the Customizer live preview.
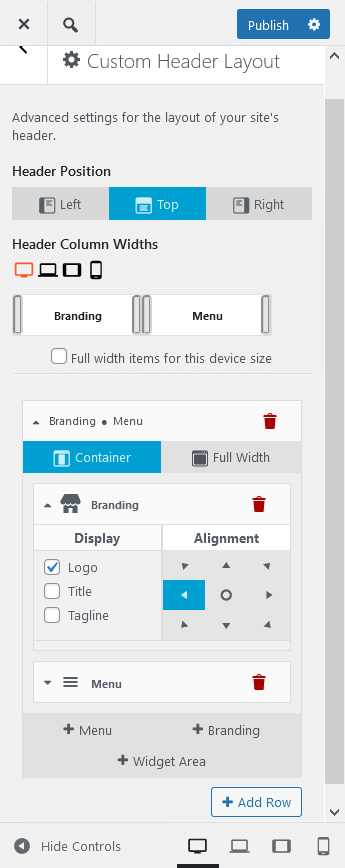
Select the Header Position
You can select the Header Position from the three different options here: Header on Top, Header on Left, or Header on Right. In the Left or Right positions you can set a fixed width by using the slider under Header Width.
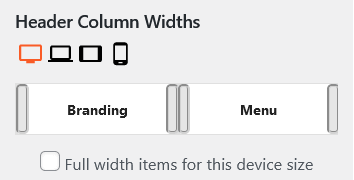
Adjust Header Column Widths per Device
Using the sliders, you can adjust how much space each element in the header should use. To ensure your header layout displays correctly, there shouldn’t be any empty space or gaps between elements.
Above the sliders are 4 icons – click each one to review the device size settings. If you’d like all elements to use an entire row, simply click the checkbox below the sliders. Tablet and mobile have this checked by default.
Add or Remove Content
Your WordPress website header is made up of Rows, and you can have as many rows as you need. There are 3 types of elements you can add to your header – Branding (Logo, Title, and Tagline), Menus, and Widget Areas. For more information on working with widgets, please read this article.
Use the 9 way directional arrows to align each element appropriately. Clicking the red trash icon next to an element will remove only that element, to remove the entire row click the red trash icon at the top of the row’s panel. The alignment will be relative to the space defined in the Column Width section.
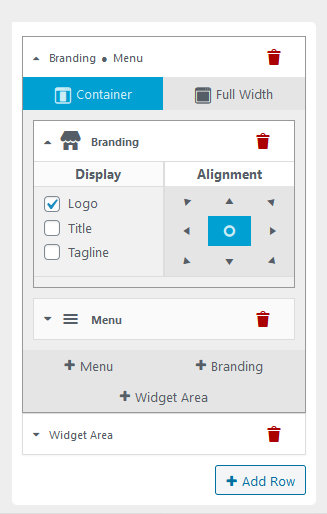
You have options to put your WordPress header content in either a Fixed Width container or Full Width. This refers to the container the content resides in, allowing you to change your header’s look and feel. Each row can have a different container type.
Custom Header Example: Adding a Search Widget to your Header
Now that you know about more about the Custom Header Layout controls it’s time to put it into practice! This example demonstrates how to add a WordPress Search widget to your Custom Header.
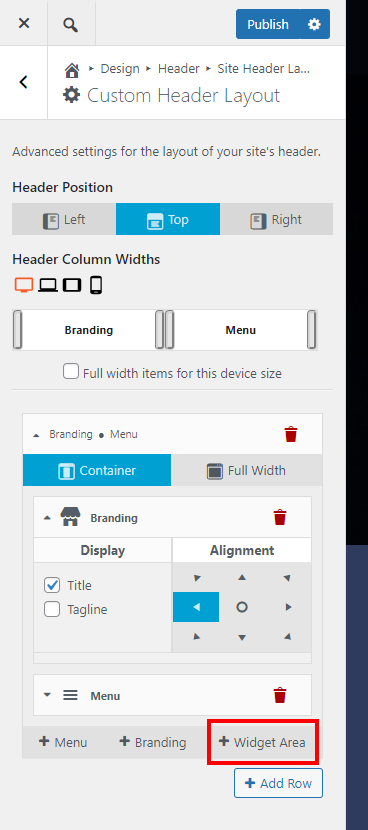
First, locate the Header Row that contains your Branding and Menu items and add a new Widget Area.
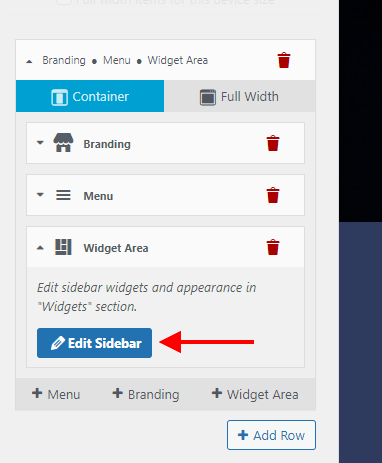
Expand the Widget Area and click the Edit Sidebar button to start adding the Search widget to the new Widget Area.
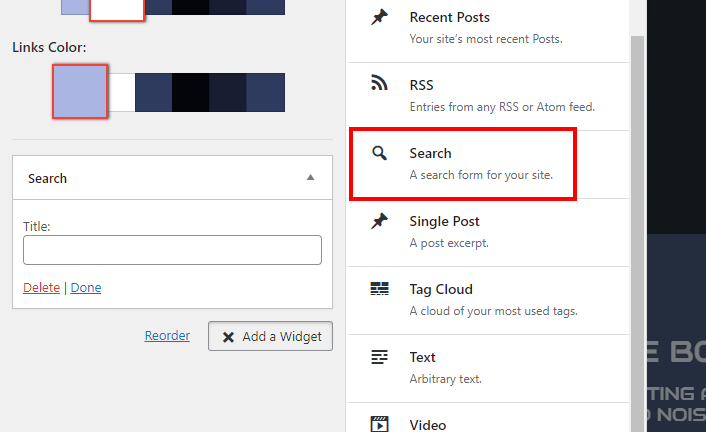
Next, click the Add a Widget button and locate the Search widget in the list of available options. Click on the Search widget to add it to your Header Widget Area.
Once the Search widget is added click the blue Publish button to finalize the update. You should now see a WordPress Search widget positioned next to the Menu in your Header!
Troubleshooting
How do you add tracking code to the header?
Unfortunately, WordPress doesn’t have a super easy way to insert tracking codes into the header or footer of your site. There are lots of different solutions possible, but probably the easiest way is to use a free plugin like Header Footer Code Manager.
Many different tracking platforms also produce “official” plugins for WordPress, like Google Site Kit and Facebook for WordPress.
How to prevent the Sticky Header Logo from Resizing
By default, the sticky header is smaller than the regular header, to prevent it from taking up too much screen space from your page’s content. However, if you’d like to make sure that your logo does not resize in the sticky header, you can use the following Custom CSS rule to ensure it remains the same size. Navigate to Customize > CSS/JS Editor and paste this rule into your CSS Code field:
.header-top .bgtfw-sticky-header.bgtfw-stick .custom-logo-link .custom-logo {
	width: unset;
}
Congratulations!
You have completed the tutorial for creating the WordPress Header Design for your BoldGrid Crio website. Next, you may want to change your header background.
SIGNUP FOR
BOLDGRID CENTRAL
200+ Design Templates + 1 Kick-ass SuperTheme
6 WordPress Plugins + 2 Essential Services
Everything you need to build and manage WordPress websites in one Central place.
Cicely says:
Audio began playing as soon as I opened this web site, so frustrating!
Brandon says:
Hi Cicely, this could depend on how you’re incorporating audio on your page. If you could create a new forum topic and include the URL of the page you’re working on we can inspect it and give you our best suggestions on how we would prevent audio autoplay.
Thanks Cicely, we look forward to assisting you further with this!
fafa says:
Hello. I have a problem with the header size. I placed my logo in the header and the height of the header increased. Now that I changed my logo to a shorter one the height of the header does not change back an I’m stock with a big header. How can I reduce the height of the header?
Thank you.
Brandon says:
Hi Fafa,
I’m sorry to hear you’re experiencing issues. Can you please start a new forum topic and include the URL of your website so we can have a look and give our best suggestions on how to resolve this concern.
anna says:
I can’t seem to get rid of the Site Title on my Home Page.
It hangs out in the upper left side. It’s not on my editing page of the post and page builder it only shows up when I view the page. I can’t figure out how to get rid of it. I don’t want to see it on my Home Page.
Brandon says:
Hi Anna!
To remove the Site Title from the Home Page when using the Crio WordPress Theme, follow these steps:
Customize the Header
Access Customizer: Go to your WordPress Dashboard and navigate to Appearance > Customize. This opens the WordPress Customizer.
Header Options: Look for the Header settings or similar section in the Customizer. Crio provides detailed customization options for headers.
Site Identity: Within the Header settings, find the Site Identity section. This is typically where you can show or hide elements like the site title and tagline.
Disable Site Title Display: You should find an option to toggle the visibility of the site title. Disable or uncheck this option to hide the site title from the front end of your site.
Publish Changes: After making the adjustment, click Publish to apply the changes to your site.
CSS Customization
If the above method does not work or the option is not available:
Access Customizer:
Navigate to Appearance > Customize and then to JS/CSS Editor.
Hide Site Title with CSS: Enter the following CSS code to hide the site title:
Copy and paste this css code
.site-title {display: none;
}
Publish Changes: Click Publish to apply the CSS changes.
I hope this helps!
Stefano says:
Hello, I am unable to get myself out of this problem. I’ve been trying to solve it for a day now, but to no avail.
I customised the site header a few times and finally found the one I liked.
The Polylang and Lingotek plugins are installed on the site and I have set three other languages besides the default one (EN).
The header is perfect in the main language (EN), but when switching to the others ‘site title’ and ‘tagline’ have not been updated, although in the sections (Home ▸ Design ▸ Header ▸ Site title and Home ▸ Design ▸ Header ▸ Tagline) the texts are correct.
In the general section of the site the text is correct in both sections.
I have uninstalled the theme, cleared the cache and installed the Crio and Boldgrid theme again, but nothing has changed.
Any suggestions?
Stefano says:
Solved, that was depending on string translation of Polylang.
Sorry for disturbing
Brandon says:
Hi Stefano! I’m so happy to hear you were able to quickly get this resolved on your end. Please don’t hesitate to reach back out if you have any other questions for us.
Stefano says:
Thank you very much Brandon!
Have a nice weekend,
Stefano
Kenny says:
Hello,
I seem to be having trouble placing my primary menu in the header when in desktop view. Any suggestions?
Brandon says:
Hi Kenny!
I’m sorry to hear you’re having trouble placing the nav menu your header. Could you please start a new forum topic and link us to your website, that way we can inspect the issue on our end and give you our best suggestions on how to resolve.
Hope to hear from you soon!
Tim says:
Hi,
I am embedding my wordpress site as an iframe into another page.
How to remove the header completely?
Brandon says:
Hi Tim,
You can remove your header completely with a bit of CSS. Trying adding this to the CSS/JS Editor section of your WordPress Customizer under CSS:
.site-header {display: none;
}
I hope this helps!
Ben says:
Hi, I want to use a simple sticky (fixed) header without any animated transitions. Just static, as is, at all times. Currently, when starting to scroll down from the top it disappears briefly and then slides back in, which is odd and unnecessary. I guess this requires some custom coding to eliminate the default transition? I can’t see any obvious settings. Can you advise? THanks
Brandon says:
Hi Ben,
You might be able to accomplish this using a Custom Page header. We can probably help you out with that if you don’t mind starting a new Support Forum thread and be sure to include a link to your website.
Corinne says:
Hi, love this theme but I’m having an issue with the header- whether it’s set to sticky or not, and no matter what font I have in place, the Menu items will not come up with text- they all have a symbol on them and I am not sure why. It’s frustrating! Would love help!
Brandon says:
Thanks Corinne, I’m sorry to hear you’re having issues with your page header menu. If you could start a new Support Forum thread and include a link to your website we can take a deeper look into the problem and try to provide you with a sure solution.
Mark says:
Hi, I’m enjoying playing with these layout options! I’m wondering if there’s a way to adjust the appearance of the sticky header (besides the layout). My regular header has customized fonts & colours for the links, but the sticky header seems to be using the default link colour and some default font (like Roboto).
My site is markamadeusflowerdew.com
Brandon says:
Hi Mark,
You should be able to create and implement a custom sticky header from your WordPress Dashboard with Crio<<Page Headers. If you need help implementing it into your theme feel free to open a new topic in the Support Forum.
cheryl says:
I have been trying to add a tertiary menu row to my header, above the main menu and logo. Even though I’ve created it in the customizer, it isn’t appearing on my site. I’ve both created the location using custom header and created the menu content in menus.
Brandon says:
Hi Cheryl,
If you’ve made the necessary changes and published the menu you may need to clear any cache associated with the site in order for the menu to display. You’d want to clear all browser related cache, server side cache and cache created from plugins. After doing so try reloading, your site to see if the elements display.
sundar says:
My primary header and sticky header messing kindly check and guide how to bring the same header of primary to sticky here is the url https://s4hosting.in
Jesse says:
Hi Sundar-
The sticky header and regular header have separate layouts. You can customize your sticky header in Customize > Design > Header > Sticky Header Layout.

SUNDAR says:
hi jesse sticky header cant add widget cant create like the site header layout now how to create the sticky header like as it as same of site header layout?
[img]https://ibb.co/mD2VPMS[/img]
Jesse says:
Hi Sundar-
Thanks for the feedback, you’re right that widgets currently aren’t available in the Sticky Header layout. I’ve gone ahead and filed a feature request to our developers for this.
One thing you could consider is disabling the built-in sticky header, and making your main header sticky with a little bit of Custom CSS and JS. Here’s a sample of Custom CSS and JS that will accomplish this for you.
CSS:
#masthead { position: fixed; top: 0;}JS:
jQuery('#content').css('margin-top', jQuery('#masthead').height());SUNDAR says:
Thank u jesse yes its working but looking of two different header like inmotionhosting…
Jesse says:
Hi Sundar-
I checked out your site, and I think you’ve got it working correctly as far as I can tell. From what you described, it sounds like you may have needed to disable the built-in sticky header in Customize > Design > Header > Sticky Header
Ben says:
How do I turn off the page title in the header?
Joseph says:
Hi Ben! The option to disable the Page Title display in Crio can be found by navigating to Design > Pages > Title in the Customizer. There is also some options located under Design > Site Content > Page Titles that allow you to set other global configurations for your Page Titles, such as whether or not they should display in the Header or Page Content. I hope that this helps you create the design you are looking for and please let us know if you have any other questions for us!
Becky says:
My site design has the header on the left. I understand how to make a top header sticky, but is there a way to make the side header sticky? Right now it scrolls with the page and I want it to be stationary while the rest of the page scrolls.
Jesse says:
Hi Becky-
You can make the side header sticky in much the same way as a top header, just make sure to use the Default layout option:

sundar says:
under menu able to use the crio headers? or only able to set under page header?
Jesse says:
Hello Sundar-
Generally speaking, the menu is a part of the header. However, yes you can use Custom Page Headers as well as the Custom Layout design to include additional content below your menu.
J says:
Hi I am using Crio but am unable to have the logo position beside the title. I have tried all solution and still can’t solve it. Please assist! Thank you
Jesse says:
Hello J-
You can accomplish this using a Custom header layout, by including two branding columns in the same row. On the first one, enable your logo only, and on the second one, enable the site title only:

Greg says:
I watched the video above in the hopes of learning how to manage column widths in the header. I dont see the column sliders referred to in the beginning of the video. (customize –> design –> header –> layout) Is there a switch I need to to turn on or is this a pay feature?
Jesse says:
Hi Greg-
The new adjustable column widths feature is included in the free version of the theme, but this is a very new feature. Make sure you’re using the most up-to-date version of Crio, version 2.4.2.
sundar says:
whats the crio premium latest version in my admin panel plugin installed version is showing as 1.2.0
Jesse says:
Hi Sundar-
1.2.0 is the latest version of Crio Pro.
Doug says:
I have a Main Menu configured, as well as a Social Icons Menu… I have my main menu added to the header, but when I attempt to add a second menu to the header and want to select the Social Icons menu, it’s grayed out and I cannot select it?? Is there something I’m doing wrong? I’m not sure why the social icons menu is grayed out??
Jesse says:
Hi Doug-
Based on what you described, it sounds like your Social Menu is already assigned to another menu location, most likely in the footer. You can create a new menu with “Custom Links” to your social profiles and assign that one to the second header location, or you can re-assign your social menu to the new header location.