
Widgets allow you to add additional content to your header and footer and require no coding experience. First you need to set up the Widget Areas where the widgets will appear, which are enabled from the Customizer.
Adding Widgets to the Header and Footer
First add a widget area to your Header or Footer design.
- In the Dashboard navigate to Customizer → Design → Layout → Header or Footer
- Choose the widget area where you want to edit sidebar
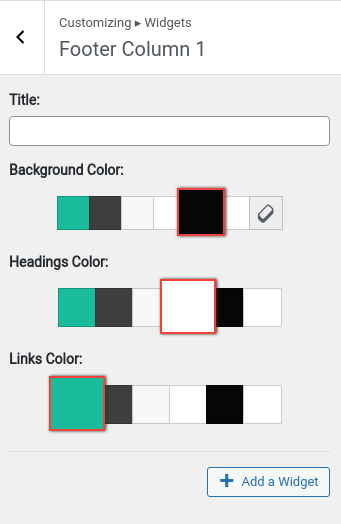
- The controls for the widget area are used to add a title, change colors, and add new widgets by clicking the button at the bottom of the controls
- Click the Publish button to save your changes
Customizing Widgets in the Header and Footer
Change Widget Background, Heading, and Link Colors
Once you’ve added Widgets to your header or footer, you can customize their appearance. Navigate to Customize → Widgets → [Widget Area] and you’ll find controls to modify the color for Backgrounds, Headings, and Links in your widget area. Note the Eraser icon in the background, which will give your widgets a “Transparent” background, so it matches the already existing color.
Congratulations, you now know how to work with widgets and widget areas using BoldGrid Crio! You can also add Widgets to your Blog Page or Blog Posts too.
Example: How to add a Contact Us widget to your footer
While a dedicated Contact Us page can be valuable and might include things such as detailed information, forms, or maps, some smaller sites or a one-page site might prefer a lighter alternative. This example will show you how to create a Contact Us section in your site footer and link it to the menu in your header.
- Add a Custom HTML widget to your footer.
- Add the desired HTML to your widget, below is a basic sample that you can use and edit as you see fit to get started:
<h3 class="widget-title" id="contact-us">Contact Info</h3>
<p>1234 Street Name</p>
<p>City Name, State 000000</p>
<p>Email:<br><a href="mailto:support@example.com">support@example.com</a></p>
<p>Phone:<br>+1 123 456 7890</p>
- Replace the placeholder information with your actual contact information.
- Update the email address in both places with your actual email address.
- The heading element has an ID of “contact-us”. This is important for linking to the section later.
- Create an anchor link to the widget in your menu
This will create a link that jumps to the contact information section in your footer when clicked.
1. Navigate to Appearance > Menus.
2. Edit the menu where you would like your “Contact Us” link listed.
3. If it exists, remove the “Contact Us” page from the menu.
4. Add a new menu item with the same label as your contact information heading (e.g., “Contact Us”).
5. In the link URL field, enter the following:
#contact-us
SIGNUP FOR
BOLDGRID CENTRAL
200+ Design Templates + 1 Kick-ass SuperTheme
6 WordPress Plugins + 2 Essential Services
Everything you need to build and manage WordPress websites in one Central place.
Matias says:
Is there a way to add two different widget areas within the same header?
Joseph says:
Hi Matias!
You can quickly add multiple Widget Areas to your headers in Crio by navigating to Design > Header > Site Header Layout and then selecting the Custom option there. In the Custom Header Layout controls you will see the + Widget Area button, which you can use to create multiple Widget Areas in your header.
I hope this helps you get your header structured as needed and please let us know if you have any other questions for us!
Shellan says:
How do you make the widget background into transparent?
Jesse says:
Hello Shellan-
Transparent widget backgrounds are going to be added in Crio 2.8.1 which should be released early next week. In the meantime, you can use Custom CSS to make a transparent background. If you’d like help writing Custom CSS for this, post a new topic in our Support Forums so we can take a look at your website, and we’ll be happy to provide you with a CSS rule.