What is an “Anchor?”
The phrase “Anchor Links” in the modern web usually refers to making a link to a specific section of a page, but this isn’t entirely accurate. Technically, all links are anchors— the <a> HTML element that creates a link actually originally stood for the word “anchor.”
When Tim Berners-Lee first conceived of the web, he envisioned links would be like a ship’s anchor for a floating piece of information, keeping it moored to the right location instead of drifting in the cloud.
Links are more than just a way to move from one web page to another, or even for moving from one part of a page to another part. They are vital for SEO because they inform search engines which pieces of information are related to others. This is why the “Anchor Text” you use for links is such a strong factor in your WordPress website’s SEO rankings.
This tutorial focuses on creating anchor links in WordPress so you can link to different sections of a page. There are two main parts required— creating ID’s for your anchor links to target, and then creating a link with the anchor in it.
Creating Anchor ID’s
The first step to creating anchor links in WordPress is to label the sections of the page you’ll be linking to. You can link to any element, but most commonly, you’ll be linking to headings. There are a few things you’ll need to know about HTML ID’s.
HTML ID’s should be unique on each page. If you use the same ID on two elements on a page, all anchor links will go to the first one that occurs from the top of the page.
ID’s also cannot contain spaces. Commonly, hyphens or underscores will be used in place of spaces.
And finally, ID’s should be semantically relevant to the element they belong to. This is a fancy way of saying that the name you give to an element should describe the purpose of the element.
This article will show you how to add an ID to a heading in three WordPress page editors— the WordPress “Gutenberg” Editor, the Classic Editor, and the BoldGrid Post and Page Builder.
How to add an Anchor ID using The WordPress “Gutenberg” Editor
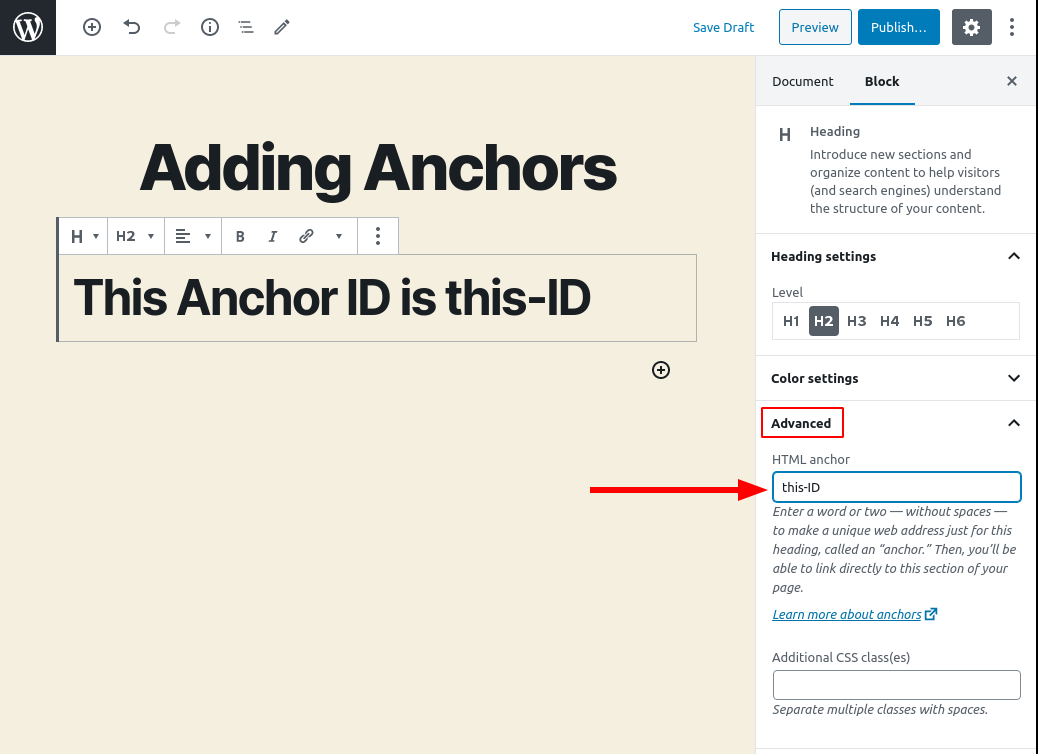
The WordPress Editor makes adding an ID to a heading very easy. While you’re editing a Heading Block, click the arrow to open the Block > Advanced section in the right-hand settings pane. If you don’t see the settings pane, click on the cog icon ( ), or use the shortcut Ctrl-Shift-Comma.
From here, you’ll see the option to add an HTML anchor.
How to add an Anchor ID using the Classic Editor
Adding an ID in the Classic Editor, also known as TinyMCE, is a little more difficult. It involves using the HTML Text Editor, which can be intimidating to newer WordPress users. This is especially true for long, complex sets of content, because there are no visual indicators of which elements are headings.
Here’s a trick you can use to easily find the right HTML element in the text editor. Simply highlight the heading before you switch editors, and it will stay highlighted in the text editor.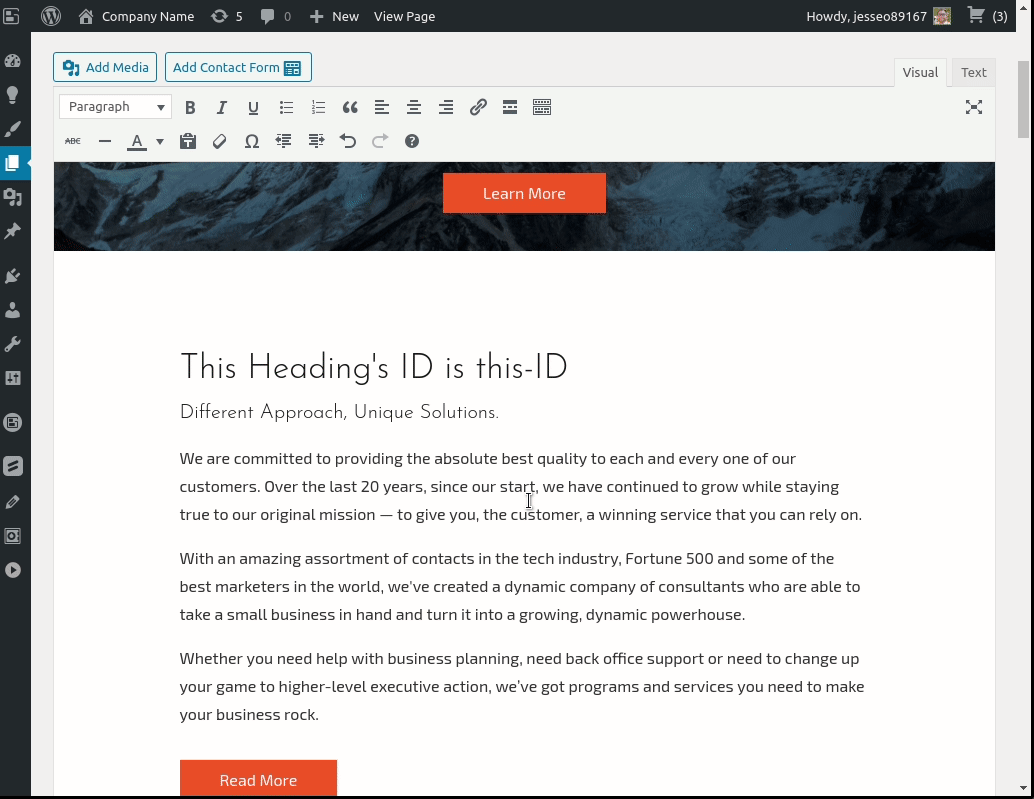
Once you’ve located the right element, put your cursor inside the < and > carets of the heading element, and add id=”this-ID” to the element. Replace this-ID with your own anchor link ID.
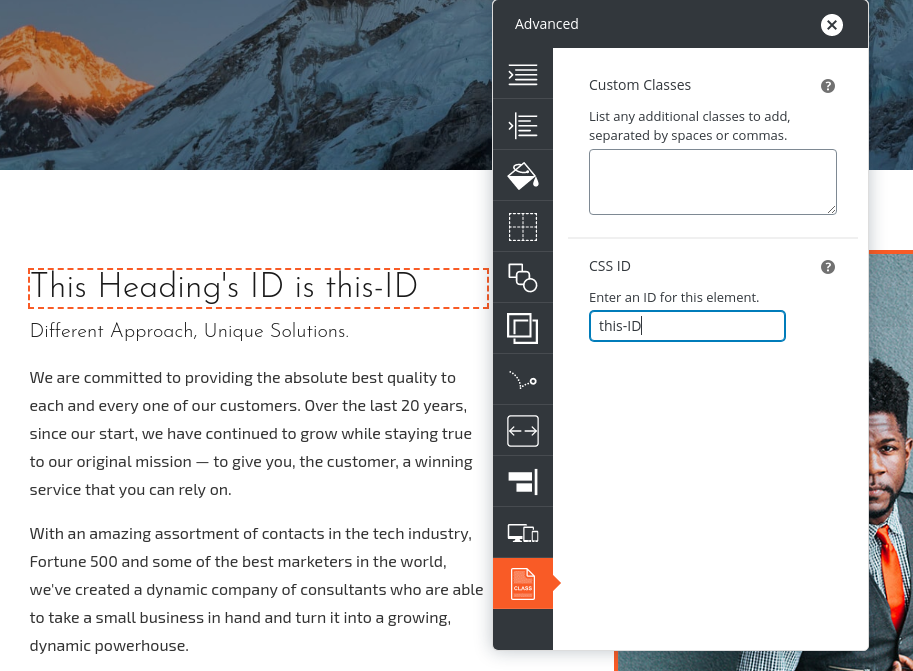
How to add an Anchor ID using the BoldGrid Post and Page Builder
Using the Post and Page Builder WordPress Plugin makes adding an ID to an element very easy. This is the process outlined in the video at the top of the article.
While you’re editing your page, hover your mouse over the heading that you’d like to link, and click on the orange Edit Content context menu, and then click on Advanced Control.
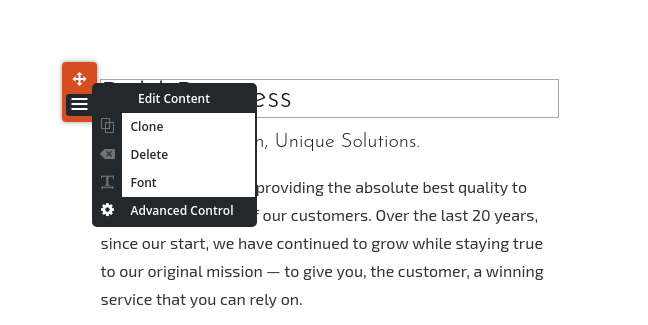
In the Advanced Control menu, the bottom item is the Custom Classes and CSS ID section. Enter your ID into the CSS ID field.
Creating WordPress Anchors Links
Now that you’ve got your ID’s added to the right elements, it’s time to create links to go to those ID’s. You do this by adding the # (Pound, Hashtag, Number sign, Octothorpe) symbol to your link, followed by the ID. If you’re linking to a section of the same page, you only need to use the #this-ID as the link’s reference rather than the full URL.
Linking to an Anchor with a text link
Regardless of which editor you’re using, making text on your page link to an anchor is much the same. Highlight the text that you want to make into a link, and click the “Chain” icon ( ), or use the shortcut Ctrl-k. Then, enter the the ID name with the # symbol before it.

WordPress Anchor Links in a Menu
Since Menus appear on multiple pages of your website, you’ll need to use the full URL of the page, followed by the #this-ID label. That also means you’ll need to use the Custom Link menu item type.

Anchor Links in WordPress and Sticky Headers
Now that you have created your anchor links, you might want to take some additional steps to provide a better experience for your website’s visitors. By default, anchor links abruptly send the visitor to the section of the page. This can be a jarring experience and leave your visitor feeling disoriented, because they won’t have any visual queue which part of the page they’re now seeing.
Additionally, if your theme features a “sticky header,” that remains visible on your page even if you scroll down, you’ll find that your anchors appear “below” the header. That’s because by default, the browser puts the anchor right at the very top of the page.
One of the best parts about using WordPress is that there are so many free ways to improve your website in the WordPress Plugin Repository. The plugin Easy Smooth Scroll Links is free, doesn’t have any upsells, has largely good reviews, and takes care of both the user experience as well as lets you specify an offset. An offset will let you deal with a sticky header.
How to find your Sticky Header Offset
The offset is a value, in pixels, of how much to move your anchors down so that they don’t go into your sticky header. In order to find out how many pixels tall your header is, visit your website in Firefox or Chrome. Right click on your header, and click Inspect in Chrome, or Inspect Element in Firefox. Then, hovering over it, you’ll see the element’s dimensions just below it.
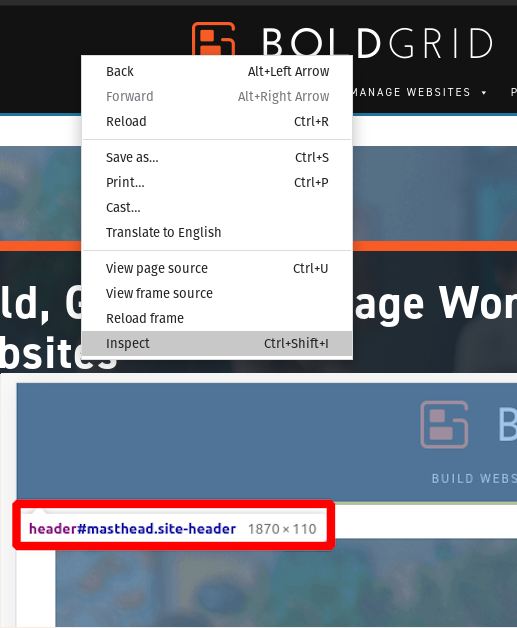
The second number is the height, in this example 110 pixels. Now you can use that value to determine your offset. You may want to add 5-20 pixels to put a little space between your Anchor and your header.
Congratulations! Now you know how to create Anchor Links in WordPress!
SIGNUP FOR
BOLDGRID CENTRAL
200+ Design Templates + 1 Kick-ass SuperTheme
6 WordPress Plugins + 2 Essential Services
Everything you need to build and manage WordPress websites in one Central place.
Greg says:
Thanks for you article.
Do you know if it’s possible to insert an anchor which relates to a point within a long list eg half way down. Inserting an anchor seems to relate to the whole block, so if a list is long it redirects to the top of the list, rather than the desired place.
Thanks
Brandon says:
Hi Greg thanks for your question. Yes it’s possible to accomplish this using bit of CSS. If you don’t mind reaching out with this same question to our Support Forum we can try to come up with a quick solution for you. Be sure to include the URL to your website in the forum thread.