There are two major things that must load before your website can be “rendered,” the Document Object Model (DOM) and the CSSOM (Cascading Style Sheet Object Model).
The DOM contains all of the markups for your website, and the CSSOM contains all of the styling to display it correctly.
In WordPress, most CSS files, or stylesheets, are loaded as separate files as enqueued by your theme, plugins, and other site assets, and this leads to numerous network requests that are considered “render-blocking.” In this guide, you’ll learn how to eliminate render-blocking CSS by moving it to the HTML body with W3 Total Cache Pro.
In a recent test, Eliminating render blocking CSS improved our PageSpeed Score by over 17 points on mobile devices! Check out the test results to see how we accomplished this!
Upgrade to W3 Total Cache Pro and improve your PageSpeed Scores today!
Speed Up Your WordPress Website.
A Difference of Just 100ms in Page Load Speeds Can Cause a Visitor to Prefer Your Competitor’s Website.
Why Do I Need to Eliminate Render-Blocking CSS?
If a site’s markup is loaded without CSS, it can cause a “Flash of Unstyled Content,” (FOUC) which will contribute to the Cumulative Layout Shift (CLS) Core Web Vital metric. It may also lead to longer First Contentful Paint (FCP) metrics, and overall cause a poorer user experience and Core Web Vitals score.
Let’s take a look at what render-blocking CSS may cause your website to look like on a slow web connection. Here are two images of the WordPress Dashboard, one without CSS, and one with CSS:

On a slower connection, a user might briefly see the first image, and only see the styled content after the stylesheets load.
What is “Moving to the HTTP Body?”
When you use W3 Total Cache Pro to eliminate render-blocking CSS, your stylesheets are first minified, then combined, and finally inserted into the top of the DOM as an inline style, rather than a separate network request.
This means that your visitors will receive all of the necessary styles at the same time that they receive the rest of your site’s markup, and therefore eliminate any Layout Shift caused by CSS and further delays in rendering the First Contentful Paint.
from Render Blocking
Resources
In one of our newest PageSpeed Experiments, moving our CSS to the HTTP body reduced our Potential Savings From Render-Blocking Resources by over 94% loading nearly 2 seconds faster on mobile devices! Check out our test results to see how we did it!
Upgrade to W3 Total Cache Pro and improve your PageSpeed Scores today!
How do I Eliminate Render-Blocking CSS with W3 Total Cache Pro?
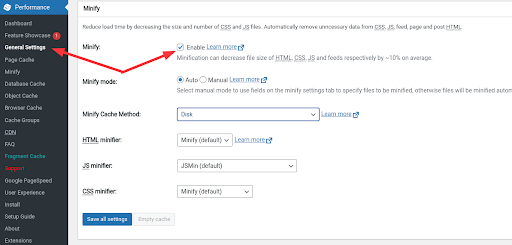
- Navigate to the Performance — General Settings menu and enable Minify. Try Automatic mode first.

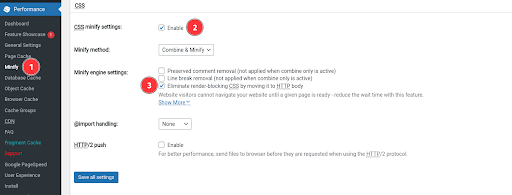
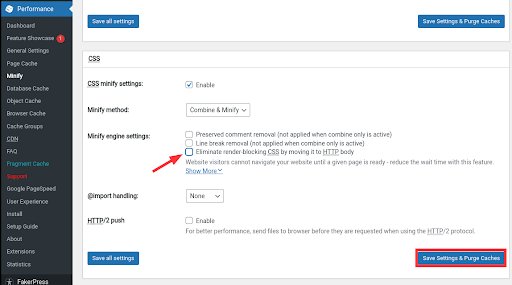
- Navigate to the Minify settings menu, and scroll down to the CSS section. Ensure that minify is enabled, and select Eliminate render-blocking CSS by moving it to HTTP body

That’s it! Your CSS stylesheets will now be automatically minified and moved to the top of your main DOM (HTTP Body).
How Do I Tell If It’s Working?
Most of the time, you’ll be able to tell simply by running Google’s PageSpeed Insights tool, or by running the Lighthouse tool in your browser’s developer tools. However, if you’d like to check out how it works under the hood, follow these steps.
- First, disable the setting and purge all caches

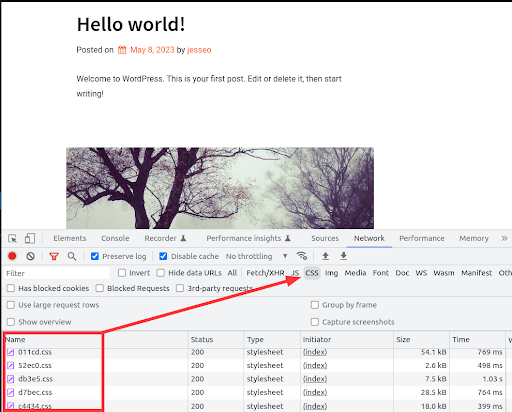
- Load your site in an Incognito, or Private Browsing Window and open your browser’s developer tools, and check out the Network tab. In Chrome, the shortcut for this is Ctrl-Shift-i. In Firefox, use Ctrl-Shift-e. For simplification, use the CSS filter to show only the relevant requests. Take note of the various minified CSS files you can see.

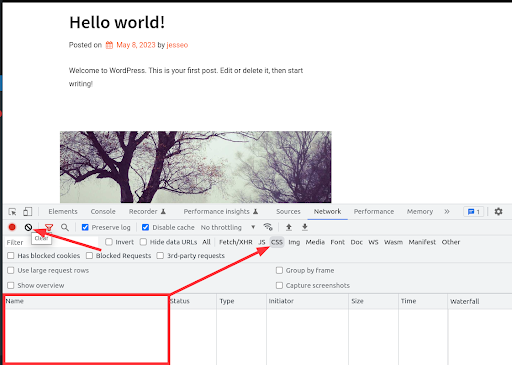
- Go back to your Dashboard, and re-enable the option to eliminate render-blocking css in the Minify settings menu, then reload your site in the private browsing window. (Hint: delete the network requests history with the Clear button). Note that there are no longer any separate network requests for stylesheets.

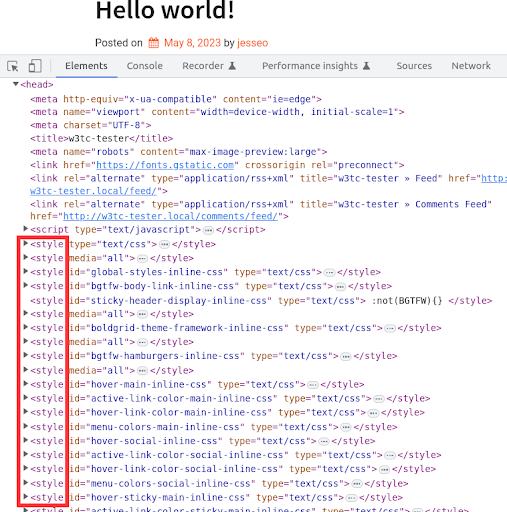
- Switch over to the Elements tab of your developer tools, and note that all of your stylesheets have been minified and added to the <head> element of your DOM.

How Do I Make It Even Faster?
Eliminating render-blocking CSS via the automatic method will almost always improve your PageSpeed Insights score, but you may choose to optimize even further. The following steps will take some development skills, but you should feel encouraged to dive deeper to get even better results.
What Types of Stylesheets Are Actually Render-Blocking?
Stylesheets are only considered Render-Blocking if they apply to All Media Types. By using Auto-Minify, you’ll be minifying and combining all of your stylesheets into the HTTP Body. This may have a negative impact on sites with a lot of plugins, or complicated themes, because the DOM request filesize may become larger than ideal.
Instead, you may choose to use Manual Minify mode to further optimize your CSS. Using manual, you can select the specific files to combine, minify, and move to the HTTP body.
- Examine your site’s source HTML, and perform a CTRL-F search for all instances of the string rel=“stylesheet”.
- Using this search, locate any stylesheets that do not specify a media type, or use media=“all” . These are the stylesheets that are considered render-blocking.
- Navigate to the Minify settings menu, and add each stylesheet that applies to all media to the list of minified files.
- Save your settings, check that your site renders correctly, and perform a new PageSpeed Insights report to ensure that you didn’t miss any render-blocking stylesheets.
In one of our recent tests, Eliminating render blocking CSS improved our Largest Contentful Paint time by over 56% loading nearly 4 seconds faster on mobile devices! Check out the results to see how we did it!
Upgrade to W3 Total Cache Pro and improve your PageSpeed Scores today!
FAQ
What are resources?
In the context of web development, “resources” refer to the various components needed to load and display a web page properly. These include HTML, CSS, and JavaScript files, as well as images, videos, fonts, and other media or data files. Each resource is fetched from the server and processed by the browser to render the web page as intended by its design.
How does a browser “render” a web page?
The browser rendering process involves several detailed steps:
Parsing HTML to Build the DOM: The browser reads the HTML code and creates the DOM (Document Object Model), a tree-like structure representing all page elements.
Creating the CSSOM: For every CSS style encountered (inline, embedded, or external), the browser constructs the CSS Object Model (CSSOM), detailing how elements should be styled.
Render Tree Construction: The browser combines the DOM and CSSOM to create the render tree, which includes only visible page elements and their styles.
Layout (Reflow): The browser calculates the position and size of each element within the viewport, considering the current window size and the computed styles for each element.
Painting: The browser fills in pixels for the elements, applying text, colors, images, etc., according to the render tree.
Compositing: The browser draws elements onto the screen in the correct order, ensuring that elements that overlap are displayed properly.
This complex process transforms the code into the visual and interactive experience users see on their screens.
To learn more, we recommend starting out with Critical rendering path.
What does it mean when an html document has been fully parsed?
When an HTML document has been fully parsed, it means that the browser has read through the entire HTML code, converting it into a structured, in-memory representation known as the Document Object Model (DOM).
During this process, the browser identifies all the elements, attributes, and text within the HTML file, creating a tree-like structure that represents the hierarchy and organization of the webpage. This structured representation allows the browser to render the page visually and enables JavaScript to interact with the page’s content through the DOM API.
A fully parsed document is ready for further processing, including the execution of scripts that were deferred (using the defer attribute) until this point, ensuring they interact with a fully constructed DOM.
What are render-blocking resources?
“Render-blocking resources” refers to elements, typically CSS and JavaScript files, that must be loaded before a web page can be displayed to the user.
These resources are considered “blocking” because browsers must pause the rendering of the page until these files are fully downloaded and processed. This can significantly delay the time it takes for a page to become visible and interactive, affecting user experience and potentially impacting a site’s performance metrics and search engine rankings.
What is an example of a render-blocking resource?
A common example of a render-blocking resource is a CSS file linked in the HTML head. For instance, if a website’s HTML includes a link to a stylesheet like:
<link href="styles.css" rel="stylesheet">
… the browser must download and process this CSS file before it can render the page content. This means the site won’t be visible to the user until “styles.css” is fully loaded, potentially delaying how quickly the page can be displayed.
Are only scripts and styles render blocking?
Other resources, like images or fonts, do not block HTML parsing but can affect the speed at which a page becomes visually complete. While images and fonts are critical for visual rendering, they are typically not considered render-blocking in the same sense as CSS and JavaScript because the browser can continue parsing and laying out the page while these resources are being loaded. The primary concern with render-blocking revolves around CSS and JavaScript, which must be processed before the page can render and become interactive.
What is the opposite of render-blocking?
The opposite of “render-blocking” is often referred to as “non-blocking” or “asynchronous” loading. This approach involves loading resources such as JavaScript or CSS in a way that does not interfere with the initial rendering of the page. Techniques include using the async and defer attributes for scripts, which allow the browser to continue parsing and rendering the HTML while scripts are being downloaded in the background, thereby improving page load times and user experience.
How can css and styles be made non-blocking?
CSS and styles can be made non-blocking through several techniques:
Use Media Queries: Specify media types or queries on
<link>elements to load stylesheets conditionally, ensuring they are only loaded when needed. For example, print stylesheets don’t need to block rendering of the page on screen.Critical CSS: Inline the critical CSS directly in the HTML document. This is the minimal set of styles needed to render the above-the-fold content, allowing the page to display content quickly before additional styles are loaded.
Load CSS Asynchronously: Use JavaScript to load CSS files asynchronously. This can be done by dynamically creating a
<link>element in the DOM via JavaScript or using libraries that facilitate asynchronous loading.Use
rel="preload": Mark non-critical CSS files withrel="preload"as a hint to the browser that these resources are important but do not need to block rendering. They can be downloaded asynchronously and applied once loaded.
Implementing these strategies helps improve the rendering performance of web pages by reducing the impact of CSS files on the critical rendering path.
How can JS and Scripts Be Made Non-Blocking?
JavaScript and scripts can be made non-blocking through several methods to improve page load times:
Use the
asyncAttribute: Addingasyncto a script tag (<script async src="...">) allows the script to be downloaded in the background. The browser can continue parsing and rendering the HTML page while the script is being fetched. The script will be executed as soon as it’s downloaded, without waiting for the parsing to complete.Use the
deferAttribute: Thedeferattribute (<script defer src="...">) also allows the script to be downloaded asynchronously, but it guarantees that scripts execute in the order they appear in the document and only after the document has been fully parsed. This is particularly useful for scripts that rely on the entire DOM being available.Dynamically Load Scripts: JavaScript can be used to dynamically load other scripts on demand. This involves creating
<script>elements via JavaScript and appending them to the DOM, which allows for more control over when and how scripts are loaded and executed.Move Scripts to the Bottom: Although less effective than
asyncordefer, moving<script>tags to the bottom of the HTML body ensures that the browser can render the rest of the HTML page before it needs to load and execute the scripts. This can improve the time to first render, even though it’s a more dated technique.
Each of these methods can help minimize the performance impact of JavaScript, making web pages faster and more responsive.
What is the difference between Async and Defer?
The async and defer attributes are used in <script> tags to control the loading and execution of JavaScript files without blocking the rendering of the page. Here’s a more detailed comparison and examples of each:
async
- When you add async to a script tag, the script is downloaded in the background while the browser continues to parse and render the HTML document.
- Scripts with async are executed as soon as they are downloaded, which means they might run in a different order from how they appear in the HTML. This can lead to problems if the scripts depend on each other.
- async is best used for scripts that do not depend on other scripts and do not modify the DOM immediately upon loading.
Example:
<script async src="analytics.js"></script>This script can be loaded and executed asynchronously without affecting the page’s initial rendering or depending on other scripts.
defer
- Scripts with defer are also downloaded in the background, but they are executed only after the HTML document has been fully parsed.
- defer scripts are executed in the order they appear in the document, making them suitable for scripts that depend on each other or rely on the full HTML document being parsed.
- Use defer for scripts that need the entire DOM but should not block the page from rendering.
Example:
<script defer src="app.js"></script>This script will be executed after the HTML document is parsed, preserving execution order without blocking the initial page render.
Key Differences
- Execution Order: async scripts execute as soon as they’re downloaded, which could be out of order, while defer scripts maintain their order relative to each other and execute after the document is parsed.
- Use Cases: Use async for independent, non-DOM reliant scripts like analytics. Use defer for scripts that need the whole DOM or rely on the execution order.
Choosing between async and defer depends on the specific needs of your scripts and how they interact with the rest of your page.
What types of scripts should be render-blocking?
The goal is typically to avoid render-blocking scripts wherever possible to improve page load times and user experience. However, there are scenarios where scripts might be intentionally made render-blocking due to their critical importance to the page. Here are examples where scripts might be considered necessary to be render-blocking, though modern best practices often aim to minimize these cases:
Critical Inline JavaScript: Scripts that are essential for rendering the initial view of the webpage and are too small or crucial to be deferred. This might include inline JavaScript within the HTML that initializes necessary layout or visual elements before anything else is processed.
Early-Stage Feature Detection: Scripts that perform feature detection for older browsers to conditionally load polyfills or alternate stylesheets. These need to run before the rest of the page to ensure compatibility.
Security or Compliance Scripts: Certain scripts related to security, compliance, or cookie consent that must run before any other content is loaded or interacted with by the user.
Web Fonts Loader: JavaScript-based font loaders that bring in custom fonts before the page renders to prevent a flash of unstyled text (FOUT). While not ideal, in some cases, these scripts are prioritized to ensure visual consistency from the moment the page starts loading.
Minimal, Early UI Setup: Scripts that set up a minimal user interface or critical path CSS before the rest of the page loads. This could be part of a strategy to enhance perceived performance, where a minimal layout is shown to the user as quickly as possible.
While these examples can be situations where scripts are render-blocking by necessity or design choice, the overarching trend in web development is to find strategies that mitigate the need for render-blocking resources.
What types of scripts should load async?
Analytics Scripts: Scripts for analytics platforms (like Google Analytics) are ideal candidates for
asyncloading. They track user behavior and gather data without affecting the page’s initial rendering or functionality. Since these scripts don’t modify the DOM or depend on other scripts, they can be loaded in the background without impacting user experience.Social Media Sharing Buttons: Many websites include social media sharing buttons that load external scripts (e.g., from Facebook or Twitter) to function. These scripts, often not critical to the primary content, can be loaded asynchronously to prevent them from blocking the page’s main content and functionality from rendering promptly.
Ad Scripts: Advertising scripts that load ads onto a page are perfect for asynchronous loading. Ads are typically not essential to a webpage’s main content, so loading these scripts asynchronously ensures that they do not slow down the access to the content that users came for.
Third-Party Widgets: Widgets from third-party services, such as weather updates, news tickers, or chatbots, should be loaded asynchronously. These elements offer supplementary information or features and should not delay the loading of the core content and functionality of the page.
What types of scripts should load with defer?
Main JavaScript Frameworks or Libraries: Scripts that contain essential frameworks or libraries (like jQuery, React, or Vue) that are used to build the page’s structure and functionality should be loaded with
defer. This ensures that the entire HTML document is parsed before these critical scripts are executed, maintaining script execution order without blocking the initial rendering.Document Manipulation Scripts: Scripts that modify the DOM or initialize the UI, assuming they are not needed immediately as the page starts to load, are best loaded with
defer. This ensures that the entire page is available for manipulation once the script runs, preventing errors that could occur if the script tries to modify elements not yet loaded.Web Application Bootstrap Scripts: For single-page applications (SPAs) or any web application that initializes from a script, using
deferensures that the app’s bootstrap code executes only after the HTML is fully parsed. This is crucial for applications that rely on a complete DOM for initialization.Custom Analytics or Tracking Scripts: Unlike third-party analytics that can be loaded asynchronously, custom-built analytics or tracking scripts that depend on a fully loaded DOM or need to ensure accurate pageview hits after the page is fully loaded should use
defer. This ensures the tracking code executes in the correct order and context.Lazy-Loaded Component Scripts: If your site dynamically loads components based on user interaction but these components are not immediately necessary, you can initially load the scripts with
defer. Once the page is fully loaded, these deferred scripts can then take care of loading additional components as needed, ensuring a smooth user experience without compromising initial load performance.
Using defer for these types of scripts ensures that they are executed in the correct order and only after the HTML document has been fully parsed, facilitating a faster page load time while still enabling complex functionalities and interactions on the webpage.
Can CSS use Async or Defer?
No, the async and defer attributes are specifically for <script> tags in HTML and cannot be directly applied to CSS. CSS has its own mechanisms for non-blocking loading, such as using media queries, rel="preload", or inlining critical CSS directly into the HTML to avoid render-blocking. CSS inherently behaves differently from JavaScript in the loading and rendering process, requiring different strategies to optimize performance.
async and defer vs. placement of scripts in the head and body
Historical Context – Traditional Placement of Scripts:
- In the Head: Initially, scripts were often placed in the
<head>of HTML documents. This approach ensured that all JavaScript was loaded before the page’s content, which could be important for scripts that needed to interact with or modify the DOM as soon as the page began to load. However, this method introduced render-blocking, where the browser would halt rendering until all scripts were downloaded and executed, leading to slower page load times. - At the End of the Body: To mitigate render-blocking issues, developers started moving scripts to the bottom of the
<body>. This practice allowed the browser to render the HTML content first, with scripts executing only after the page’s content was fully loaded. While this improved perceived loading times, it still did not provide full control over script loading and execution order, especially for pages with heavy JavaScript.
Introduction of async and defer:
- As web applications became more complex and reliant on JavaScript, the need for more sophisticated loading strategies became apparent. The
asyncanddeferattributes were introduced to give developers better control over the loading and execution of scripts without compromising page performance. async: Allows scripts to be downloaded in the background and executed as soon as they’re downloaded, without waiting for the entire page to be parsed. This is ideal for scripts that are independent of other scripts and don’t modify the DOM immediately.defer: Enables scripts to be downloaded in parallel with HTML parsing but delays script execution until after the HTML document has been fully parsed. This is useful for scripts that need to interact with the entire DOM and ensures scripts execute in the order they appear in the document.
Key Differences
- Control Over Execution:
asyncanddeferprovide more precise control over when scripts are loaded and executed relative to the parsing of the HTML document. This contrasts with the more binary choice of placing scripts in the<head>or at the end of the<body>, which does not offer the same level of granularity. - Performance Optimization: By allowing scripts to be loaded asynchronously or deferred until after parsing,
asyncanddeferhelp minimize the performance impact of JavaScript on page load times. Traditional placement methods, while still useful in some cases, generally result in less optimized loading behavior. - Modern Web Development Practices: The introduction of
asyncanddeferreflects a broader shift towards optimizing user experience by improving site speed and interactivity. These attributes are part of modern web development best practices aimed at creating fast, responsive websites.
The evolution from simply placing scripts in specific locations within the HTML document to using async and defer attributes represents a shift towards more sophisticated and performance-oriented web development practices. These modern attributes offer developers the tools needed to balance the necessity of JavaScript with the demand for fast and responsive web pages.
What does it mean when a web page is interactive?
When a web page is interactive, it means that users can engage with the content beyond just reading it. This includes actions like clicking buttons, filling out forms, selecting options from menus, or any other activity where the page responds to user input. An interactive page allows for a dynamic experience, offering personalized features or responses based on how the user interacts with the web elements on the page.
What happens if a user tries to interact with a page that hasn’t rendered?
If a user tries to interact with a page that hasn’t fully rendered, they might find that their clicks, taps, or inputs have no effect. This is because the interactive elements like buttons, forms, or links are not yet functional until the page is fully loaded and the browser has executed the necessary JavaScript. This can lead to a frustrating user experience, as the visual elements might appear ready before they’re actually interactive.
Remove Unused CSS/JS with W3 Total Cache Pro
And here’s an exciting update: with the latest version of W3 Total Cache, we introduced an powerful new feature – Remove Unused CSS & JavaScript. Unused CSS and JavaScript files contribute to the bloat of your website’s codebase, increasing load times and hindering user experience. When visitors access your site, their browsers are required to download and parse every CSS and JS file linked to the page, even if they’re not utilized. This results in unnecessary HTTP requests, consuming bandwidth and slowing down the rendering process.
Removing Unused CSS & JS eliminates unnecessary code from your website, further enhancing its speed and efficiency. Combine this approach with other optimization techniques, such as eliminating render-blocking resources, to unlock the full potential of your website’s performance with one of the best WordPress cache plugins available.
W3 Total Cache
You haven't seen fast until you've tried PRO
Full Site CDN + Additional Caching Options
Advanced Caching Statistics, Purge Logs and More
Everything you need to scale your WordPress Website and improve your PageSpeed.