Utilizing page cache can significantly enhance your website’s speed, especially when evaluating Time to First Byte (TTFB). TTFB represents the duration between a user accessing your website and your server delivering its initial response.
Page Cache expedites this process by maintaining a “snapshot” of your page, allowing immediate delivery to the user without the need for processing PHP code.
What is Page Caching?
Page caching is a web development and content delivery technique aimed at enhancing website performance and speed. It involves creating static snapshots of fully rendered web pages after the initial dynamic content generation, storing them in a cache, and serving these copies for subsequent requests. This eliminates the need to regenerate content dynamically, leading to faster load times.
Page caching not only reduces server load, especially during high traffic, but also improves scalability, allowing websites to handle more users without a proportional increase in resource utilization. The result is an enhanced user experience characterized by faster page load times, lower bounce rates, and increased user satisfaction.
How to Enable Page Caching
- Install and activate W3 Total Cache on your WordPress website.
- Go to the WordPress dashboard and click on “Performance” in the sidebar.
- Locate the “General Settings” section.
- In the “Page Cache” section, tick the checkbox next to “Enable” to activate page caching.
How to confirm page caching is working
Method 1: View Page Source
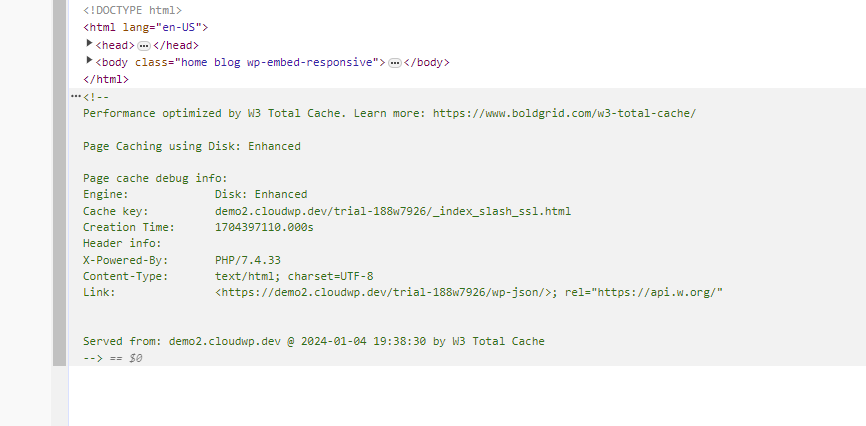
Inspect the page source of your website. Visit your sites homepage, right-click on your webpage, then select “View Page Source,” and scroll down towards the bottom of the page. Look for HTML comments or tags added by W3 Total Cache. If you see comments like:
<!-- Performance optimized by W3 Total Cache. Learn more: https://www.boldgrid.com/w3-total-cache/

Page Caching using Disk: Enhanced (User is logged in) --!>
You want to check for references to page caching similar to the example above, it indicates that the page is being served from cache.
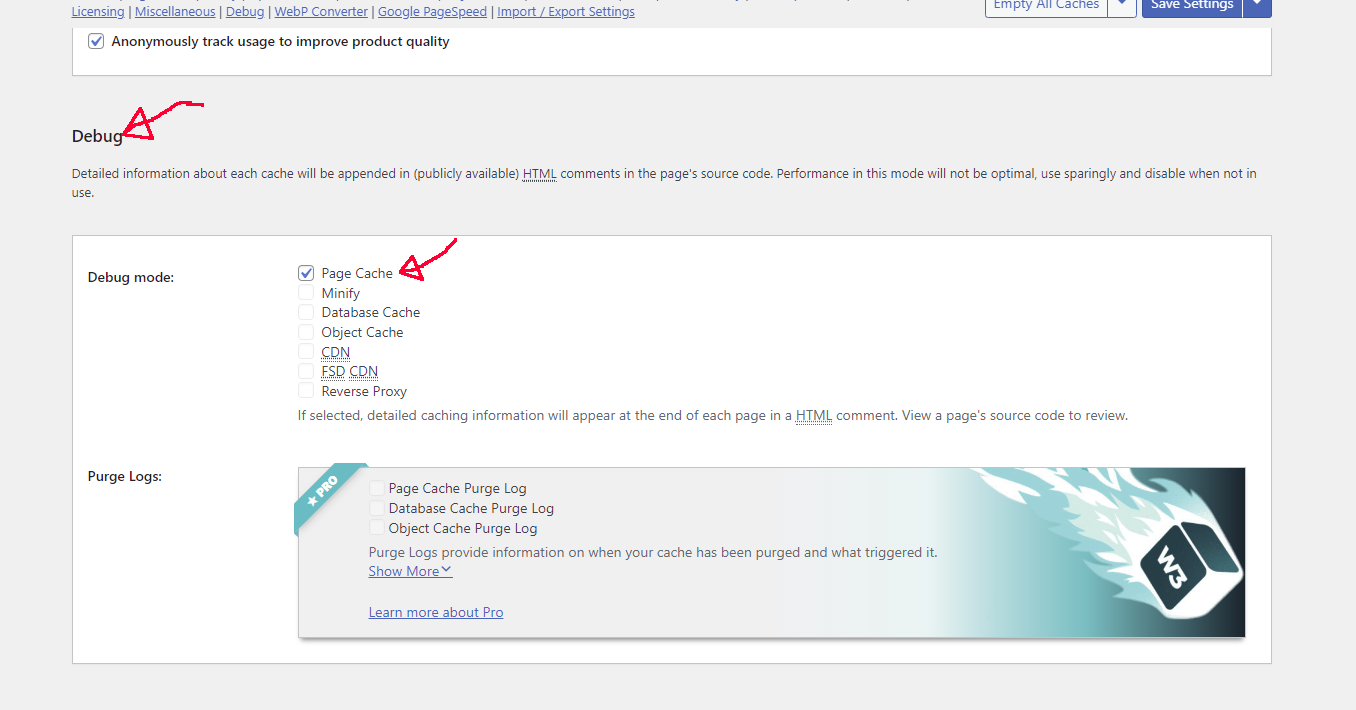
Method 2: Use Debug Mode
- Select “Debug” from the W3 Total Cache Option that appears at the top of the “Page Cache” settings page.
- Navigate to the Homepage of your website, right-click and select “View Page Source“
- Scroll to the bottom of the page and look for Page Cache debug Info. It should look similar to below:

Method 3: Check Cache Dir
Another way to check for Page Cache is by exploring the cache directory via ssh or a file manager. This method won’t actually show you that page cache is working, but it’ll at least show you if the cache files are being written.
- Log in to your servers file management system
- Locate the directory where your WordPress installation is stored. This is typically in the
public_htmldirectory or a subdirectory within it. - Within the WordPress installation directory, find the
wp-contentdirectory. Insidewp-content, you should see a directory namedcache. - Inside the
cachedirectory, you’ll find subdirectories for different types of caches. Look for a directory namedpage. This is where W3 Total Cache stores cached versions of your pages.
General Page Cache settings
Visibility
The General Settings in W3 Total Cache will display different options based on your websites homepage display settings. Your homepage display settings can be accessed from your WordPress dashboard Settings < Reading section. For example, when you choose to display a “static page” the first settings you will see under the General Page cache settings are “Cache post page” and “Don’t cache front page”.
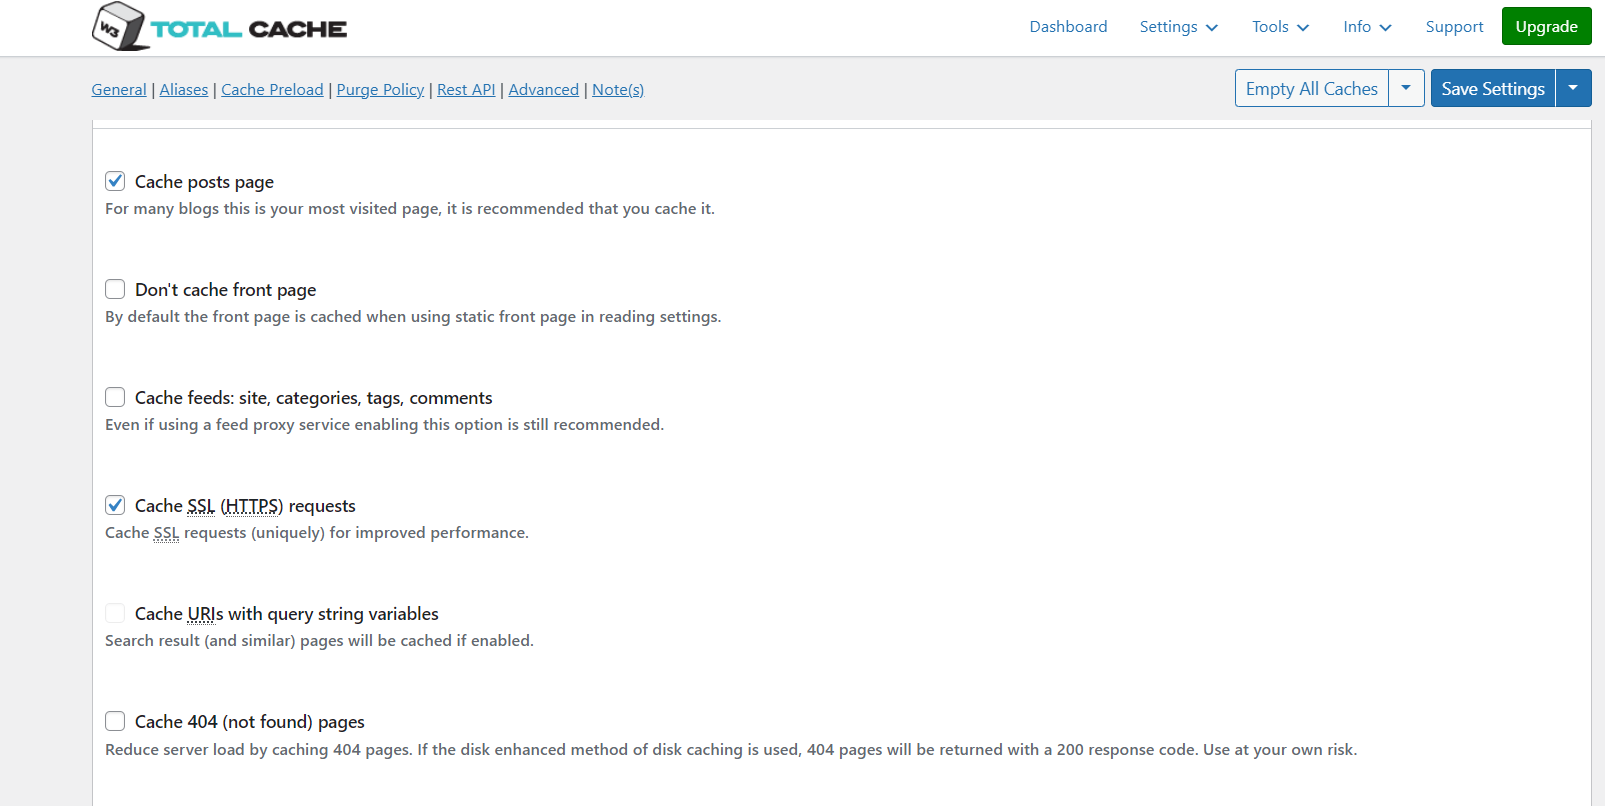
Cache Posts Page
Default Setting: Checked
The “posts page” in WordPress typically serves as the blog’s homepage or the main landing page where the latest blog posts are displayed. Since this page often receives high traffic, optimizing its loading speed is crucial for providing a positive user experience.
Enabling the option to Cache posts page involves creating a static HTML version of the page and storing it. When subsequent visitors access the posts page, they are served this pre-generated static version, eliminating the need for dynamic content generation. As a result, users experience significantly faster loading times, leading to an improved and more enjoyable browsing experience.
Don’t Cache Front Page
Default Setting: Unchecked
The decision to enable the “Don’t Cache Front Page” option comes into play when the front page contains dynamic content that needs to be updated frequently or displays personalized information for each visitor. Examples of dynamic content might include recent posts, featured content, or elements that change based on user interactions.
Cache Front Page
Visibility
W3 Total Cache, caches the front page by default when a static front page is set from the Settings < Reading section of the WordPress dashboard . When you choose to display “Your latest posts” the first setting you will see under General Page cache settings is “Cache front page” which is checked by default.
Why is the front page cached by default?
This is part of the plugin’s automatic caching mechanism designed to enhance performance by generating and serving static HTML versions of pages.
Cache feeds: site, categories, tags, comments
Default Setting: Unchecked
Caching feeds in W3 Total Cache involves storing static versions of various types of feeds on your website, such as the main site feed, category feeds, tag feeds, and comment feeds. Feeds, especially the main site feed, are inherently dynamic as they reflect the latest content and user interactions. By default, WordPress dynamically generates these feeds each time they are requested, executing PHP code and querying the database to fetch the most recent information.
Enabling the option to cache feeds involves creating and storing static HTML versions of these feeds. This significantly improves performance by reducing the need for dynamic content generation on each request. Visitors accessing feeds experience faster load times and improved responsiveness.
Cache SSL (HTTPS) requests
Default Setting: Checked
Enabling the “Cache SSL (HTTPS) Requests” option in W3 Total Cache involves caching the content of web pages that are served over a secure SSL (Secure Socket Layer) or HTTPS connection. SSL is a security protocol that provides a secure and encrypted connection between a user’s web browser and the server hosting a website. HTTPS (Hypertext Transfer Protocol Secure) is the secure version of HTTP, and it uses SSL/TLS (Transport Layer Security) to encrypt data during transmission.
The process of establishing an SSL connection involves a handshake between the user’s browser and the server. This handshake incurs some computational overhead due to the negotiation of encryption parameters. Caching SSL requests helps minimize this overhead by serving pre-generated, static content.
Cache URIs with query string variables
Default Setting: Unchecked
Enabling the “Cache URIs with query string variables” option in W3 Total Cache involves caching pages that have additional information appended to their URLs in the form of query string variables. In a URL, the query string is the portion that follows the “?” character and consists of key-value pairs separated by “&” symbols. Query string variables provide a way to pass additional information to a web page. For example, in the URL “example.com/search?q=term,” the query string variable is “q” with the value “term.”
Pages that utilize query strings often display dynamic content based on user input or specific parameters. Common examples include search result pages, filter options, or pages with sorting preferences. Each unique combination of query string variables can result in a distinct page content.
Cache 404 (not found) pages
Default Setting: Unchecked
Enabling the “Cache 404 (not found) pages” option in W3 Total Cache involves storing and serving cached versions of pages that return a 404 (not found) status. A 404 status code is returned by the server when a requested page is not found. This could be due to a broken link, a mistyped URL, or the removal of a page. By default, when a user encounters a 404 error, the server dynamically generates a response indicating that the requested content is not available.
Without caching, the server dynamically generates a 404 response for each occurrence, incurring server-side processing and potentially involving database queries. This can contribute to server load, especially in scenarios where there are numerous 404 errors, such as from broken links or outdated references.
Example scenario
By default, 404 pages are not cached. In this screenshot below, I visited a page that I know doesn’t exist, /blah-blah.
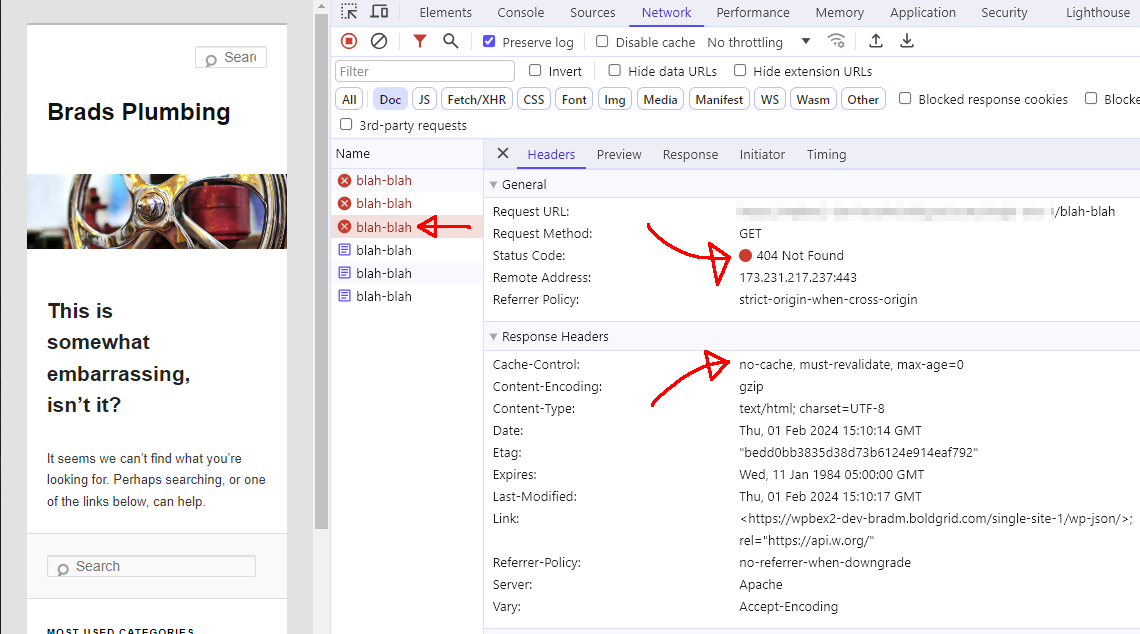
After enabling the option to cache 404 pages, the very first 404 still has to be rendered so the results can be saved to cache, but the 404 pages after that return very quickly via cache:
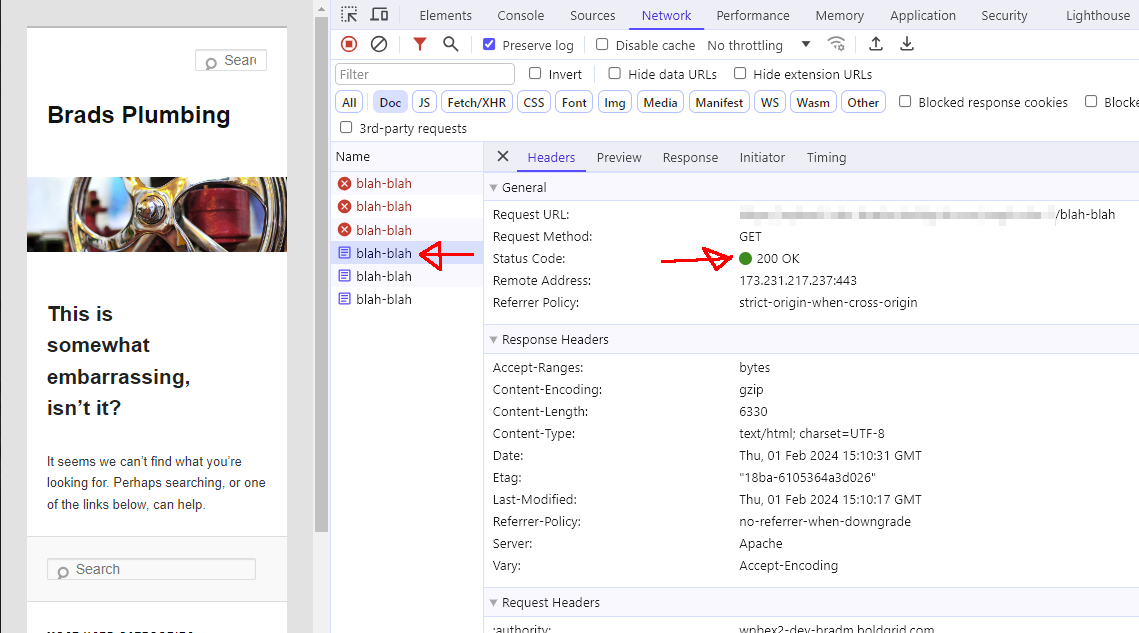
Potential SEO Implications:
If using Disk Enhanced, cached 404 pages return a 200 status code. If using Disk Basic, cached 404 pages return a 404 status code.
Caching 404 pages with a 200 response code can impact search engine indexing. Search engines may interpret these cached 404 pages as valid content, potentially leading to indexing issues and affecting SEO rankings. This is a critical consideration, and website administrators should weigh the trade-off between server load reduction and potential SEO consequences.
Don’t cache pages for logged in users
Default Setting: Checked
The “Don’t cache pages for logged-in users” option in W3 Total Cache is a strategic choice that involves preventing the serving of cached versions to users who are logged into the WordPress website. When users are logged into a WordPress website, they often have access to personalized or dynamic content, such as user-specific dashboards, account information, or content restricted to certain roles. Dynamic content requires real-time generation and customization based on each user’s profile and interactions.
Caching is effective for optimizing the performance of static or semi-static content by serving pre-generated versions. However, dynamic content for logged-in users is unique to each user session and cannot be reliably cached without potentially compromising the user experience.
Disabling the option not to cache pages for logged-in users ensures that each user’s interactions with the site, such as form submissions, comments, or other dynamic activities, are accurately reflected in real-time. Caching these interactions could lead to inconsistent or unexpected behavior.
Don’t cache pages for the following user roles
Default Setting: Unchecked
The “Don’t cache pages for the following user roles” option in W3 Total Cache allows website administrators to specify certain user roles for which cached versions of pages should not be served. This option is particularly useful for specific user roles, such as administrators or editors, who typically engage with the website’s backend, where they perform tasks like content creation, editing, and site management. These tasks involve interactions with dynamic elements and user-specific information, which cannot be accurately served from cached versions.
Website administrators and editors often require accurate and timely information when performing tasks. Disabling caching for their user roles guarantees that they see the latest changes, updates, and real-time data without the delay associated with cached content. The user experience for administrators and editors is crucial for effective website management. Disabling caching for specific user roles ensures a seamless and responsive experience, preventing potential conflicts or discrepancies arising from serving cached content.
Aliases
The “Aliases” option in W3 Total Cache’s page cache settings allows users to configure cache alias hostnames. By recognizing alias hostnames, the plugin optimizes cache utilization, leading to improved website performance and user experience across various domains or subdomains.
Cache Alias Hostnames
Default Setting: Unchecked
This setting enables caching for alias hostnames, particularly useful when identical WordPress content is accessible from multiple domains. This means that if your WordPress website is accessible from multiple domains or subdomains that point to the same content, the cache engine will treat them as equivalent for caching purposes.
Additional Home URLs
This setting is designed to ensure cache consistency across different versions of the website’s home page. It allows administrators to specify full URLs that mirror the primary home page URL. This is particularly useful in scenarios where the website is accessible via multiple domain aliases or variations of the home page URL.
Cache Preload
The “Cache Preload” option in W3 Total Cache’s page cache settings allows for the automatic priming of the page cache.
Automatic Priming of the Page Cache
Default Setting: Unchecked
The process of proactively generating and storing cached versions of web pages without waiting for user requests.
Update Interval
Default Setting: 900 seconds
Users can set the update interval, determining how frequently a new set of cached pages is created (default is every 900 seconds).
Pages Per Interval
Default Setting: 10 Pages per Interval
The “Pages per interval” setting limits the number of pages created per batch, which can be adjusted based on server capabilities.
Sitemap URL
Users can specify a compliant sitemap URL to guide the primed cache creation, with pages cached according to XML file priorities. The option also includes the ability to preload the post cache upon publishing events, ensuring that new content is promptly cached for optimized page delivery.
Preload the Post Cache Upon Publishing Events
Default Setting: Unchecked
Ensures that new content is promptly cached for optimized page delivery.
Purge Policy: Page Cache
Specify Pages and Feeds to Purge
Default Setting: “Posts page”, “Post page” & “Blog feed” Checked
The “Purge Policy: Page Cache” option in W3 Total Cache’s page cache settings allows users to specify the pages and feeds to purge when new posts are created, edited, or comments are posted on a WordPress site.
The default settings, including options like the front page, posts page, blog feed, and various archive pages, are recommended to maintain optimal server performance.
Specify the feed types to Purge
Default Setting: rss2 (default) Checked
Just like with pages and post, users can also specify feed types to be purged.
Purge Limit
Default Setting: 10
The “Purge limit” setting allows users to control the number of pages purged on post updates, with 0 indicating purging all pages that list posts.
Additional Pages
Users can specify additional pages to purge, including parent pages in the path.
Purge Sitemaps
Default Setting: ([a-z0-9_-]?)sitemap([a-z0-9_-])?.xml
The option to purge sitemaps involves specifying a regular expression matching the sitemaps to be cleared. Overall, these settings offer flexibility and control over the cache purging process, ensuring that the cached content stays synchronized with the latest changes on the website.
Rest API
Default Setting: Don’t Cache
Don’t Cache
Caching the Rest API is a pro feature so the “Don’t Cache” option is selected by default for standard users. The “REST API” option in W3 Total Cache’s page cache settings provides control over caching for the WordPress REST API. Users can choose to either cache or not cache the REST API. Enabling caching is recommended when utilizing the WordPress API to enhance performance and scalability.
Cache (Pro feature)
Enabling caching is recommended, especially when using WordPress as a backend for integrations, as it significantly improves response times and reduces resource consumption for repeat API requests. This feature is particularly beneficial for scaling performance.
Disable REST API
Default Setting: Unchecked
This option is available to disable the WordPress REST API entirely, providing an extra layer of security for users who may not require this functionality. Overall, this setting offers flexibility and customization for optimizing the performance and security of the WordPress REST API.
Advanced
Late Initialization
Default Setting: Unchecked
The “Late Initialization” option in W3 Total Cache’s page cache settings is a feature designed to enhance support for WordPress functionality, particularly in the context of fragment caching within the page caching engine.
When “Late Initialization” is enabled, the caching engine postpones the initialization of certain caching processes until a later stage in the page generation cycle. This delayed initialization allows for better compatibility with WordPress functionality, especially when fragment caching is involved.
Enabling this option ensures that the caching engine better accommodates the intricacies of WordPress functionality. It allows for more effective caching of dynamic elements, enhancing the overall performance and responsiveness of the website.
Late Caching
Default Setting: Unchecked
The “Late Caching” option introduces a mechanism to modify the caching process by postponing the extraction of entries during the initialization (init) action of WordPress. When “Late Caching” is enabled, it allows for the overwriting of the key used in the page caching process. The key is a unique identifier associated with a specific page or content, and it is crucial for retrieving the correct cached version.
Enabling this feature offers a high degree of customization and flexibility in how pages are cached. Website administrators or developers can leverage this option to tailor the caching strategy based on specific requirements, criteria, or dynamic conditions within the website.
Compatibility Mode
Default Setting: Unchecked
The “Compatibility Mode” page cache setting is a feature designed to enhance the plugin’s interoperability with different hosting environments and address specific actions within the WordPress ecosystem.
One specific use case for enabling “Compatibility Mode” is to address issues related to Apache rules. Apache is a widely used web server, and its configuration rules can sometimes conflict with caching mechanisms. Enabling compatibility mode may help mitigate these conflicts and ensure smoother operation.
Performance Impact
While “Compatibility Mode” increases interoperability, it comes with a trade-off in terms of performance. Enabling this mode may result in a decrease in overall performance, with an estimated impact of approximately 20% at scale. The performance decrease is a consideration for websites where high performance is critical.
The impact on performance is emphasized at scale, meaning on websites with high traffic and resource demands. For smaller websites or those not sensitive to slight performance variations, the benefits of improved compatibility may outweigh the performance impact.
Charset
Default Setting: Unchecked
The “Charset” option specifically addresses character encoding issues related to UTF-8 support. Enabling UTF-8 support ensures proper handling of diverse characters, languages, and symbols on a website. The option to “Disable UTF-8 blog charset support” is provided for situations where issues arise with character encoding, particularly when odd or incorrect characters appear in cached pages. By disabling UTF-8 support, the caching mechanism may handle character encoding differently.
This option might be relevant in situations where the default UTF-8 encoding leads to rendering problems or misinterpretation of characters on the website. It provides a means to experiment with alternative character encoding settings to find a configuration that resolves such issues.
Website administrators encountering character encoding issues, such as strange symbols or odd characters in cached pages, may choose to experiment with disabling UTF-8 support. It’s a measure to be used in a testing and troubleshooting context to identify the root cause of encoding problems.
Reject HEAD Requests
Default Setting: Unchecked
The “Reject HEAD Requests” option in W3 Total Cache’s page cache settings pertains to the handling of HEAD HTTP requests and the caching behavior associated with them. HEAD is one of the HTTP methods used by browsers to request only the headers of a particular resource (e.g., a web page) without requesting the full content. HEAD requests are often used to gather information about a resource, such as its size or modification date, without downloading the entire content.
Enabling the “Disable caching of HEAD HTTP requests” option ensures that requests made using the HEAD method do not result in the caching of full page content. By default, HEAD requests are not cached to prevent subsequent requests from returning “empty pages.”
The purpose of this option is to control caching behavior and prevent scenarios where subsequent requests for a resource might return empty or incomplete pages. Since HEAD requests are intended for informational purposes and don’t retrieve the full content, caching their responses as if they were complete pages could lead to undesired outcomes.
Garbage Collection Interval
Default Setting: 3600 seconds
The “Garbage Collection Interval” setting refers to the frequency at which expired cache data is removed from the cache storage. In the context of caching, garbage collection is the process of identifying and removing cache entries that have expired or are no longer valid. This setting allows website administrators to specify how often the system should perform the garbage collection process. The value is defined in seconds and represents the time interval between successive garbage collection runs. Expired cache data can accumulate over time, and regular garbage collection ensures that the cache remains up-to-date.
The recommendation that “lower values are preferable for busy sites” implies that websites with high traffic and frequent content updates benefit from more frequent garbage collection. Lower intervals ensure that expired cache data is promptly removed, reducing the likelihood of serving outdated content to visitors. The optimal garbage collection interval depends on the activity level of the website. High-traffic sites with dynamic content or frequent updates might benefit from shorter intervals, while lower-traffic sites with less dynamic content may not require as frequent garbage collection.
Website administrators can adjust the garbage collection interval based on their specific requirements and site characteristics. Experimenting with different intervals allows finding the right balance for ensuring a responsive and up-to-date user experience.
Comment Cookies
Default Setting: 1800 seconds
The “Comment Cookie Lifetime” setting in W3 Total Cache’s page cache settings refers to the duration for which comment cookies are considered valid. Comment cookies are small pieces of data stored on a user’s device when they leave a comment on a website. These cookies help recognize the user when they revisit the site, retaining information such as their name, email, and website URL for a more convenient commenting experience.
TTL refers to the time duration for which a cookie remains valid. In the context of comment cookies, the default TTL is the standard period for which these cookies are considered active before they expire. Reducing the TTL helps minimize the duration for which comment cookies remain active. By setting a shorter TTL, the goal is to minimize the duration for which comment cookies are stored on users’ devices. This can be beneficial in scenarios where there is a desire to reduce the volume of authenticated user traffic, potentially lowering server load and improving overall performance.
Considerations for User Experience:
While reducing the TTL can help in managing server resources, it’s essential to consider the impact on the user experience. A balance needs to be struck to ensure that comment cookies remain active long enough for users to have a seamless experience while still achieving the desired reduction in server load. Website administrators can adjust the comment cookie lifetime based on their specific goals and considerations. Experimenting with different TTL values allows finding the right balance between user convenience and server resource optimization.
Accepted Query Strings
The “Accepted Query Strings” setting allows administrators to specify a list of query string name-value pairs for which URLs should always be cached. In a URL, the query string is the part that comes after the “?” character and consists of key-value pairs separated by “&” symbols. Query strings are commonly used to pass additional information to a web page, such as parameters for filtering, sorting, or customizing content.
The “Accepted Query Strings” setting enables administrators to define a list of specific query string name-value pairs. URLs that include these query string parameters will always be cached by the W3 Total Cache plugin. By configuring accepted query strings, administrators have the flexibility to customize the caching behavior for URLs with specific parameters. This is particularly useful for dynamic pages that rely on query string values to generate unique content.
Common use cases for specifying accepted query strings include scenarios where certain parameters dynamically alter the content of a page, such as search results, filter options, or pages with sorting preferences. Caching these variations can improve performance for users with similar requests.
Rejected User Agents
This setting allows administrators to specify a list of user agents for which cached pages should never be served. User agents are strings sent by web browsers to identify themselves to web servers. They provide information about the browser, its version, and the operating system. This information helps websites tailor content or styles based on the user’s browser.
The “Rejected User Agents” setting enables administrators to define a list of specific user agents. For the listed user agents, W3 Total Cache will never serve cached pages. Instead, it will dynamically generate the content for each request from users with these specified user agents.
Common use cases for specifying rejected user agents include scenarios where certain browsers or devices may not render cached content correctly or where dynamic content is essential for a specific user agent.
Rejected Cookies
Default Setting: wptouch_switch_toggle
The “Rejected Cookies” setting in W3 Total Cache’s page cache settings allows administrators to specify a list of cookies. For pages that use these specified cookies, the caching system will never serve cached versions. Instead, it dynamically generates content for each request from users with these specified cookies. This setting is mostly used in scenarios where certain functionalities on a website are cookie-dependent, and serving cached content might interfere with the expected behavior.
Considerations for Functionality
Careful consideration is required when specifying rejected cookies to ensure that essential functionalities of the website are not disrupted. For example, if a particular cookie is crucial for user authentication or personalization, excluding it from caching may be necessary.
Administrators have the flexibility to adjust the list of rejected cookies based on their specific requirements and considerations. Regular updates to the list may be necessary to accommodate changes in website functionality or cookie usage.
Never Cache the Following Pages
Default Setting: wp-.*.php
index.php
Regular expressions (regex or regexp) are patterns used for matching character combinations within strings. In the context of W3 Total Cache, administrators can use regular expressions to define patterns for specific pages or directories they want to exclude from caching. This setting allows administrators to specify a list of regular expressions representing pages or directories that should never be cached. Any page or directory matching these regular expressions will not have cached versions served. Instead, the system dynamically generates content for each request.
This setting is often used in scenarios where certain pages or directories contain dynamic content that should not be cached. This could include pages with real-time data, user-specific content, or frequently changing information. Careful consideration is required when using regular expressions to specify never-cached pages. The goal is to strike a balance between caching for performance benefits and serving dynamic content when necessary for specific pages or directories.
Never Cache Pages Associated with These Categories, Tags, Authors, or Custom Fields
This setting allows administrators to specify slugs or usernames associated with categories, tags, authors, or custom fields. In WordPress, content organization involves the use of categories and tags, and each post or page can be associated with specific authors or custom fields. Categories and tags help classify and organize content, authors are the creators of content, and custom fields provide additional metadata.
The setting enables administrators to provide lists of slugs (for categories and tags) or usernames (for authors and custom fields). Pages associated with these specified categories, tags, authors, or custom fields will not have cached versions served. Instead, the system dynamically generates content for each request related to these associations.
Common use cases for specifying never-cached associations include scenarios where certain categories, tags, authors, or custom fields are expected to have dynamic or frequently changing content. This ensures that pages associated with these elements always reflect the latest updates.
Cache Exception List
The “Cache Exception List” provides a way to override the general rule of not caching certain pages or directories specified in the “Never Cache the Following Pages” field. This setting allows administrators to selectively cache specific pages or directories that might have been excluded based on regular expressions.
Regular Expressions and Exemptions:
The regular expressions used in the “Never Cache the Following Pages” field serve as a set of rules to determine which pages or directories should not be cached. The “Cache Exception List” allows administrators to specify exceptions to these rules, indicating pages or directories that should be cached despite matching the exclusion patterns.
Use Cases:
Use cases for the “Cache Exception List” include scenarios where certain pages or directories should be treated as exceptions to the general caching rules. This is useful when specific content needs to be cached even if it matches exclusion patterns defined for other areas of the website.
Non-Trailing Slash Pages
The “Non-Trailing Slash Pages” setting in W3 Total Cache’s page cache settings allows administrators to specify a list of regular expressions for pages that should be cached even if they don’t have a trailing slash at the end of their URLs. Typically, URLs with or without a trailing slash are treated differently in web servers. The “Non-Trailing Slash Pages” setting provides a way to cache pages that do not have a trailing slash in their URLs, allowing administrators to customize the caching behavior for specific pages.
Use cases for the “Non-Trailing Slash Pages” setting include scenarios where certain pages on the website are designed to function without a trailing slash in their URLs. Caching these pages without requiring a trailing slash can contribute to a more flexible and user-friendly caching strategy.
Specify Page Headers
This setting enables administrators to extend the caching mechanism beyond the default by including specific HTTP headers along with the cached page content. HTTP headers provide important metadata about the content being served. Setup requires administrators to provide a list of HTTP headers that they want to include in the cached version of the pages. Each header should be specified on a separate line.
Example Headers:
Common HTTP headers that might be specified include:
Last-Modified: Indicates the last modification date of the resource.Content-Type: Specifies the media type of the resource.X-Pingback: Indicates the URL where a pingback to the resource should be sent.P3P: Defines a platform for asserting the privacy practices of a website.Link: Specifies relationships between the resource and other resources.
Use Cases:
Specifying additional headers in the caching process is useful in scenarios where certain headers are critical for the correct interpretation or functionality of the cached pages. For example, specifying Last-Modified can assist in more efficient browser caching and conditional requests.
Handle XML Mime Type
Default Setting: Unchecked
The “Handle XML Mime Type” setting allows administrators to control how the caching system handles the Content-Type header for XML files. The Content-Type header specifies the media type of the resource being served, and it is crucial for proper interpretation by browsers and other user agents.
This setting is particularly relevant when the website includes XML files, such as feeds or sitemaps. Ensuring that the correct Content-Type header is returned is important for the proper rendering and interpretation of XML content by client applications.
Trade-Off Between Accuracy and Performance:
The potential slowdown mentioned in the setting indicates a trade-off between accuracy in handling XML Content-Type and the overall performance of the cache engine. Administrators should evaluate whether the accuracy of Content-Type is critical for their XML files and whether the perceived slowdown is acceptable.
Considerations for Website Functionality
Administrators should consider the impact on website functionality when deciding whether to enable or disable this setting. If the website relies heavily on XML files and their proper interpretation by client applications, the trade-off in performance may be justified.
In Conclusion
Optimizing your WordPress website with W3 Total Cache’s page caching feature can significantly enhance speed, particularly when measuring Time to First Byte (TTFB). By following these guidelines, website administrators can strike a balance between performance optimization and delivering a tailored, responsive experience for different user segments.
W3 Total Cache
You haven't seen fast until you've tried PRO
Full Site CDN + Additional Caching Options
Advanced Caching Statistics, Purge Logs and More
Everything you need to scale your WordPress Website and improve your PageSpeed.
CJ says:
Loved the guide, super helpful for a site we worked on. Thanks!