Welcome to the W3 Total Cache Pro Remove CSS/JS feature guide. This feature helps improve your website’s performance by removing HTML script/link tags either on the homepage or on specified pages. By doing so, this can be used to eliminate unused CSS/JS anywhere on the site which translates to better Google PageSpeed scores. In this guide, we’ll walk you through how to use Remove CSS/JS effectively for removing unused CSS/JS files and optimizing your website’s performance. Let’s dive into the details and get started.
In one recent test, removing unused CSS and JS added over 27 points to the Google PageSpeed score! Review the testing results to see how.
Upgrade to W3 Total Cache Pro and improve your PageSpeed Scores today!
Why Removing Unnecessary CSS/JS Matters
Every time a user visits your website, their browser needs to load all the CSS and JavaScript files associated with your site. These files control everything from the design layout to interactive features like sliders and forms. However, not all of these files are essential for every page. For instance, a plugin might load its CSS/JS on every page, even if its functionality is only needed on one. This leads to longer loading times and a slower site.
By removing unnecessary CSS and JS files, you reduce the number of requests the browser has to make, decrease the overall page size, and as a result, your site loads faster. This is crucial for keeping users engaged and improving your site’s search engine rankings.
Enabling Remove CSS/JS
The first step to using the Remove CSS/JS feature is to enable the feature by navigating in your WordPress admin to Performance > General Settings and then clicking on the sub-nav User Experience. Once there, click on the Remove Unwanted/Unused CSS/JS checkbox to enable it and then click on Save Settings.

Configuring Remove CSS/JS
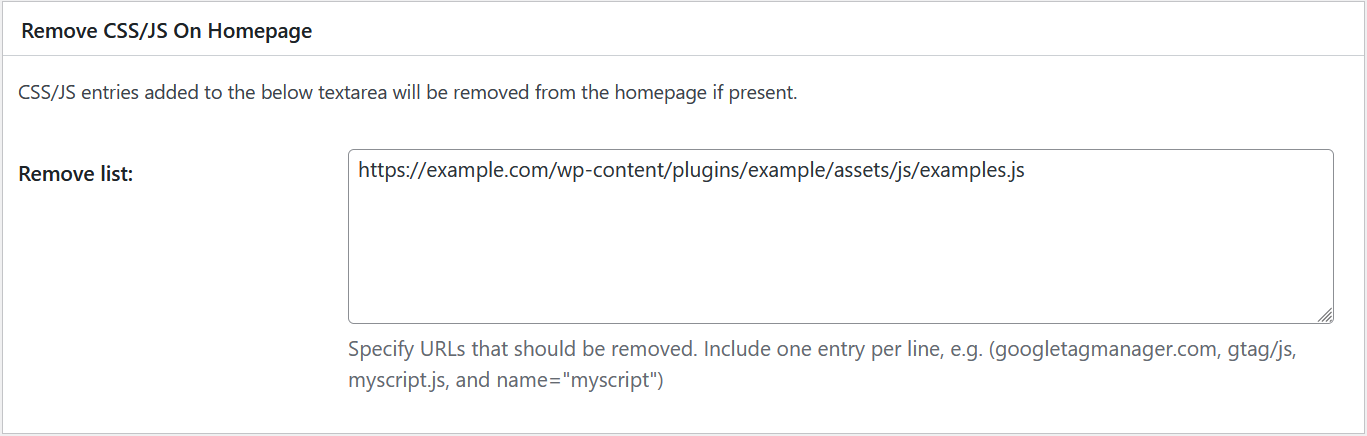
The next step is to configure the feature by navigating to Performance > User Experience. There will be a new section titled Remove CSS/JS On Homepage towards the bottom of the page. The Remove List textarea allows users to input a list of absolute URLs for CSS/JS files that should be removed from the homepage by means of filtering out the matching script/link tags before rendering.
The Remove CSS/JS Individually functions similarly to that of the above but allows users to control the loading of CSS/JS files either on a URL or page content basis. The Add button will create a new blank entry and will focus on a text-area labeled Remove on these pages where the user can define the absolute/relative URL for a given CSS/JS file. If a directory is specified, then all CSS and JS files within that directory will be managed by the rule.
Relative vs. Absolute URLs:
- A relative URL provides the path to a resource in relation to the current page. For example, if the current page URL is “https://www.example.com/blog/“, a relative URL to another article could be “latest-news”, which effectively points to “https://www.example.com/blog/latest-news“.
- An absolute URL specifies the exact location of a page or resource on the internet, including the protocol (http:// or https://) and domain name.
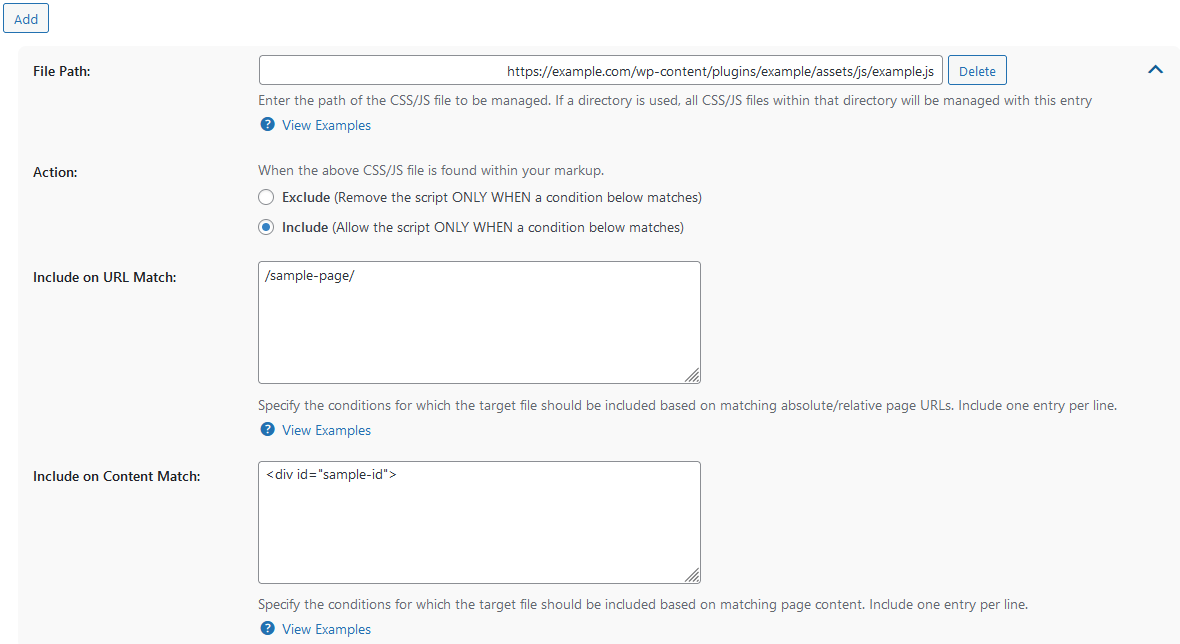
Action
This radio option determines what happens to the target(s) when matches are found.
- Exclude: The target(s) will be removed only if the page URL or content matches any defined page URL or content rule values.
- Include: The target(s) will be removed from ALL pages except those that match the defined page URLs or content rule values.
Exclude/Include on URL Match
In this section, you can specify the relative or absolute URLs of the pages or posts that the specified action should be applied to the target(s) if matches are found.
Examples:
- Relative URL:
/about-us - Absolute URL:
https://www.example.com/about-us
These entries would exclude/include the target(s) from the About Us page.
Exclude/Include on Content Match
This section allows you to match content within the HTML markup for pages or posts and apply the specified action to the target(s) if matches are found in the page content.
Examples:
<h1>About Us</h1><div class="about-us-container">
These entries would exclude/include the target(s) from the About Us page.
Load Time
In one recent test, removing unused CSS and JS reduced the Largest Contentful Paint Element from 4.7 seconds down to 1.8 seconds, over a 60% decrease! Review the testing results to see how.
Upgrade to W3 Total Cache Pro and improve your PageSpeed Scores today!
How do I determine which files should be removed?
For the home page of your site, you can utilize the W3 Total Cache Google PageSpeed tool via Performance > Google PageSpeed. This tool will analyze your site’s homepage and provide detailed performance metrics, of which the Reduce unused JavaScript and Reduce unused CSS metrics are key for identifying candidates for this feature. For non-homepage pages/posts, use the Google PageSpeed Insights tool via this link to analyze those pages and determine which CSS/JS files should be removed.
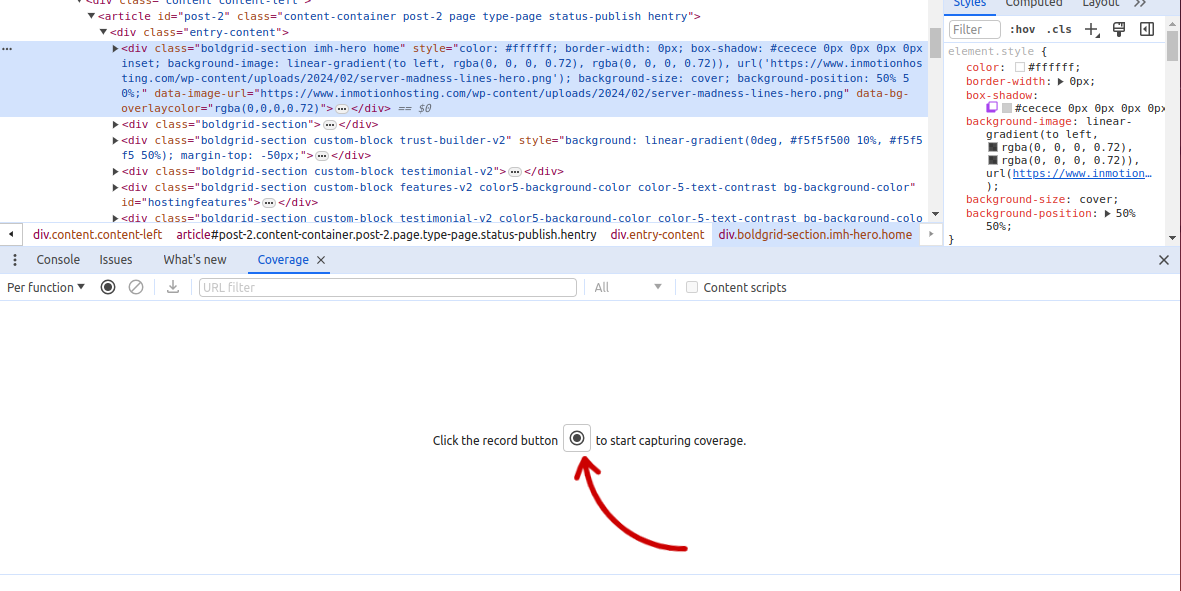
You can also pinpoint unused CSS/JS using Chromes developer tools. To do so pull up your website in chrome and right click anywhere in your page content, then click Inspect. This will bring up the Chrome Developer Tools window, use Ctrl + Shift + P and search for Coverage. The Coverage tool helps identify which parts of your JavaScript and CSS code are executed or used during the loading and rendering of a webpage. This feature allows developers to analyze and optimize the code coverage of a web page.
You can initiate a code coverage recording session by clicking the “Start” button. This will reload the page while collecting data on which lines of code were executed.
You can use the Unused Bytes window to locate files that are 100% unused and remove them by copy/pasting the file into the W3TC Remove CSS/JS control window.
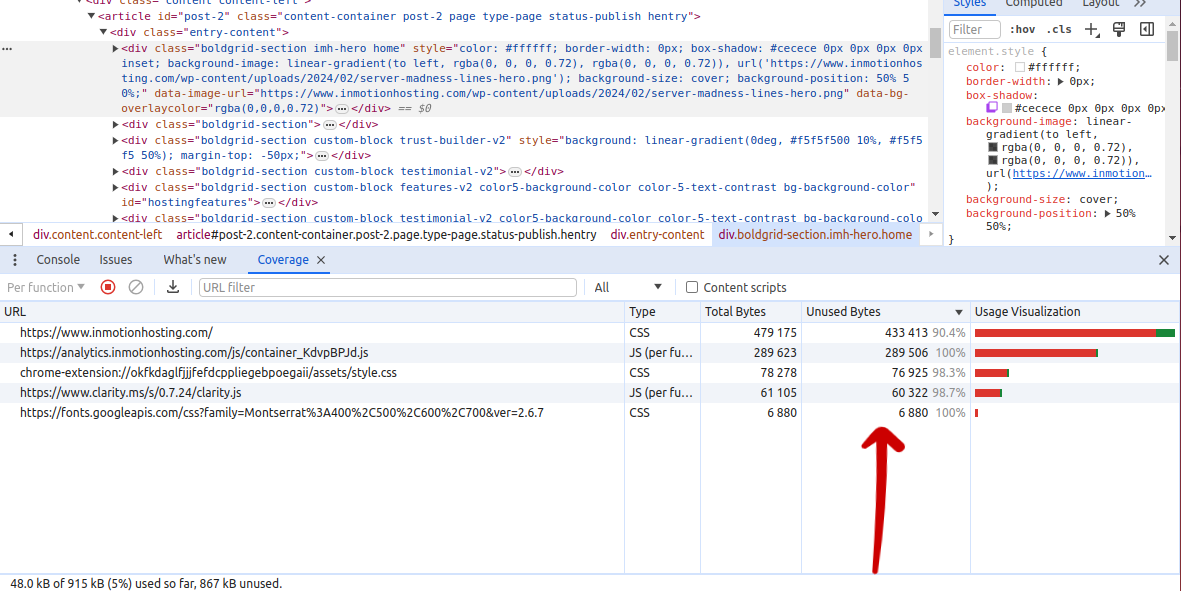
After interacting with your website or performing specific actions, you can stop the recording, and DevTools will display a report highlighting the code that was executed and the code that wasn’t.
Resources
In one recent test, removing unused CSS and JS decreased the Potential Savings From Render-Blocking Resources from 4.9s seconds down to 0.6 seconds, over an 87% improvement! Review the testing results to see how.
Upgrade to W3 Total Cache Pro and improve your PageSpeed Scores today!
How Do I Confirm that Remove CSS/JS Feature is Working?
To confirm that CSS/JS is has been removed you should check your websites source code. Look at the HTML source code of your website before and after enabling the feature. If the feature is working, you should see fewer CSS and JS file calls. This can mean either the files have been combined into fewer files or unnecessary files have been removed.
You can also use the Browser Developer Tools in your web browser (usually accessible by pressing F12 or right-clicking on the page and selecting “Inspect”) and go to the “Network” tab. Refresh your page. You should see a reduction in the number of CSS/JS files loaded if the feature is effectively removing or combining these resources.
Another method for confirming this feature is working is using performance testing tools like Google PageSpeed Insights, GTmetrix, or WebPageTest. These tools can provide insights into whether your CSS and JS files are being efficiently loaded. Improvements in loading times and recommendations can indicate that the Remove CSS/JS feature is having a positive effect.
W3 Total Cache
You haven't seen fast until you've tried PRO
Full Site CDN + Additional Caching Options
Advanced Caching Statistics, Purge Logs and More
Everything you need to scale your WordPress Website and improve your PageSpeed.