Divi is more than just a WordPress theme, it’s a completely new website building platform that replaces the standard WordPress post editor with a vastly superior visual editor. And when optimized with W3 Total Cache your website will look fantastic and have fantastic performance!
With the steps below we will show you how to optimize your Divi-built website with W3 Total Cache for your website’s best performance!
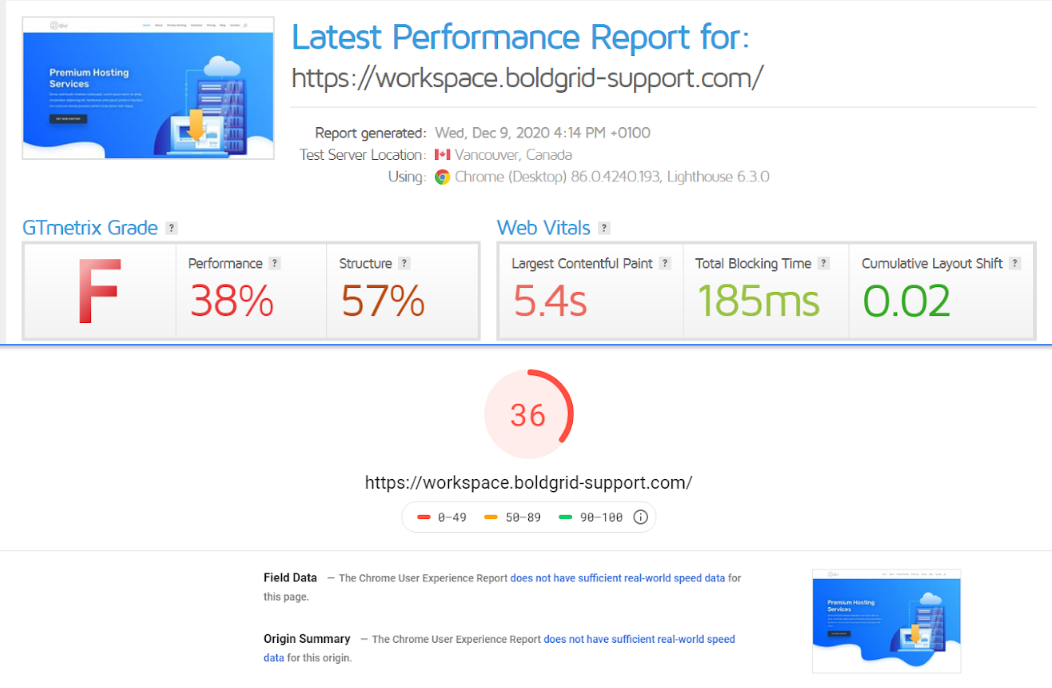
Baseline: Divi Web Hosting with Defaults
The first step is to install Divi and build the website. For this guide, we used a Divi Template for a Web Hosting service, and made some modifications to suit our needs. Once the website is built we performed tests on GTMetrix and Google PageSpeed Insights:
Install and configure W3 Total Cache
Once the tests are performed, go to your WordPress dashboard and navigate to Plugins > Add new and search for W3 Total Cache.
The configurations shown here will work in all shared hosting environments. If you are using a more powerful platform like a VPS you can use a memory-based caching solution for Object Caching and Database caching if the database is a bottleneck of your website performance.
- In General Settings, enable Page Cache and select Disk: Enhanced for the cache control method.
- Enable Minify, set the mode to Auto, and use Disk for the caching method.

- Use these settings for Minify > General
- Enable Rewrite URL structure
- Enable Disable minify for logged in users
- Use these settings for Minify > HTML & XML:
- Enable HTML Minify
- Enable Inline CSS Minification
- Enable Inline JS Minification
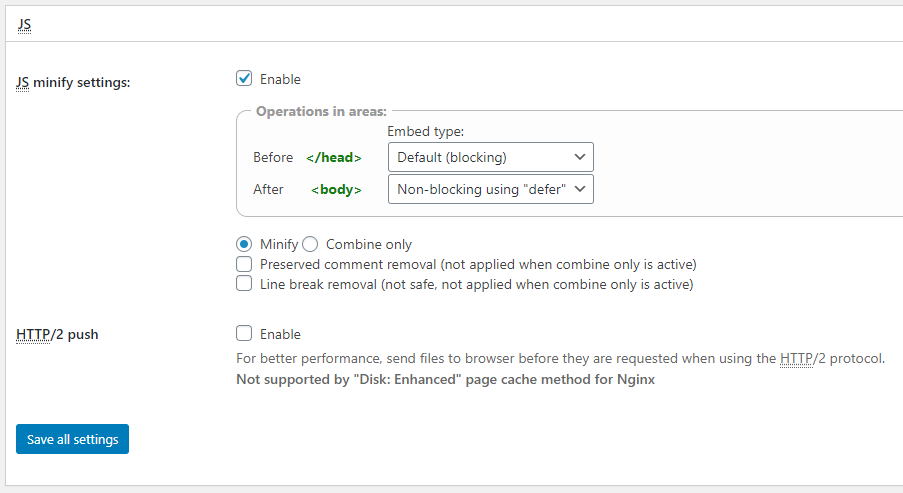
- Use these settings for Minify > JS:
- Enable JS minify settings
- Before </head> select Non-blocking using “defer”
- After <body> with Non-blocking using “defer”
- Select Combine & Minify
- Use these settings for Minify > CSS:
- Enable CSS minify
- Enable Eliminate render-blocking CSS by moving it to the HTTP bodyGet Premium to enable this feature.
- In General Settings, add the following:
- Enable Object Cache using Disk
- Enable Browser Cache
- In Performance > Browser Cache, use the following settings:
- In the General, CSS & JS, HTML & XML, Media & Other Files sections, use these settings:
- Set Last-Modified header
- Set expires header
- Set cache control header
- Set entity tag
- Enable HTTP (gzip) compression
- Don’t set cookies for static files
- Set CSS & JS expires header to 31536000 seconds (one year)
- Set HTML & XML expires header to 3600 seconds (one hour)
- Set Media & Other files expires header to 31536000 seconds (one year)
- Back in General Settings, enable Lazy Load Images and Disable Emoji in the User Experience section.
- Configure An Asset CDN
- Configure a Content Delivery Network, or CDN, to serve all the static assets from the CDN. In this example, we’ll be using Stackpath as our CDN, though the steps will be similar for most others. First, log into your CDN and create credentials.
- Configure W3 Total Cache and Stackpath CDN accordingly
- Next, navigate to Performance > General and set the CDN Type to Stackpath (recommended). Save your changes, then navigate to Performance > CDN. Then enable the following settings:
- Host attachments
- Host wp-includes/files
- Host theme files
- Host minified CSS and JS files
- Add Canonical Header
Make sure to save all settings and purge the cache after the configuration is completed.
Speed Test Results
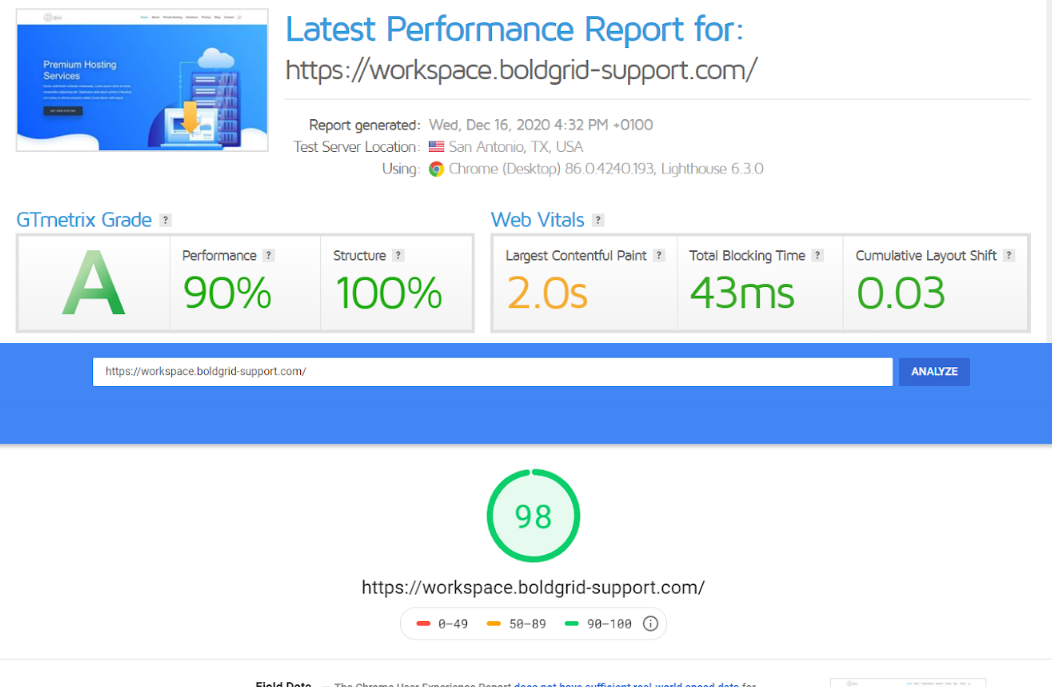
As you can see the results of the optimization are fantastic!
Important notes
Divi Builder is a very powerful tool that uses a lot of JS to build your pages. To avoid any issues with Divi Builder Please disable Minify for logged in users in Performance > Minify> Disable Minify for logged in users and also make sure that page caching is disabled for logged in users in Performance > Page Cache > Don’t cache pages for logged in users
W3 Total Cache
You haven't seen fast until you've tried PRO
Full Site CDN + Additional Caching Options
Advanced Caching Statistics, Purge Logs and More
Everything you need to scale your WordPress Website and improve your PageSpeed.
Gert-Jan says:
Thanks! I already knew how to install and configure W3, but the best tip is at the end: disable Minify for logged in users…
can have more emphasis in the beginning!
Clemant says:
BoldGrid team, pleeeeeeease, updates this article recommending the best W3TC configuration for Divi
A complete tutorial, with images…
We want to use the plugin, but it’s too hard to find content on the internet
Please, please, please
Marko says:
Hello Clement,
This tutorial offers a step-by-step process on what you need to focus on when configuring the W3 Total Cache with Divi. The tutorial is the same, however, depending on the server, plugins, images, and external resources, and since everyone’s site and traffic are different, there is no one size fits all solution.
If you have any questions about specific performance issues, please reach out directly via the plugin in Performance>Support, or open a new forum topic.
Thanks!
Rex says:
Hi can you do an update on this tutorial? Divi has updated and those options you refer to in this article are not there anymore. Thank you.
C says:
Great help, thank you Marko!
Would you mind sharing the settings for the Divi Theme Options – Performance that you have set for the latest DIVI version? A screenshot would be most helpful!
Clement says:
Just checking if this article is still relevant as Elegant Themes are referring to it. I can’t use the Divi Builder with W3 Total Cache enabled.
Marko says:
Hey Clement,
If you are experiencing problems with the Divi builder, most likely the Minify is enabled, and it’s also enabled for logged-in users.
As you can see in the article:
Important Notes
Divi Builder is a very powerful tool that uses a lot of JS to build your pages. To avoid any issues with Divi Builder Please disable Minify for logged in users in Performance > Minify> Disable Minify for logged in users and also make sure that page caching is disabled for logged in users in Performance > Page Cache > Don’t cache pages for logged in users
Joanna says:
Sind diese Einstellungen für DIVI immer noch aktuell? Im August hatte DIVI ja ein neues Leistungsupdate veröffentlicht und es wäre interessant zu erfahren, ob die hier vorgestellte Konfiguration weiterhin so verwendet werden kann?
Marko says:
Hello Joanna,
I can confirm that these optimization settings are still valid. If you are using some Performance optimizations via the Divi settings, you should disable those and let W3 Total Cache take care of the website optimization. If you have any problem with the optimization and configuration, please make sure to open a new forum topic so we can take a closer look
Thanks!
Joanna says:
Vielen Dank für die Antwort!
Ich habe mich bisher nicht an WP3 herangetraut, es ist ein mächtiges Werkzeug und ohne eine “Anleitung” hätte ich es für DIVI allein nicht konfigurieren können.
Ich werde dann morgen starten und hoffe, dass ich nichts kaputt mache an meiner Seite. Für den Notfall habe ich ja ein Backup…
Osmar says:
Hi,
I have noticed some compatibility issues of W3 Total Cache with Divi after the latest updates
For example, the tutorials they provide on the ET blog to configure hamburger menu in desktop only work if you disable the plugin, as well as WooCommerce products appearing in fewer numbers per line and therefore getting too big, so only works if you disable the plugin
Before everything worked perfectly, it’s my favorite cache plugin to work with Divi
I saw that the last update of the post was on January 12th, 2021. Will it be revised? I would love to keep the plugin active 🙂
Lethicia says:
Hi, BoldGrid team!
Divi has released a new major performance update (https://www.elegantthemes.com/blog/theme-releases/divi-performance).
I would like to know if you will update the W3 Total Cache configuration tutorial (https://www.boldgrid.com/support/w3-total-cache/divi-w3-total-cache-guide/) according to the new features that the theme offers.
Jesse says:
Hello Lethicia-
Thanks for the link! We’ll check out the newest performance features and revise this guide as soon as we can.
Nikolay says:
Very useful. Thanks.
Marko says:
You are most welcome!
Glad to know the article was helpful!