The WordPress REST API is a programming interface that allows developers to interact with WordPress websites using HTTP requests to access and manipulate data. It allows third-party applications, such as mobile apps or “headless” WordPress websites, to communicate with your site.
The REST API, an acronym for REpresentational State Transfer Application Programming Interface, is incredibly useful for allowing applications written in any language to get content from your site, as well as make changes like updating inventories. It’s also perfect for high-performance use cases, like using a JavaScript application hosted on a CDN Edge to deliver your content as fast as possible. And while caching on the edge can help performance greatly, sometimes you’ll also want to cache REST responses on the server as well.
In this guide, you’ll learn how to use W3 Total Cache Pro to enable server-side caching for REST responses, and why it’s important for scaling the performance of your website.
Speed Up Your WordPress Website.
A Difference of Just 100ms in Page Load Speeds Can Cause a Visitor to Prefer Your Competitor’s Website.
Why caching the WordPress REST API is important
To understand why caching the REST API is important, let’s examine a common use case for the REST API, a “headless” WordPress installation.
In a headless WordPress installation, the WordPress REST API is used to retrieve content from the back-end, which can then be displayed on the front-end using a different technology, such as React, Angular, or Vue. This allows developers to build highly customized and interactive front-ends that are not limited by the capabilities of the WordPress theme system.
Typically, the front-end will be served from a CDN, while the content is fetched from the back-end on request. Typically this result is cached on the CDN, but in large or high-traffic instances, the strain on the back-end to serve these requests may result in slower performance or even overload the server’s resources.
That’s where W3 Total Cache comes in. By keeping a static cache of REST responses, both response time and server resources are drastically reduced.
In this test, using REST API caching sped up our API Responses by 84.5%! Review the testing results to see how.
Upgrade to W3 Total Cache Pro and improve your PageSpeed Scores today!
How to enable WordPress REST API caching in W3 Total Cache Pro
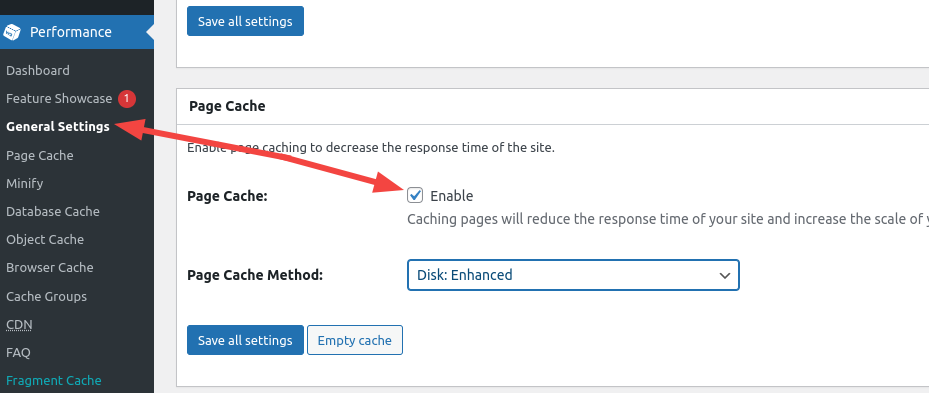
- First, enable Page Caching and select a Page Cache Method in the General Settings menu.

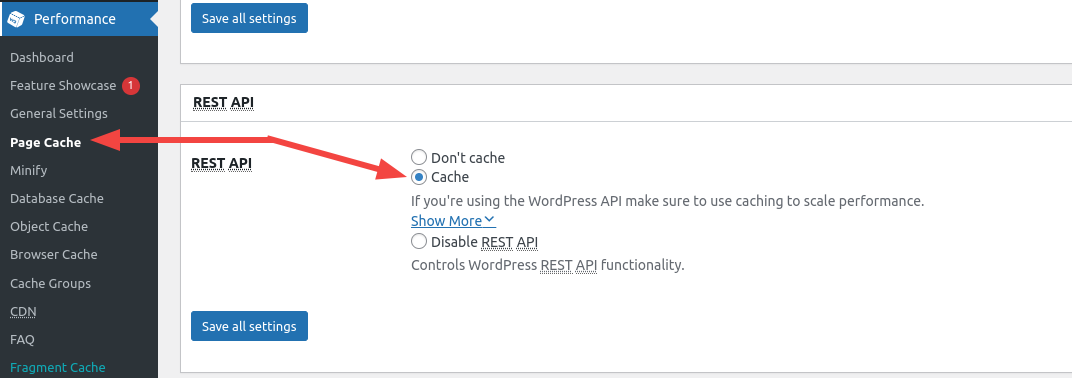
- Then, navigate to the Page Cache menu and enable the REST API Cache.

Settings for your REST API Cache will follow the same rules as other types of page caching, and are purged based on the Last Modified time of the query, and when you manually purge your caches.
How to test if your REST API cache is working correctly
You can easily test your REST API caching using your browser’s developer tools. We’ll use a couple of common REST routes in the following procedure. Check out the WordPress REST API Documentation for more routes you can use.
- In your WordPress Dashboard, use the Performance drop-down in the top toolbar and select Purge All Caches.
- Open an Incognito or Private Browsing Window and open the developer tools Network tab. In Chrome, the shortcut for this is Ctrl-Shift-i. In Firefox, use Ctrl-Shift-e.
- Paste the following URL into the browser window, and replace example.com with your website.
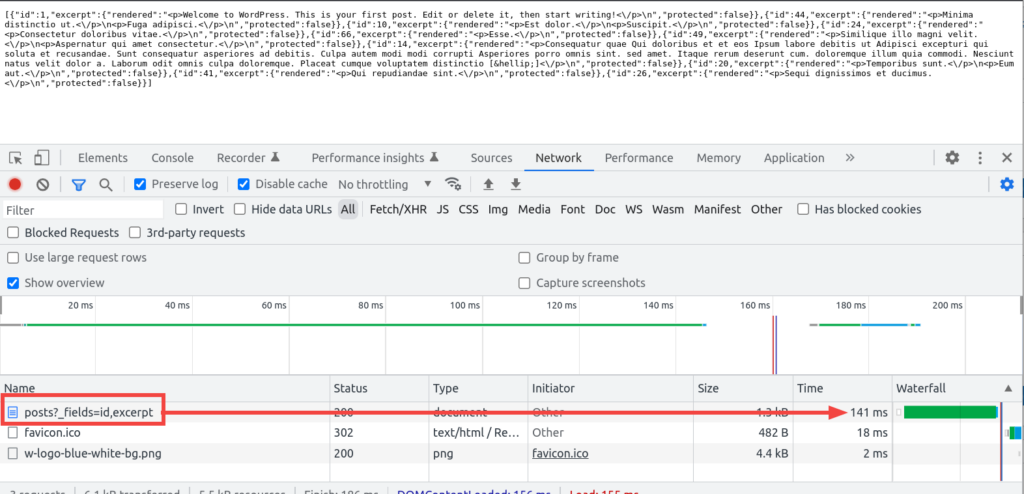
http://example.coml/wp-json/wp/v2/posts?_fields=id,excerpt - Take note of the main request in the list, posts?_fields=id, excerpt, and the amount of time it took. In this example, it took 141ms to respond.

- Click on the request. Take note that the Date and Last-Modified times are the same since this is the first time the REST route has been requested since we purged the cache.

- Reload the page. Note that the response time has significantly decreased, in this example from 141ms to just 16ms, an improvement of 88.7%.

- Click on the request again, and note that the Date has changed to the current time, but the Last-Modified time has not changed.

- Finally, you can test that the cache is automatically purging whenever the feed has changed by adding a new post to your site and reloading the page in the same incognito browser. You’ll note that the Last-Modified time will correspond to the moment you published your newest post.
How to exclude REST routes from the Page Cache
Because REST responses are cached based on Last-Modified times, you should be able to enable REST caching for most, if not all, of your routes. However, if you find that you need to keep certain routes out of your cache so that they are always dynamically generated, you can do so.
Navigate to the Advanced section of the Page Cache menu, and locate the Never cache the following pages field. This field supports regular expressions so you can fine-tune the exception list as much as you need.
For example, if we want to prevent caching of the Posts route used in the testing examples above, add the following to the field:
wp-json\/wp\/v2\/posts.*
Then, you can perform the same testing procedure outlined above to make sure that your response is always fresh. Note that the response times are consistent, and the Last-Modified and Etag headers are missing from the responses.
In a recent test, using REST API caching reduced our Average Server Load by 40%! Review the testing results to see how.
Upgrade to W3 Total Cache Pro and improve your PageSpeed Scores today!
Conclusion
Any website that uses the WordPress REST API to deliver content can benefit from caching REST responses. If you have any questions about REST API caching, please post a comment below or contact us on our Support Forums.
W3 Total Cache
You haven't seen fast until you've tried PRO
Full Site CDN + Additional Caching Options
Advanced Caching Statistics, Purge Logs and More
Everything you need to scale your WordPress Website and improve your PageSpeed.


Kristian says:
Hi.
I purchased a Pro license of W3 Total Cache. But when I use Page cache (disk, basic) the WooCommerce REST API returns an error (woocommerce_rest_cannot_view). I tried to resolve it by adding a regex to Never cache the following pages (wp-json\/.*). But it still doesn’t work. I have checked an option Don’t cache REST API.
The REST API works when Page cache is disabled.
How can be the problem resolved? Thanks for your recommendation.
Marko says:
Hey Kristian,
I am sorry for the issue you are experiencing and I am happy to help!
Depending on a Woo REST API v2 or v3, please add to Performance>Page Cache>Advanced> Never cache the following pages: section,
/wc/v3/*If you are using v2 just replace the version. Let me know if this helps!
Kristian says:
Hi marko.
No, it doesn’t work.
I tried it with no effect (/wc/v3/*, /wc/v2/* and similar). It looks like I’m unauthorized for REST API when Page caching is enabled.
Marko says:
We cannot seem to replicate this. You may want to try different caching methods.
If the issue continues, please reach out to us directly via the plugin in Performance>Support as the comment section is not very suitable for the support.
Thanks!
enciang says:
Thank you so much. I spent many hours watching youtubers following the configuration and nothing worked.
and you helped me solve my sites health.
Brandon says:
Hi Enciang,
We’re happy to hear you gained some value from our Post! Please don’t hesitate to reach out to us if you ever have questions, we’re always here to help!