Customizing Menus in BoldGrid
BoldGrid Tutorials
Formatting the menus on your WordPress website may sound like a daunting task, but customizing menus in BoldGrid is a breeze. Let us show you how to use our WordPress website builder to edit the location of your menus, their colors, fonts, and more!
 Next select “Menus” from BoldGrid’s “Customizer” menu.

 You will see the option to edit your menus (the number of which varies depending on which theme you use). For this demonstration we used the theme “Diced,” which supports five menus: Primary Menu, Top of the Footer, Secondary Menu (Above Header), Top Right (Above Header), and a Footer Menu.
 As you can see above, BoldGrid also provides the option to place menus in widget areas with a “Custom Menu” widget. Although, today we will only discuss the main menu changes.
In this example, we put a menu called “primary” in the Primary Menu spot. It contains the five pages listed under the site name (i.e., “Home,” “About Us,” “Services,” “News,” and “Contact Us”). The Primary Menu will display across all pages of this site as a point of main navigation. This helps users return to a section more easily, or just find the main points of the site we want them to visit.
Of course, we did not have to put “primary” in the Primary Menu spot. You can create multiple menus and swap them into different menu locations as you see fit. You can also use menus pre-populated by BoldGrid. To illustrate that, we changed our Primary Menu from “primary” to “social media.” Below, you can see how that changes the menu displayed with the social media thumbnails linked underneath the site title.
We suggest keeping your most important site navigation menu at the top of your page. The exception to that rule: if have a strong social media presence and want to drive your website visitors to one of those channels.
The pre-built menu options “primary” and “social media” are also available for “Top of Footer.” If you select “social media” for the Top of Footer menu then scroll down to the very bottom of the display screen in the Customizer, you will see that the Facebook and Twitter social thumbnails display again in this location.
 The footer menu will also show across all pages of your site as another place to help guide your visitors through your website. If you have pages or posts that you would like to encourage your audience to share, you can do that by placing the “social media” menu in your Top of Footer menu area.
The same two pre-built menu options (“primary” and “social media”) appear under the last three menu locations, as well. “Secondary Menu, Above Header” will place whichever menu you choose directly above the header, as displayed in the following image:
 Below you can see how it looks when you add another menu (“social media”) to the “Top Right, Above Header.”
And, the following displays how “social media” looks at the bottom of your site when you add a “Footer Menu” in addition to the “Top of Footer” social thumbnails we selected earlier.
 As you can see, if you put too many menus on your page, things can start to get a little messy. Decide which pages you want to prioritize for your users to visit and keep only those as options at the top or bottom of your site’s main navigation.
 Then choose “primary” to see the page below in your Customizer.
 Here you can change the names of the pages in the Primary Menu (i.e., “Home,” “About Us,” “Services,” “News,” and “Contact Us”). When you click on the drop-down carrot next to one of those pages, you will have the option to edit “Navigation Label” and “Title Attribute.” “Navigation Label” affects how the page displays in the main navigation when someone visits your site. “Title Attribute” provides an option to give that page an SEO title attribute to help website crawlers understand the purpose of the page.
Make sure to keep any changes you make to the name of one of these pages relevant to your site’s brand or business. For example, if you have a travel blog, changing “Services” to “Destinations” and designing the page around that topic would make sense. If you change the nomenclature of “Home” to something else, just remember that it will still take them to the main page of your site. If you want to use a different page as your homepage, you will need to make that selection in the WordPress settings menu on the left-hand side of your screen.
You also have the option to “Add Items.” Click on that button to see this submenu:
 From here you can add more pages to your Primary Menu. By default, the system selects “Pages” when you click on the “Add Items” button. At the bottom of your list, fill in the form with the new page title you like, then click the “+ Add” button.
At the top of this submenu, you can click on “Custom Links” to add an external link with defining text under “Link Text.” For this example, we linked to a fake health food sister company associated with our fitness site.
 Click “Add to Menu” to see the new addition to the primary menu with the link text you chose.
From this submenu, you can also add posts to your Primary Menu or under a Primary Menu page. Click on “Posts” and fill in the form with the title of the post you would like to add or choose from existing posts on your site. Then click “+Add” to add it to the Primary Menu like we have with “Example Post.” If you would prefer this post reside under one of your main Primary Menu pages, drag-and-drop it under the specific page you desire. You will see the post indented to the right to indicate that it will display as an option under that Primary Menu page.
 The last two customization options for the Primary Menu in the Customizer are “Categories” and “Tags.” Categories and tags can help improve your search engine results and serve as another navigational element to your site. You can add them to your Primary Menu, as well, but we suggest setting them up as a single page aligned with the specific content.
Scroll down the left side on your Customizer menu to see a couple more customization options: “Display Location” and “Menu Options.” You can choose the placement of the Primary Menu under “Display Location” here, as well. Just check the box next to one of the destinations to add it to the display screen. If you would like to automatically add any new top-level pages to the Primary Menu, simply check the appropriate box in “Menu Options.”
 You have the same options in the “social media” submenu in the Customizer as you did in the “primary” menu’s submenu. You will primarily want to focus on “Custom Links” for this menu to add more social media links. For example, if you wish to add an Instagram or LinkedIn account, Custom Links will allow you to add it to your social media menu.
Again, you can add or remove the pre-built “social media” menu to one of the five “Display Locations,” or automatically add new top-level pages from this submenu by checking the appropriate boxes.
When happy with your menus, click “Save & Publish” at the top of the page.
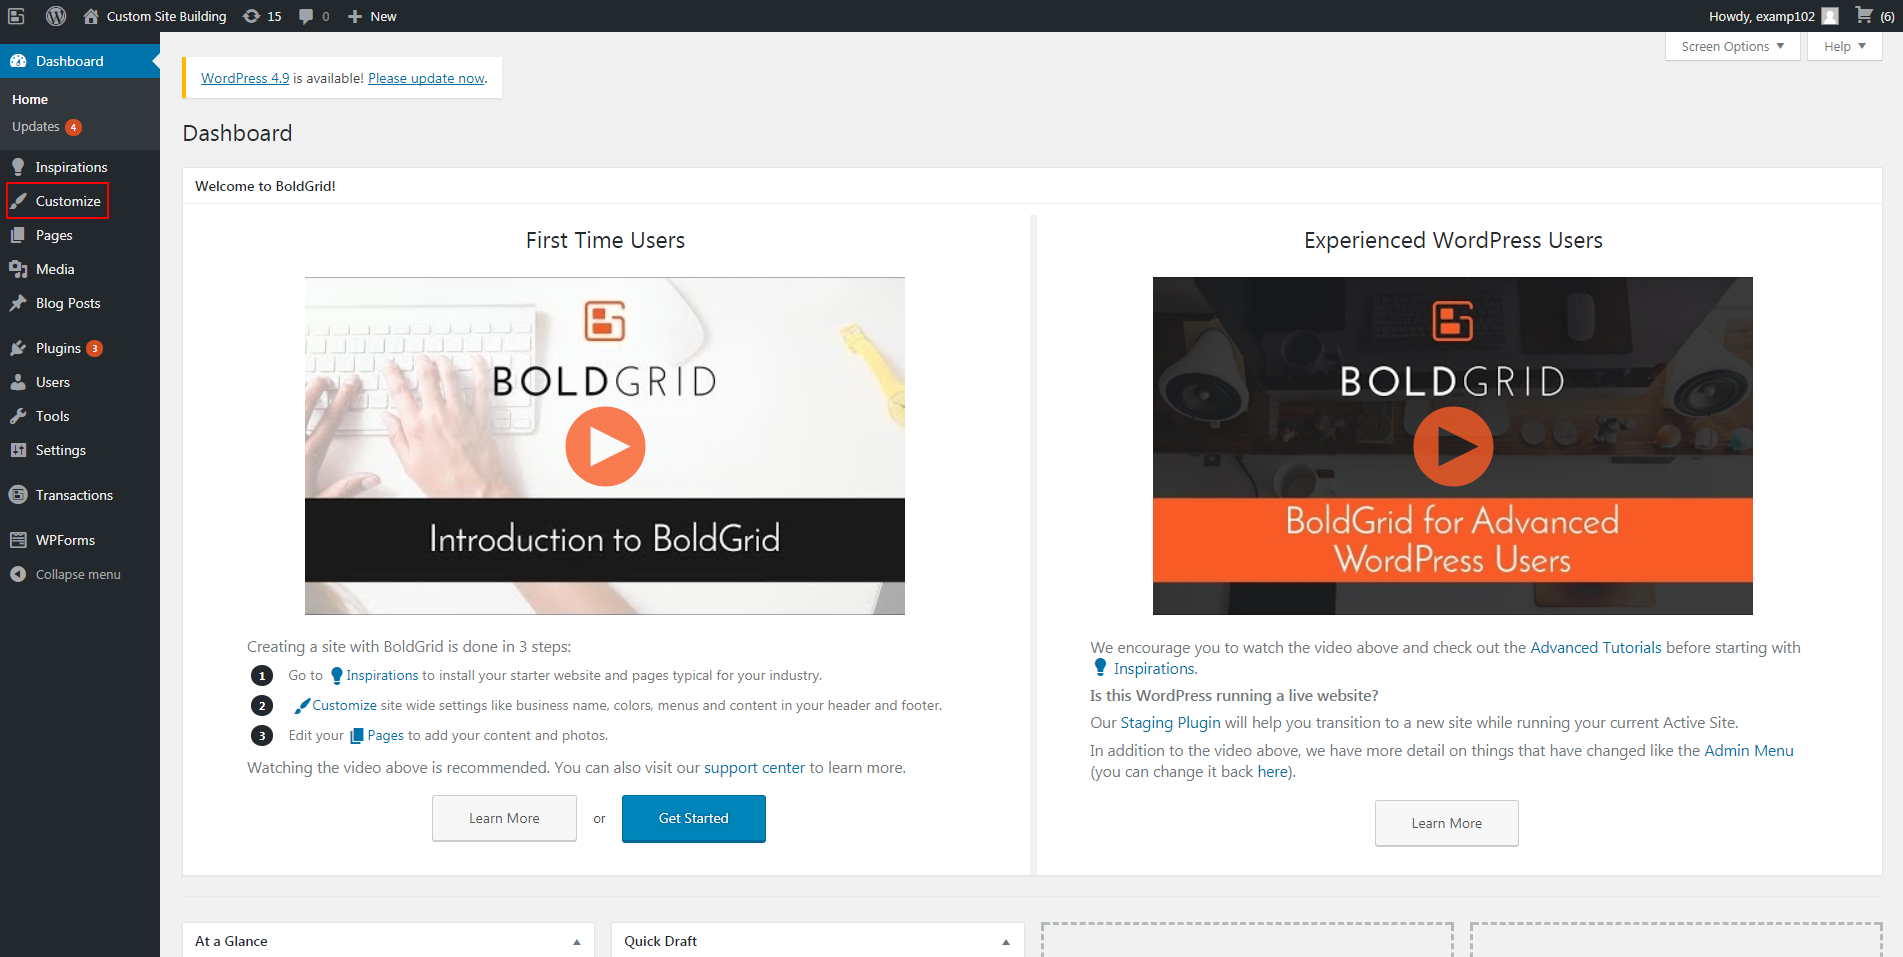
Log in to your WordPress admin menu to begin. Then select “Customize” from the left-hand side.
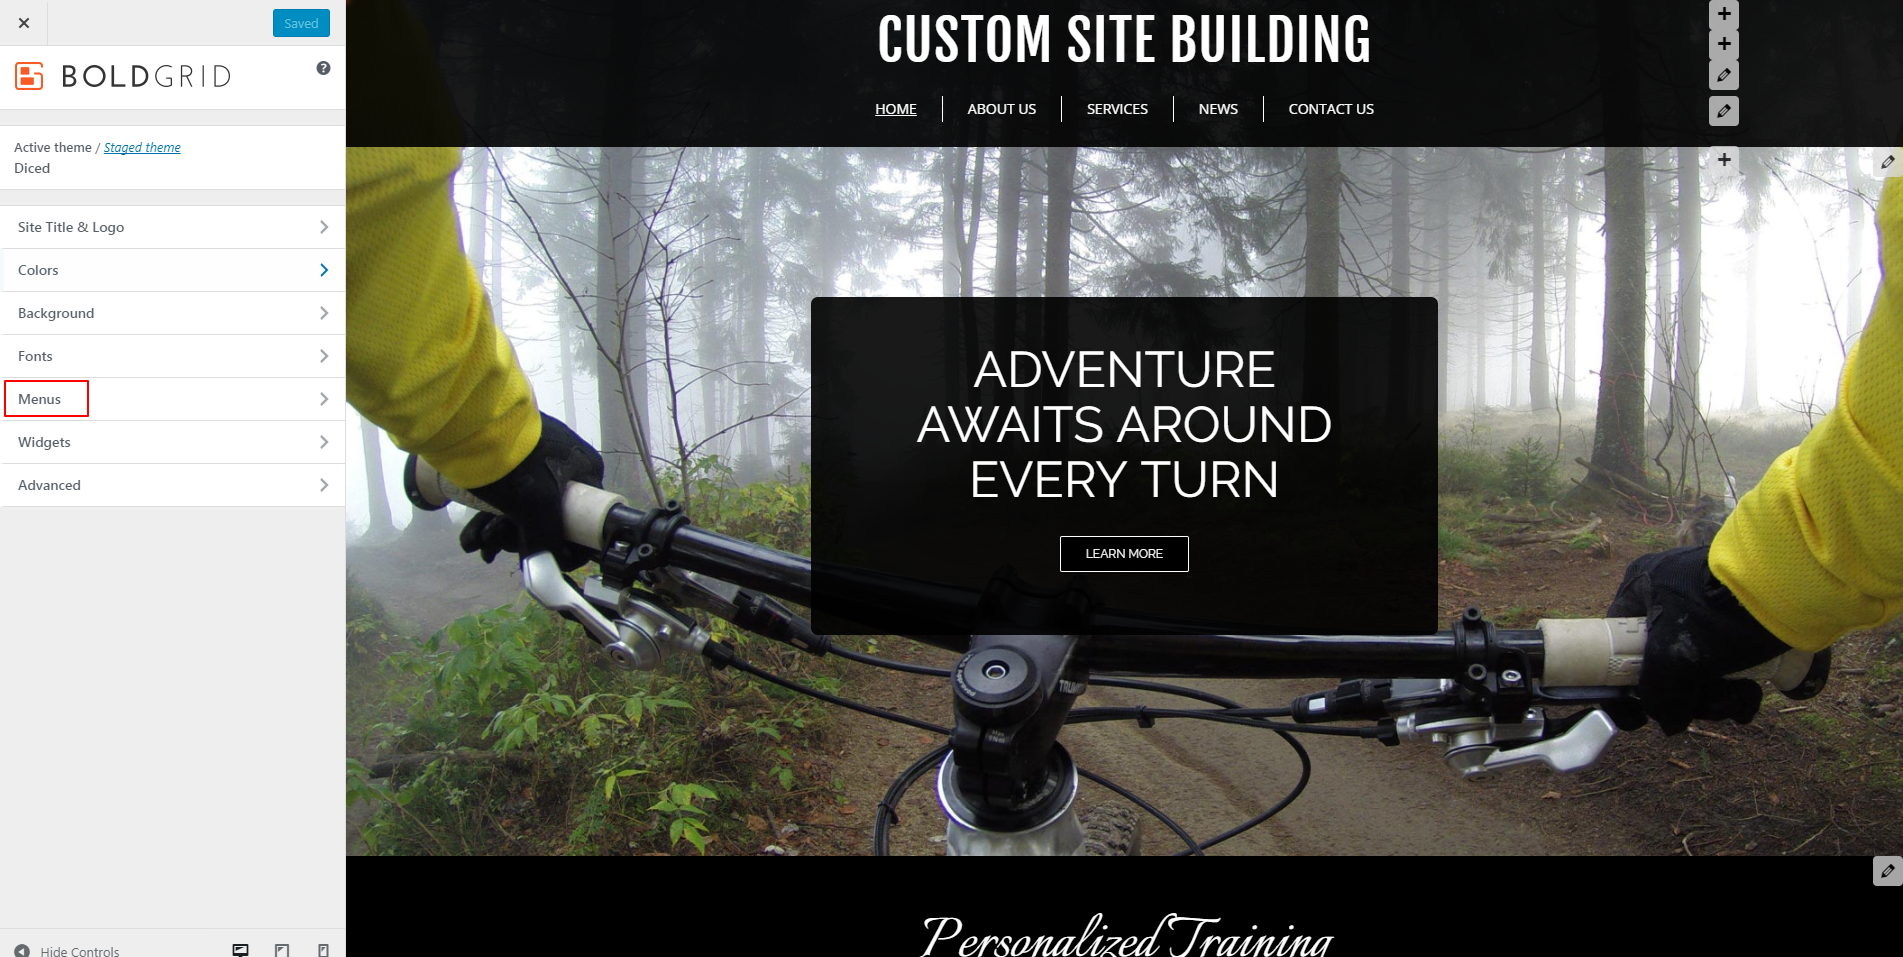
 Next select “Menus” from BoldGrid’s “Customizer” menu.
Customizing Menu Locations
From here, select “Menu Locations” to begin editing the placement of your various menus.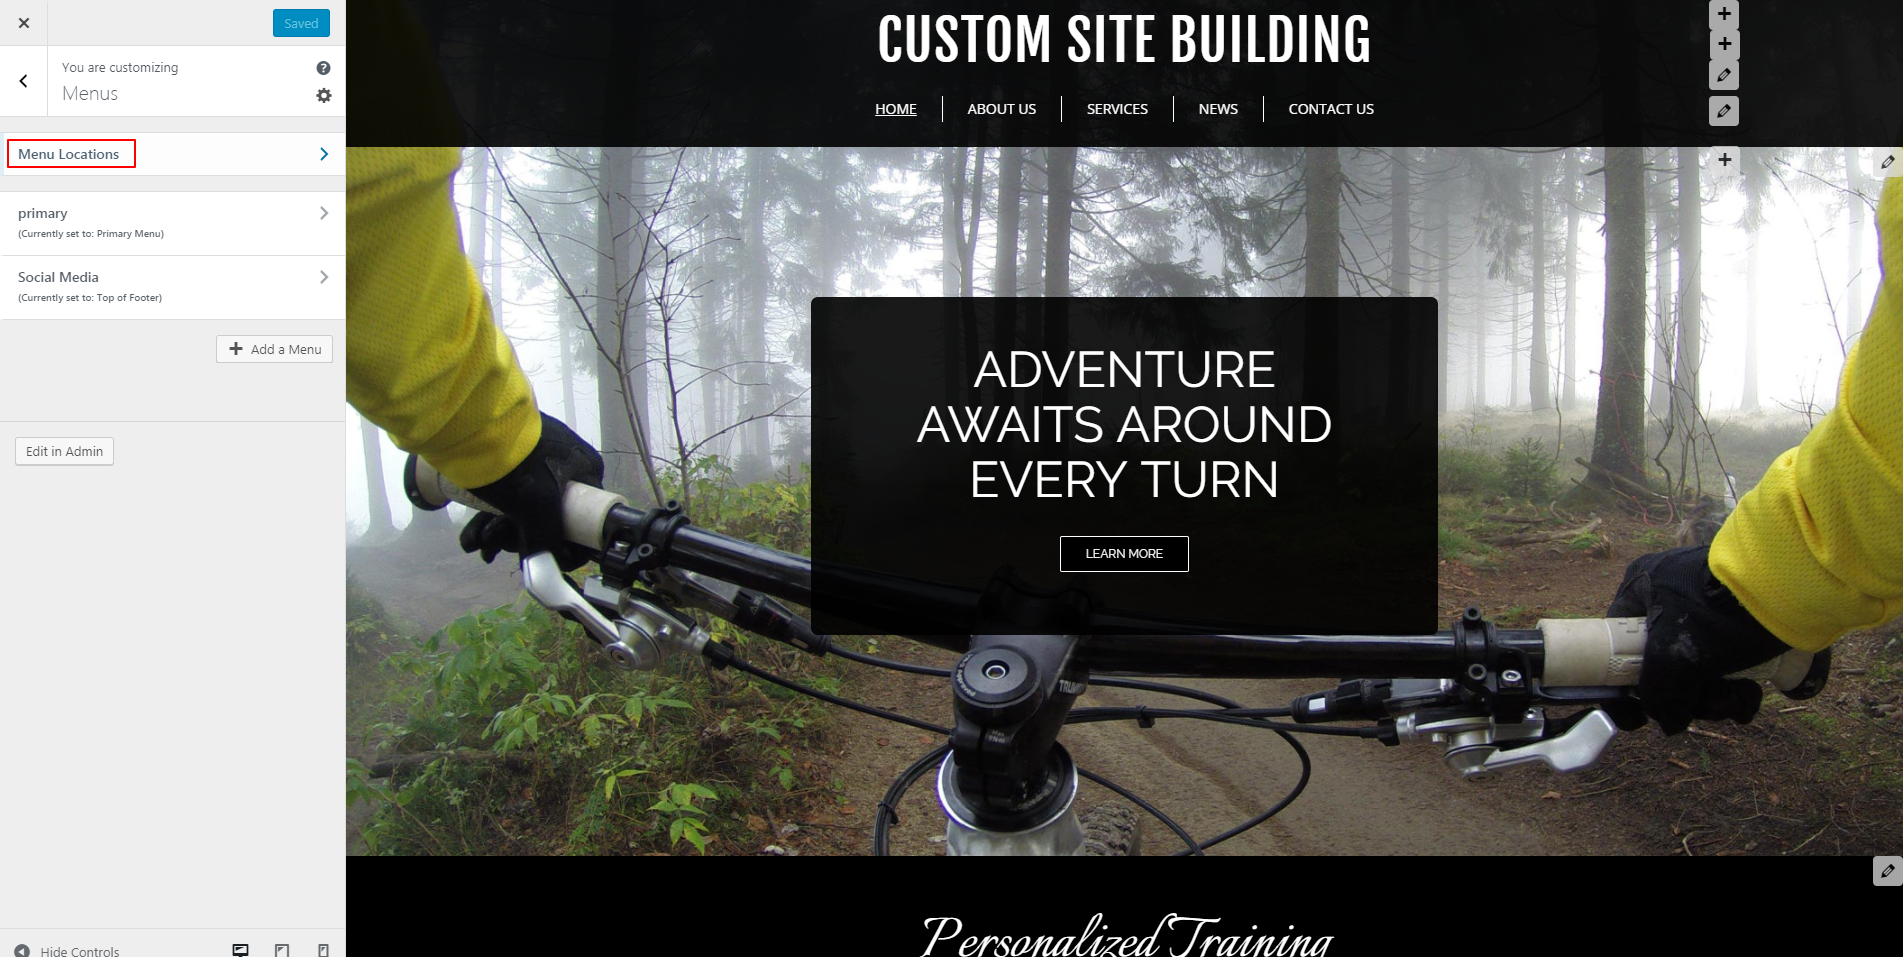 You will see the option to edit your menus (the number of which varies depending on which theme you use). For this demonstration we used the theme “Diced,” which supports five menus: Primary Menu, Top of the Footer, Secondary Menu (Above Header), Top Right (Above Header), and a Footer Menu.
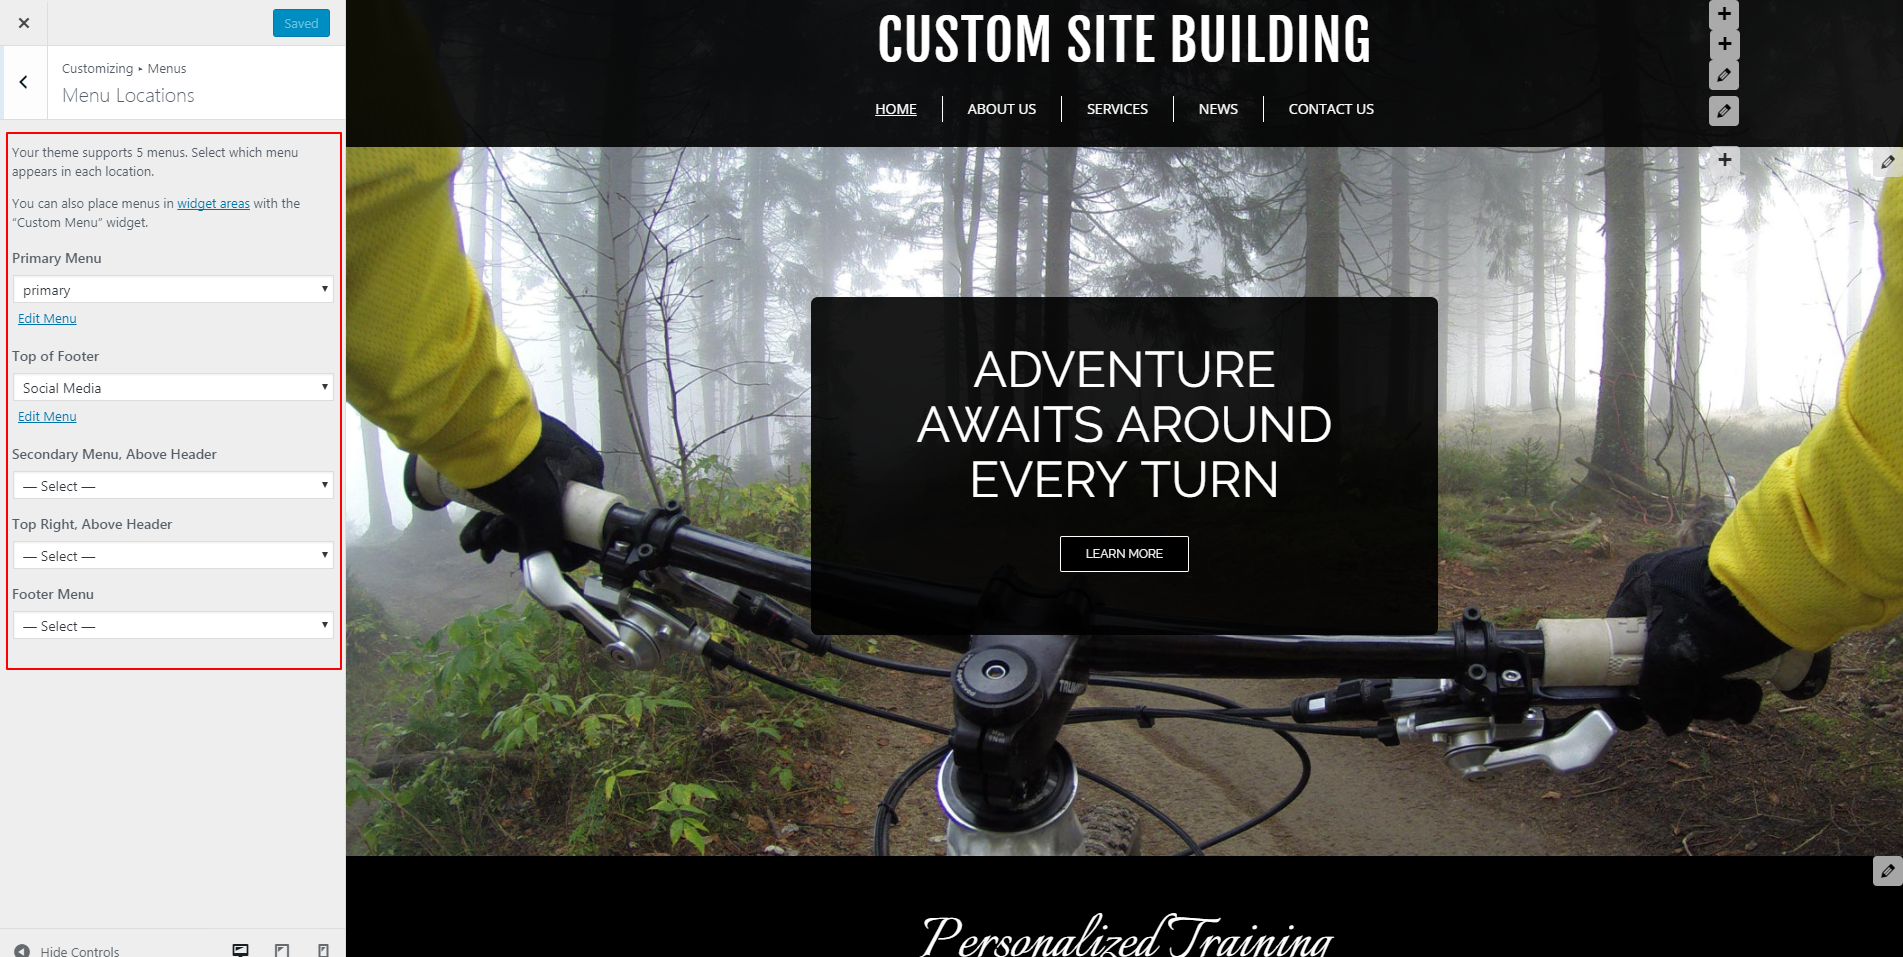 As you can see above, BoldGrid also provides the option to place menus in widget areas with a “Custom Menu” widget. Although, today we will only discuss the main menu changes.
In this example, we put a menu called “primary” in the Primary Menu spot. It contains the five pages listed under the site name (i.e., “Home,” “About Us,” “Services,” “News,” and “Contact Us”). The Primary Menu will display across all pages of this site as a point of main navigation. This helps users return to a section more easily, or just find the main points of the site we want them to visit.
Of course, we did not have to put “primary” in the Primary Menu spot. You can create multiple menus and swap them into different menu locations as you see fit. You can also use menus pre-populated by BoldGrid. To illustrate that, we changed our Primary Menu from “primary” to “social media.” Below, you can see how that changes the menu displayed with the social media thumbnails linked underneath the site title.
We suggest keeping your most important site navigation menu at the top of your page. The exception to that rule: if have a strong social media presence and want to drive your website visitors to one of those channels.
The pre-built menu options “primary” and “social media” are also available for “Top of Footer.” If you select “social media” for the Top of Footer menu then scroll down to the very bottom of the display screen in the Customizer, you will see that the Facebook and Twitter social thumbnails display again in this location.
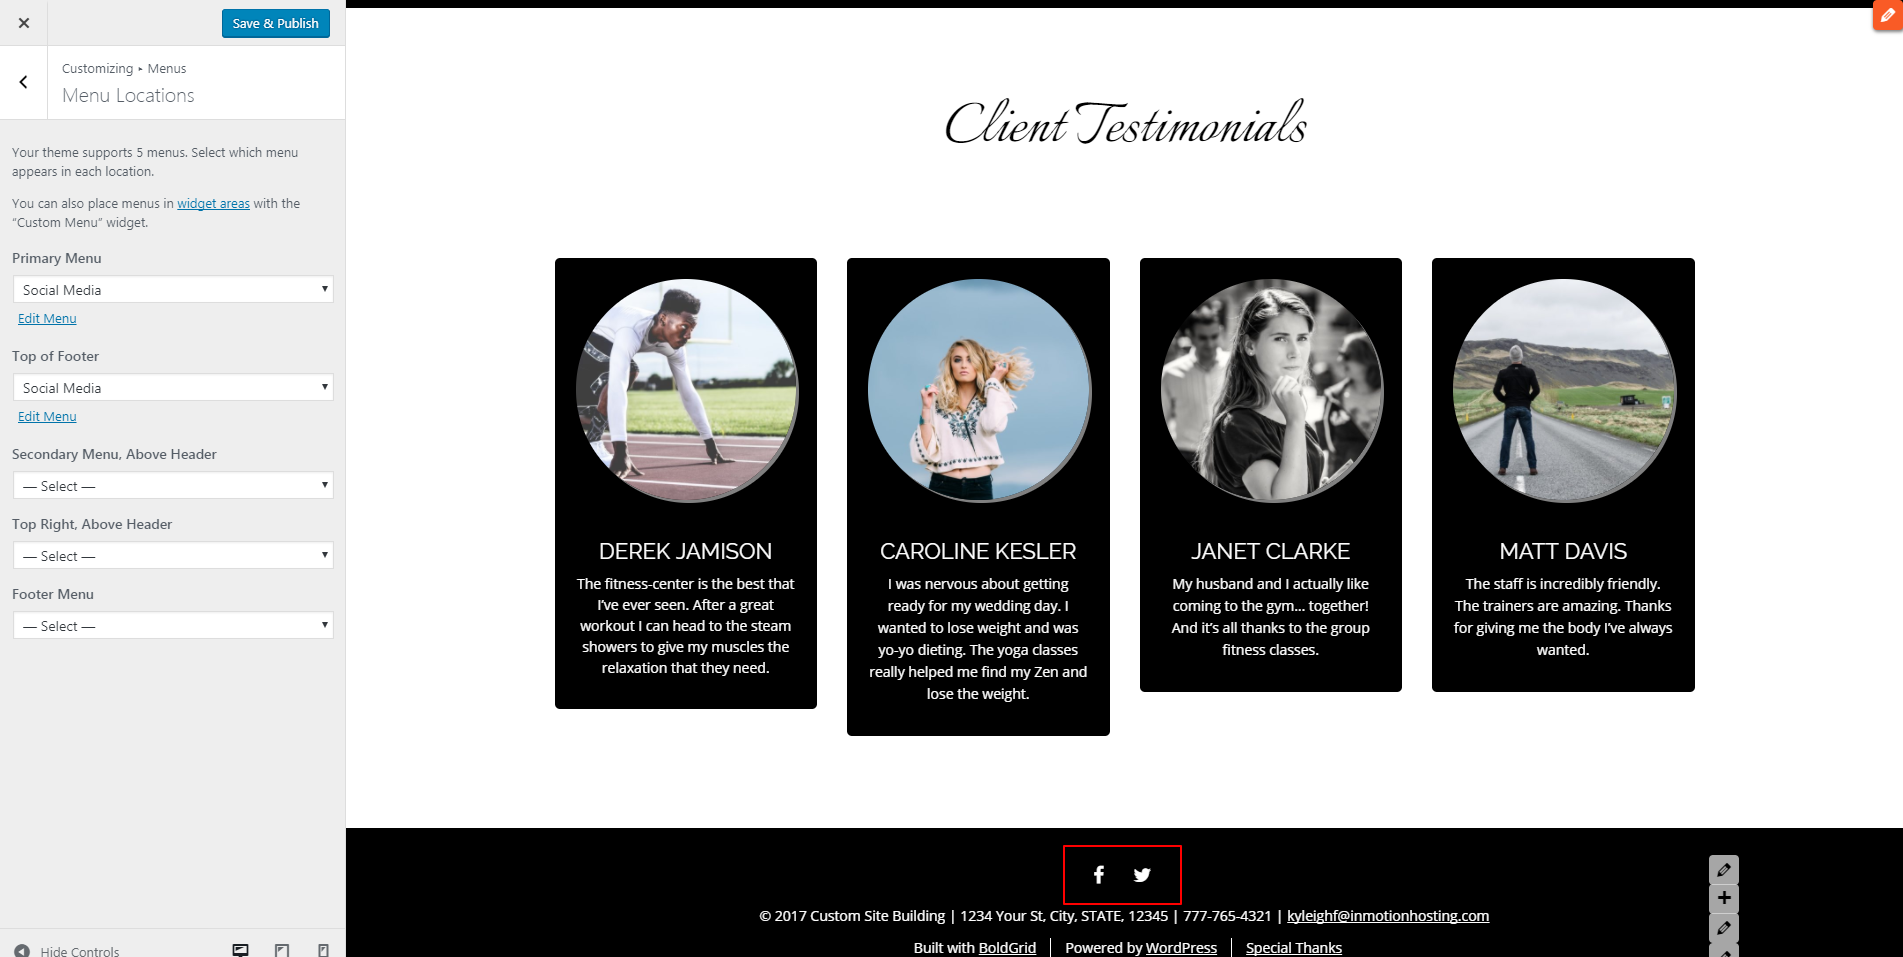 The footer menu will also show across all pages of your site as another place to help guide your visitors through your website. If you have pages or posts that you would like to encourage your audience to share, you can do that by placing the “social media” menu in your Top of Footer menu area.
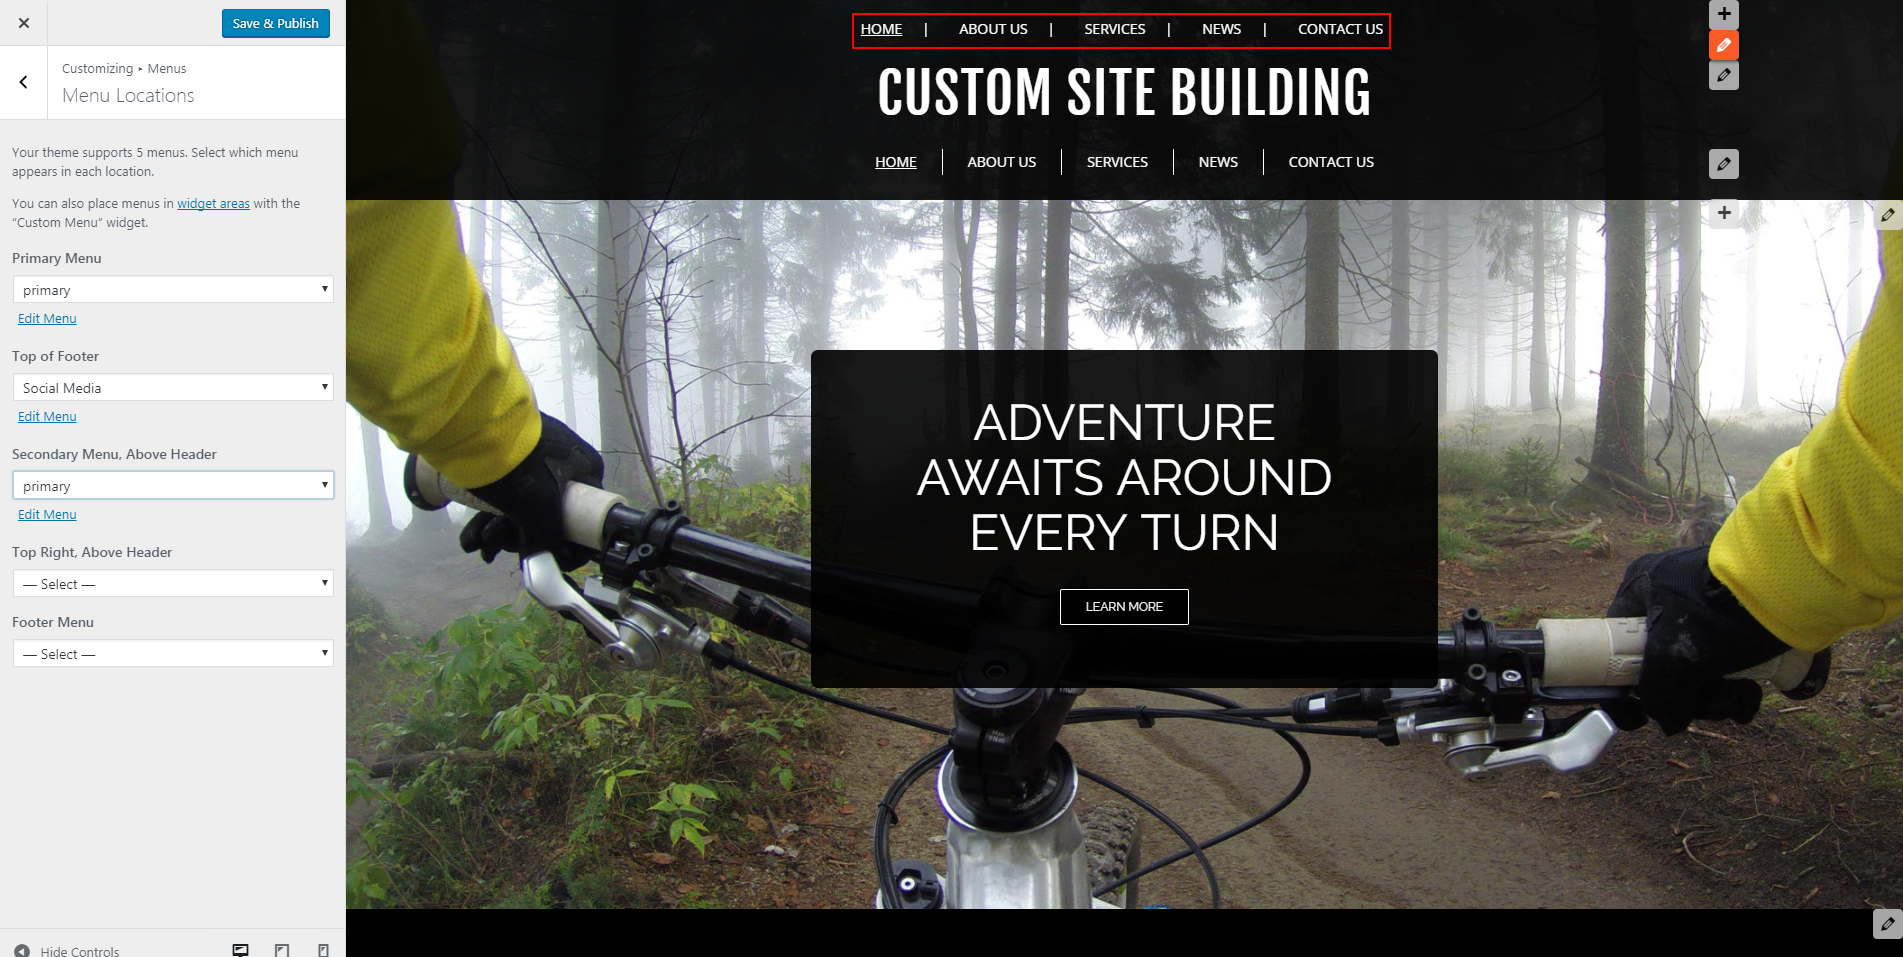
The same two pre-built menu options (“primary” and “social media”) appear under the last three menu locations, as well. “Secondary Menu, Above Header” will place whichever menu you choose directly above the header, as displayed in the following image:
 Below you can see how it looks when you add another menu (“social media”) to the “Top Right, Above Header.”
And, the following displays how “social media” looks at the bottom of your site when you add a “Footer Menu” in addition to the “Top of Footer” social thumbnails we selected earlier.
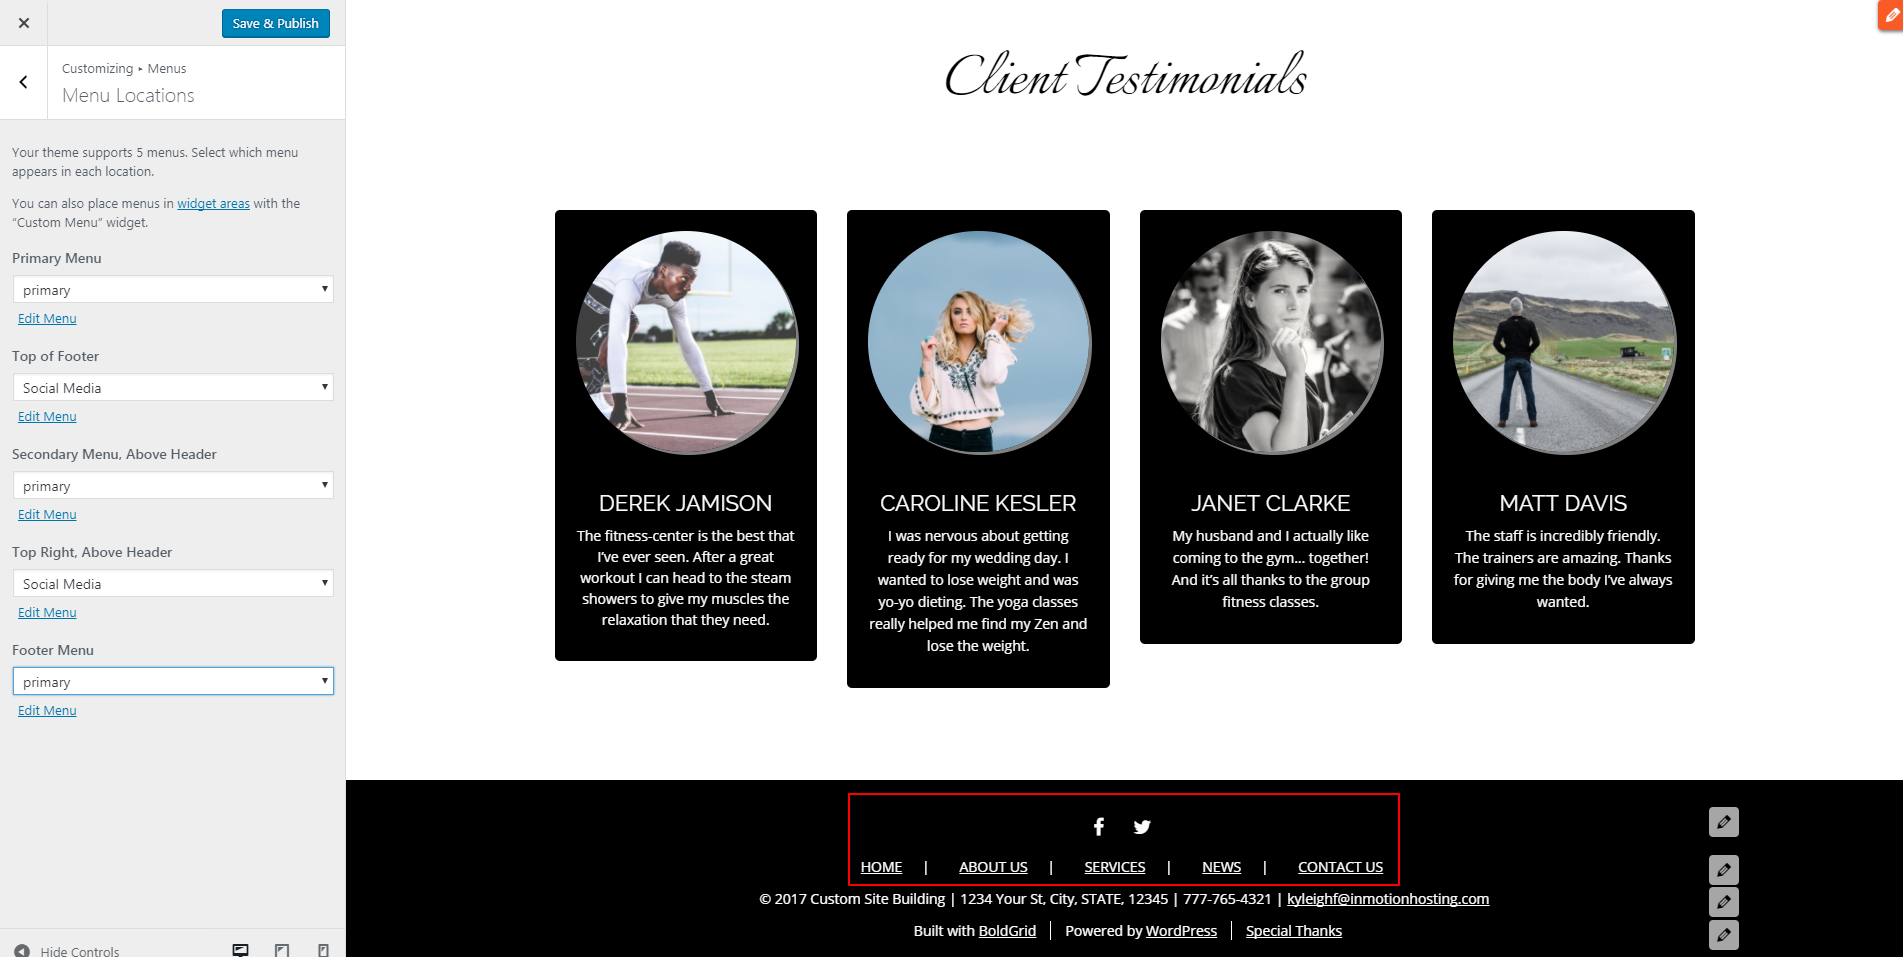 As you can see, if you put too many menus on your page, things can start to get a little messy. Decide which pages you want to prioritize for your users to visit and keep only those as options at the top or bottom of your site’s main navigation.
Customizing Primary and Social Media Menu Options
Click on the left-pointing carrot at the top, next to “Customizing > Menus: Menu Locations” to go back to further customization options for menus.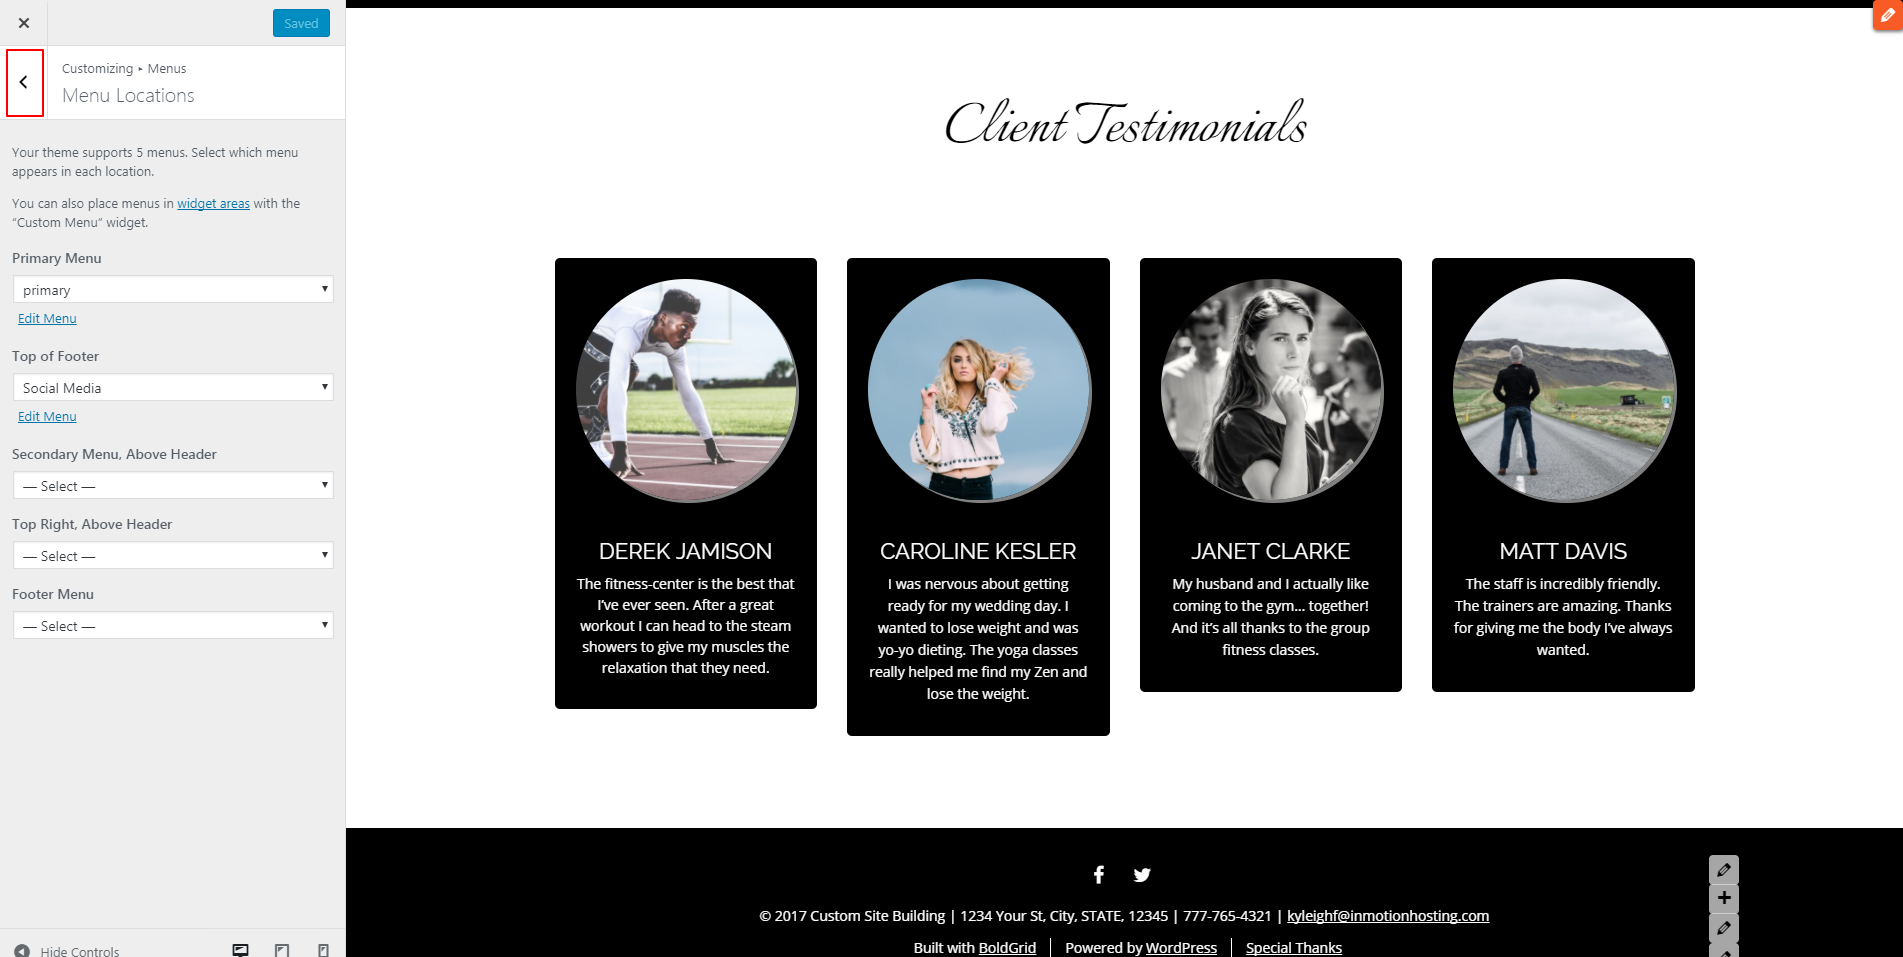 Then choose “primary” to see the page below in your Customizer.
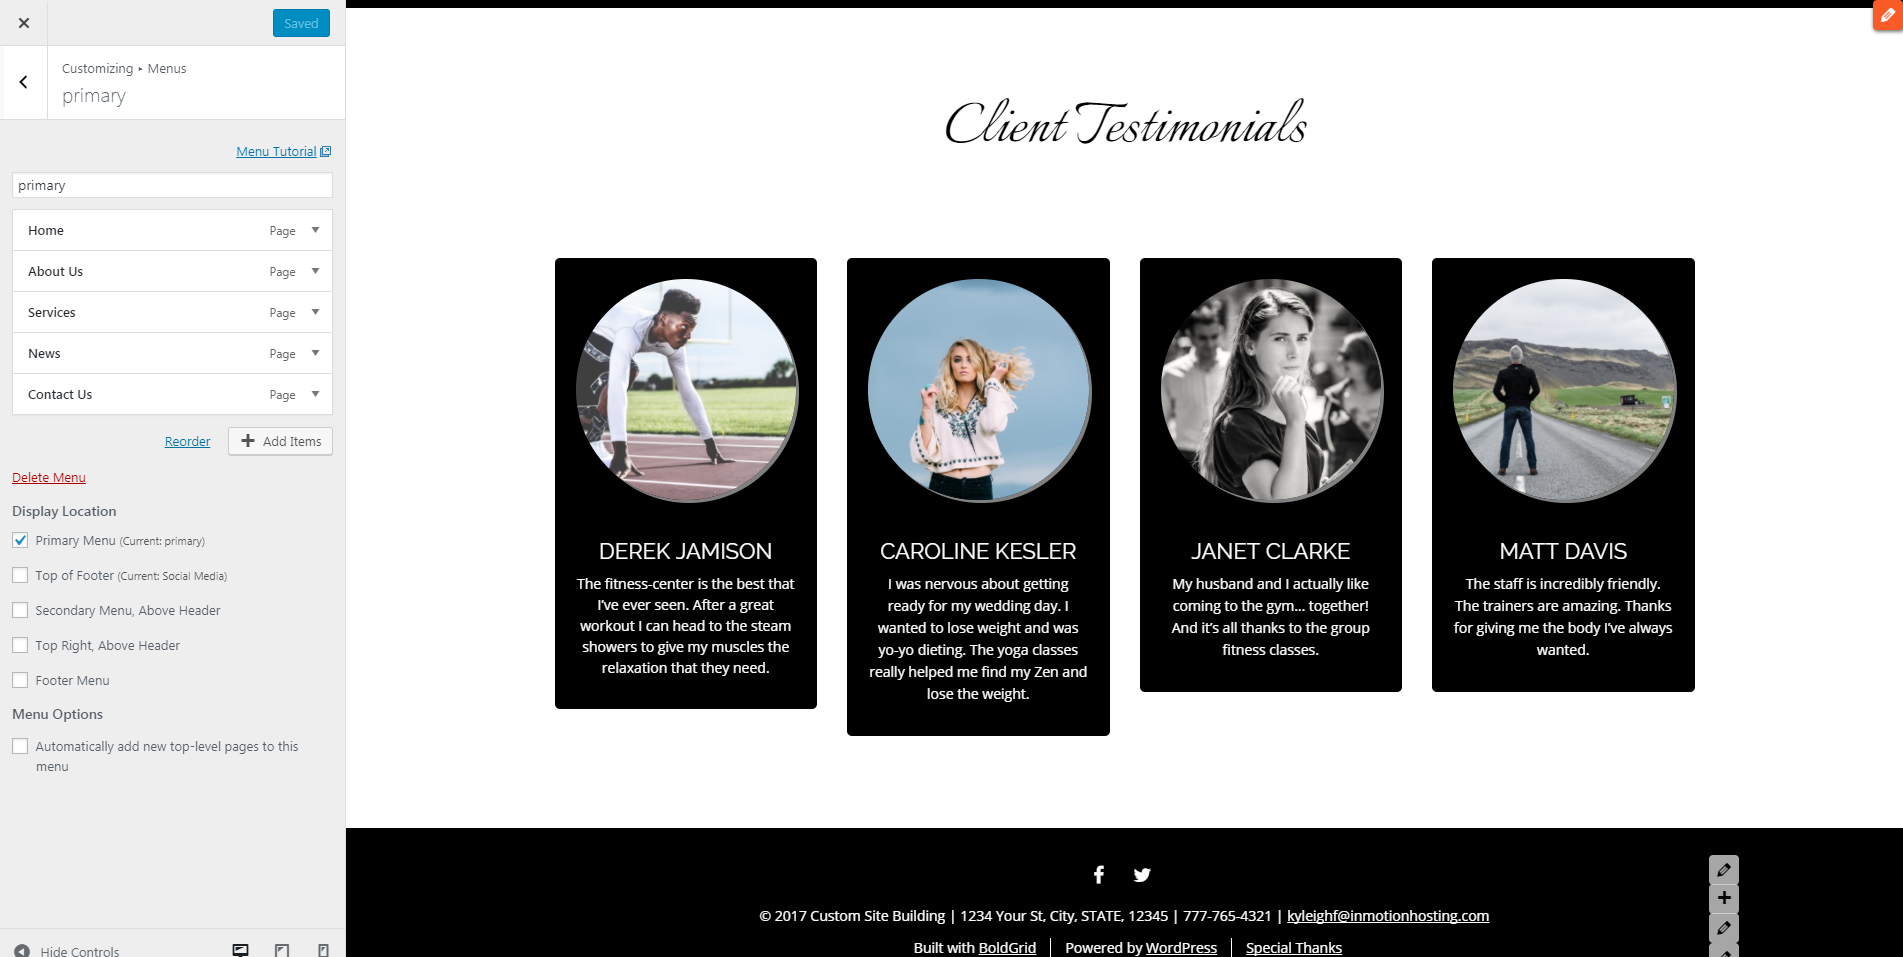 Here you can change the names of the pages in the Primary Menu (i.e., “Home,” “About Us,” “Services,” “News,” and “Contact Us”). When you click on the drop-down carrot next to one of those pages, you will have the option to edit “Navigation Label” and “Title Attribute.” “Navigation Label” affects how the page displays in the main navigation when someone visits your site. “Title Attribute” provides an option to give that page an SEO title attribute to help website crawlers understand the purpose of the page.
Make sure to keep any changes you make to the name of one of these pages relevant to your site’s brand or business. For example, if you have a travel blog, changing “Services” to “Destinations” and designing the page around that topic would make sense. If you change the nomenclature of “Home” to something else, just remember that it will still take them to the main page of your site. If you want to use a different page as your homepage, you will need to make that selection in the WordPress settings menu on the left-hand side of your screen.
You also have the option to “Add Items.” Click on that button to see this submenu:
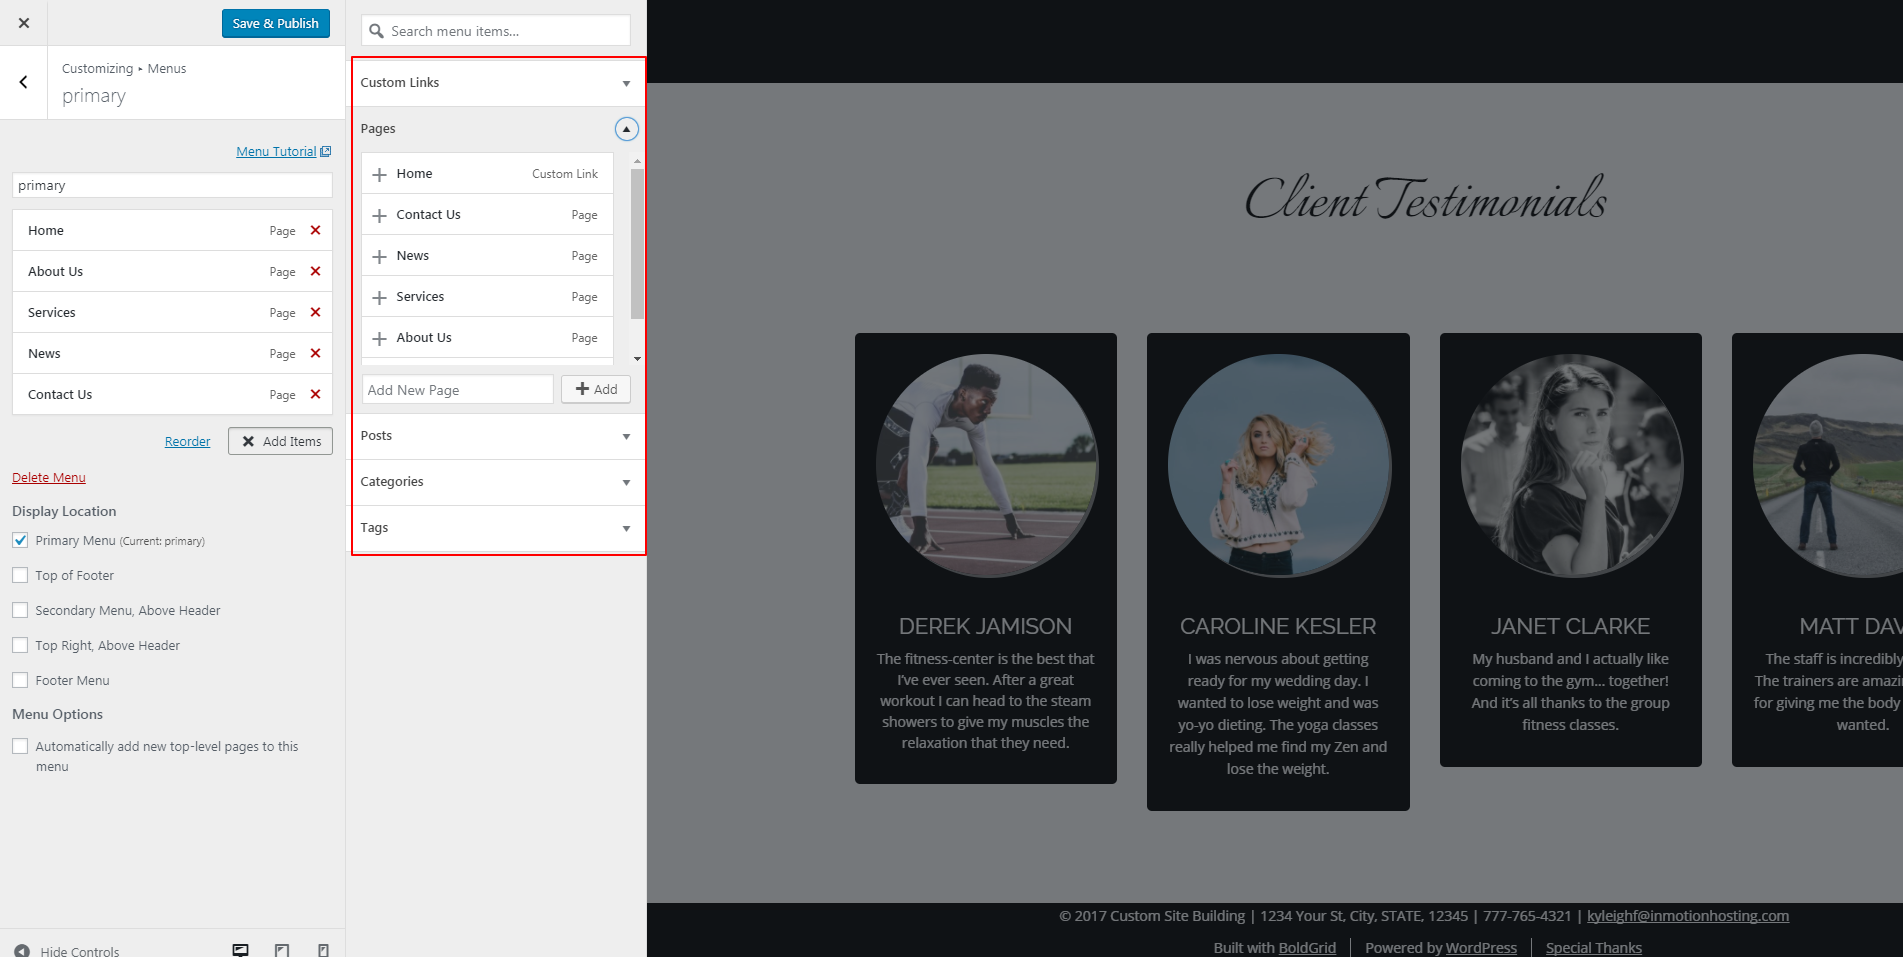 From here you can add more pages to your Primary Menu. By default, the system selects “Pages” when you click on the “Add Items” button. At the bottom of your list, fill in the form with the new page title you like, then click the “+ Add” button.
At the top of this submenu, you can click on “Custom Links” to add an external link with defining text under “Link Text.” For this example, we linked to a fake health food sister company associated with our fitness site.
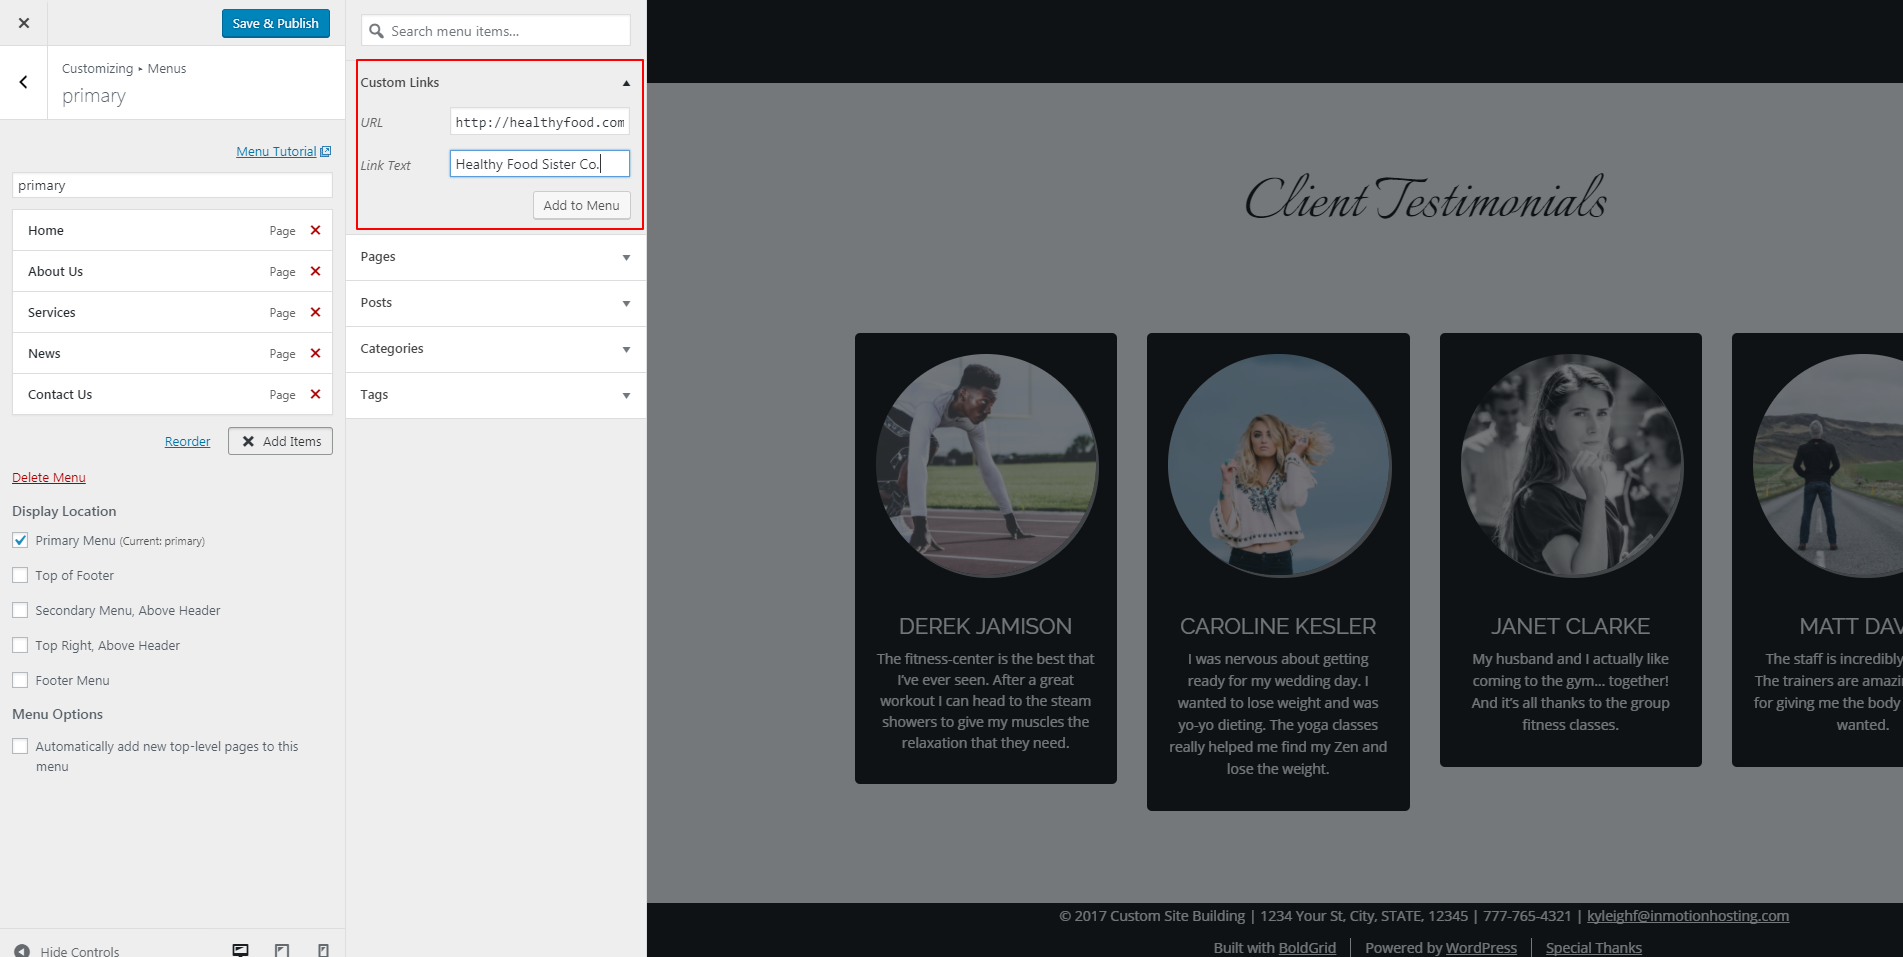 Click “Add to Menu” to see the new addition to the primary menu with the link text you chose.
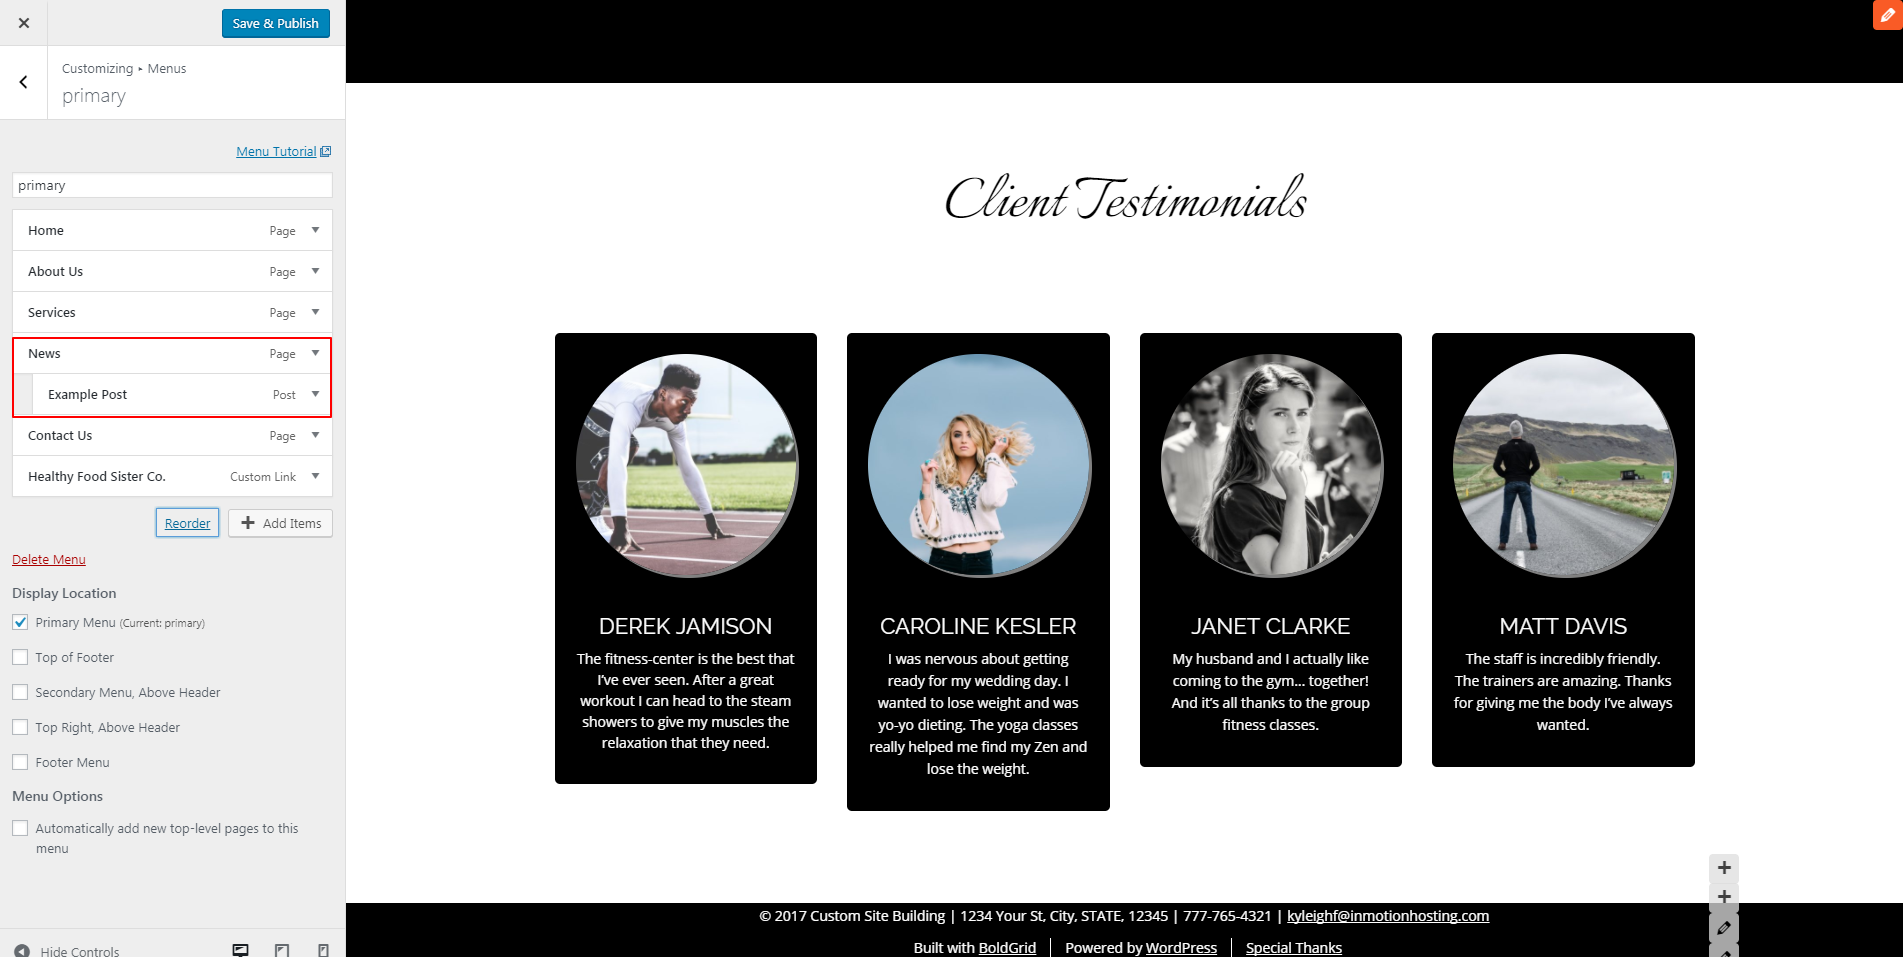
From this submenu, you can also add posts to your Primary Menu or under a Primary Menu page. Click on “Posts” and fill in the form with the title of the post you would like to add or choose from existing posts on your site. Then click “+Add” to add it to the Primary Menu like we have with “Example Post.” If you would prefer this post reside under one of your main Primary Menu pages, drag-and-drop it under the specific page you desire. You will see the post indented to the right to indicate that it will display as an option under that Primary Menu page.
 The last two customization options for the Primary Menu in the Customizer are “Categories” and “Tags.” Categories and tags can help improve your search engine results and serve as another navigational element to your site. You can add them to your Primary Menu, as well, but we suggest setting them up as a single page aligned with the specific content.
Scroll down the left side on your Customizer menu to see a couple more customization options: “Display Location” and “Menu Options.” You can choose the placement of the Primary Menu under “Display Location” here, as well. Just check the box next to one of the destinations to add it to the display screen. If you would like to automatically add any new top-level pages to the Primary Menu, simply check the appropriate box in “Menu Options.”
Social Media Menu Options
Click back on the left-pointing carrot at the top, and then choose “Social Media” to see this page: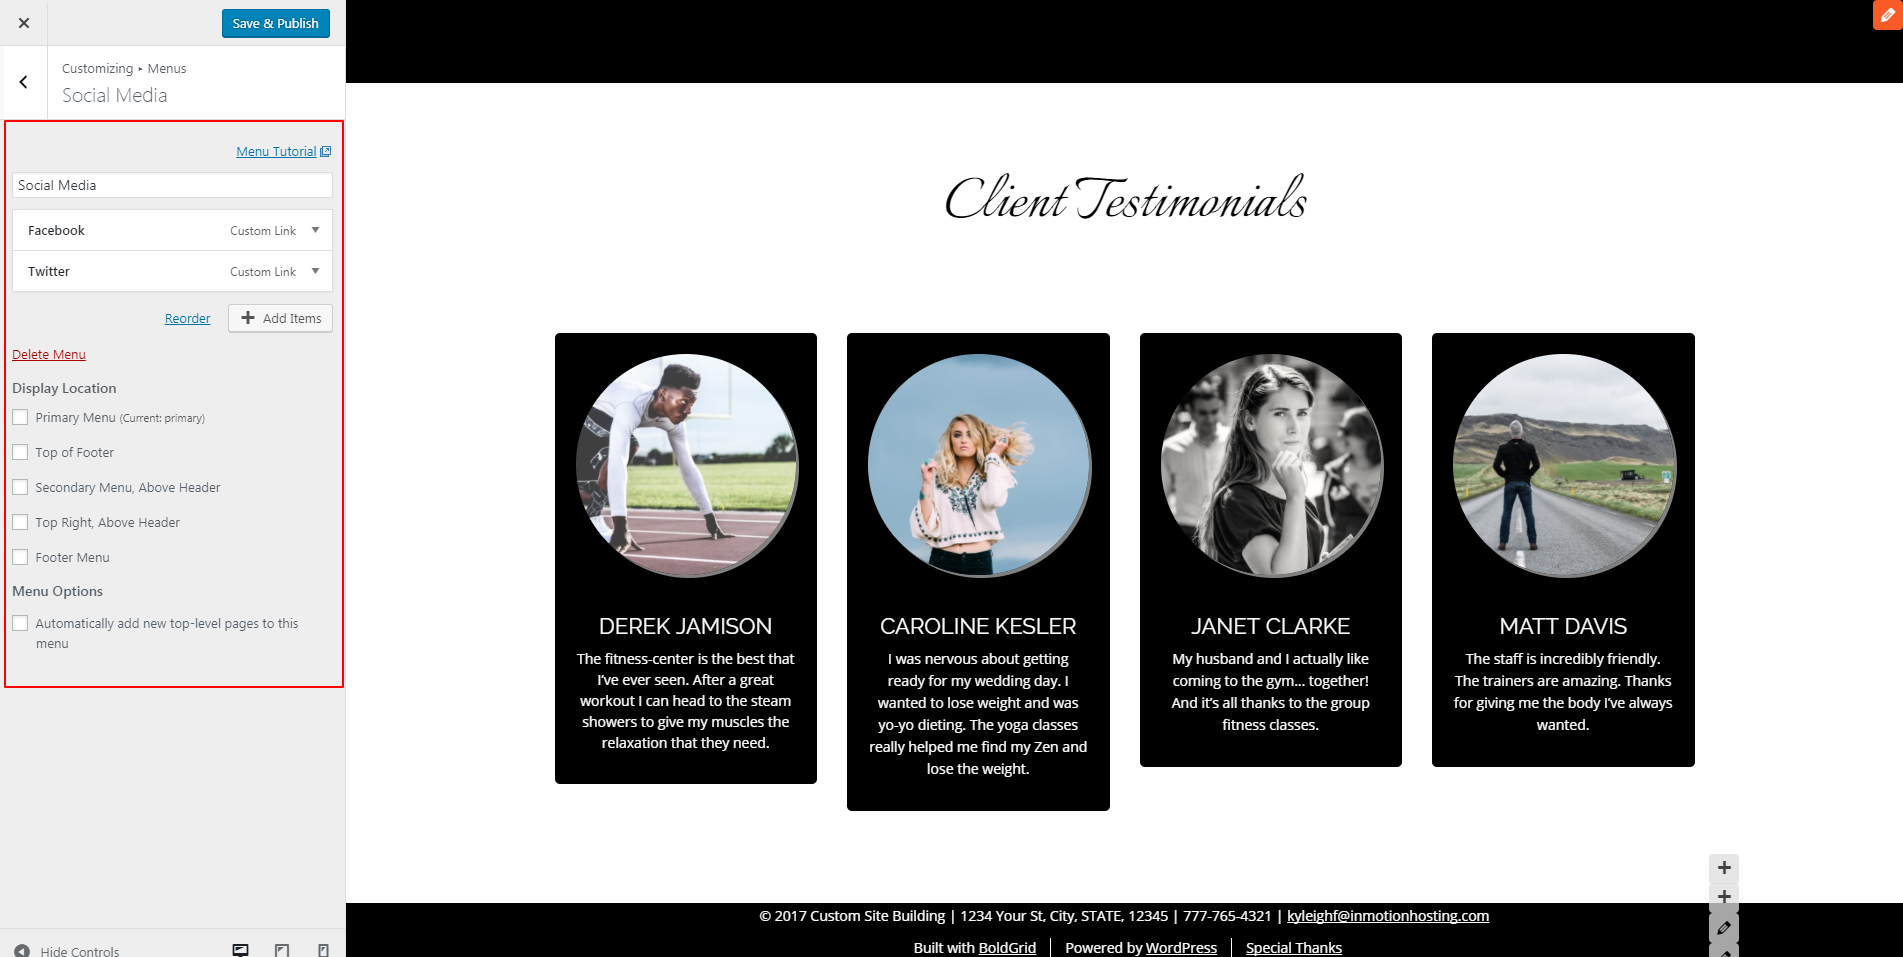 You have the same options in the “social media” submenu in the Customizer as you did in the “primary” menu’s submenu. You will primarily want to focus on “Custom Links” for this menu to add more social media links. For example, if you wish to add an Instagram or LinkedIn account, Custom Links will allow you to add it to your social media menu.
Again, you can add or remove the pre-built “social media” menu to one of the five “Display Locations,” or automatically add new top-level pages from this submenu by checking the appropriate boxes.
When happy with your menus, click “Save & Publish” at the top of the page.