Creating Image Galleries with BoldGrid’s Image Gallery Plugin
BoldGrid Tutorials
Are you a photographer or a travel blogger who would like to share your pictures online? No matter your profession, if you have images you want to share on your website we make that process easy for you. Creating image galleries with BoldGrid’s Image Gallery Plugin for WordPress will show your work in a professional manner without having to become a web designer, too.
 Click “blank page” from the left-center of the page editor to have a clean slate. Then, click the “add media” button next to the orange “add block” button in the top left corner above the toolbar. This will open your media library (as shown below) where you will click “create gallery.”
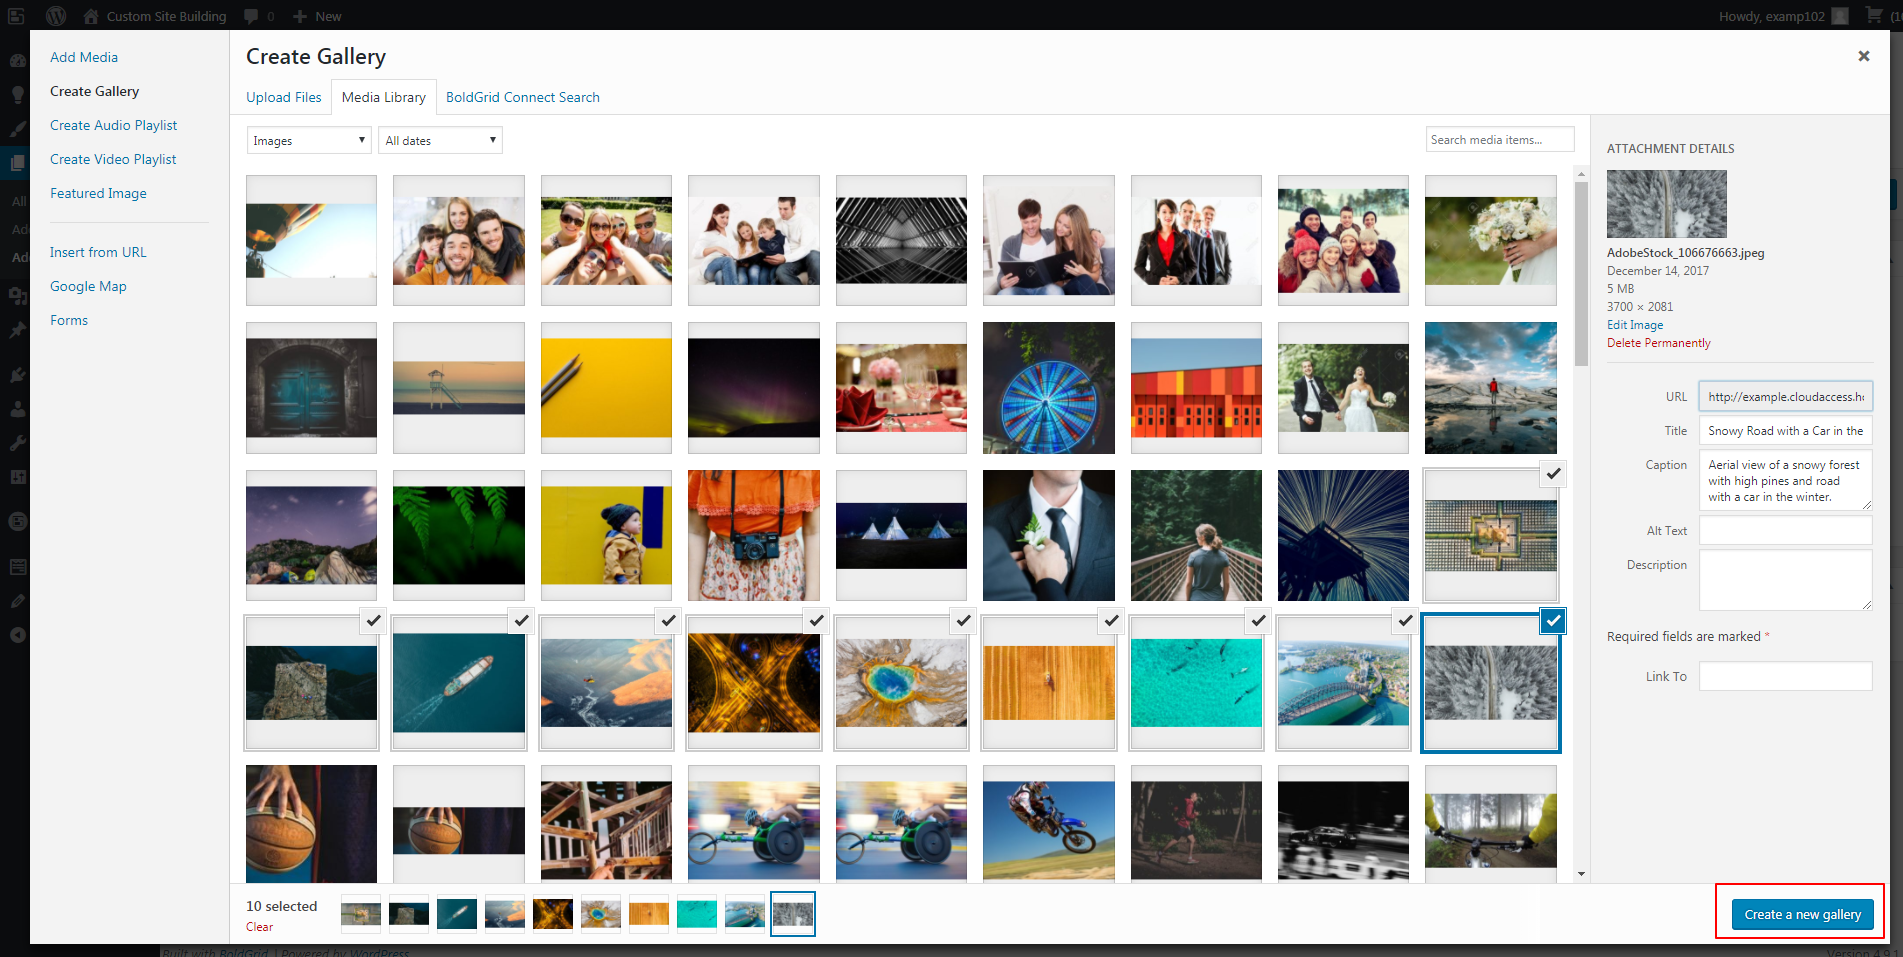
Begin selecting all the images you would like to add to your image gallery. The most recently selected image will have a blue box and check mark surrounding the image. Any previously selected images will be grayed out with the checkmark. When you have selected all the pictures, click “create a new gallery” in the bottom right corner.

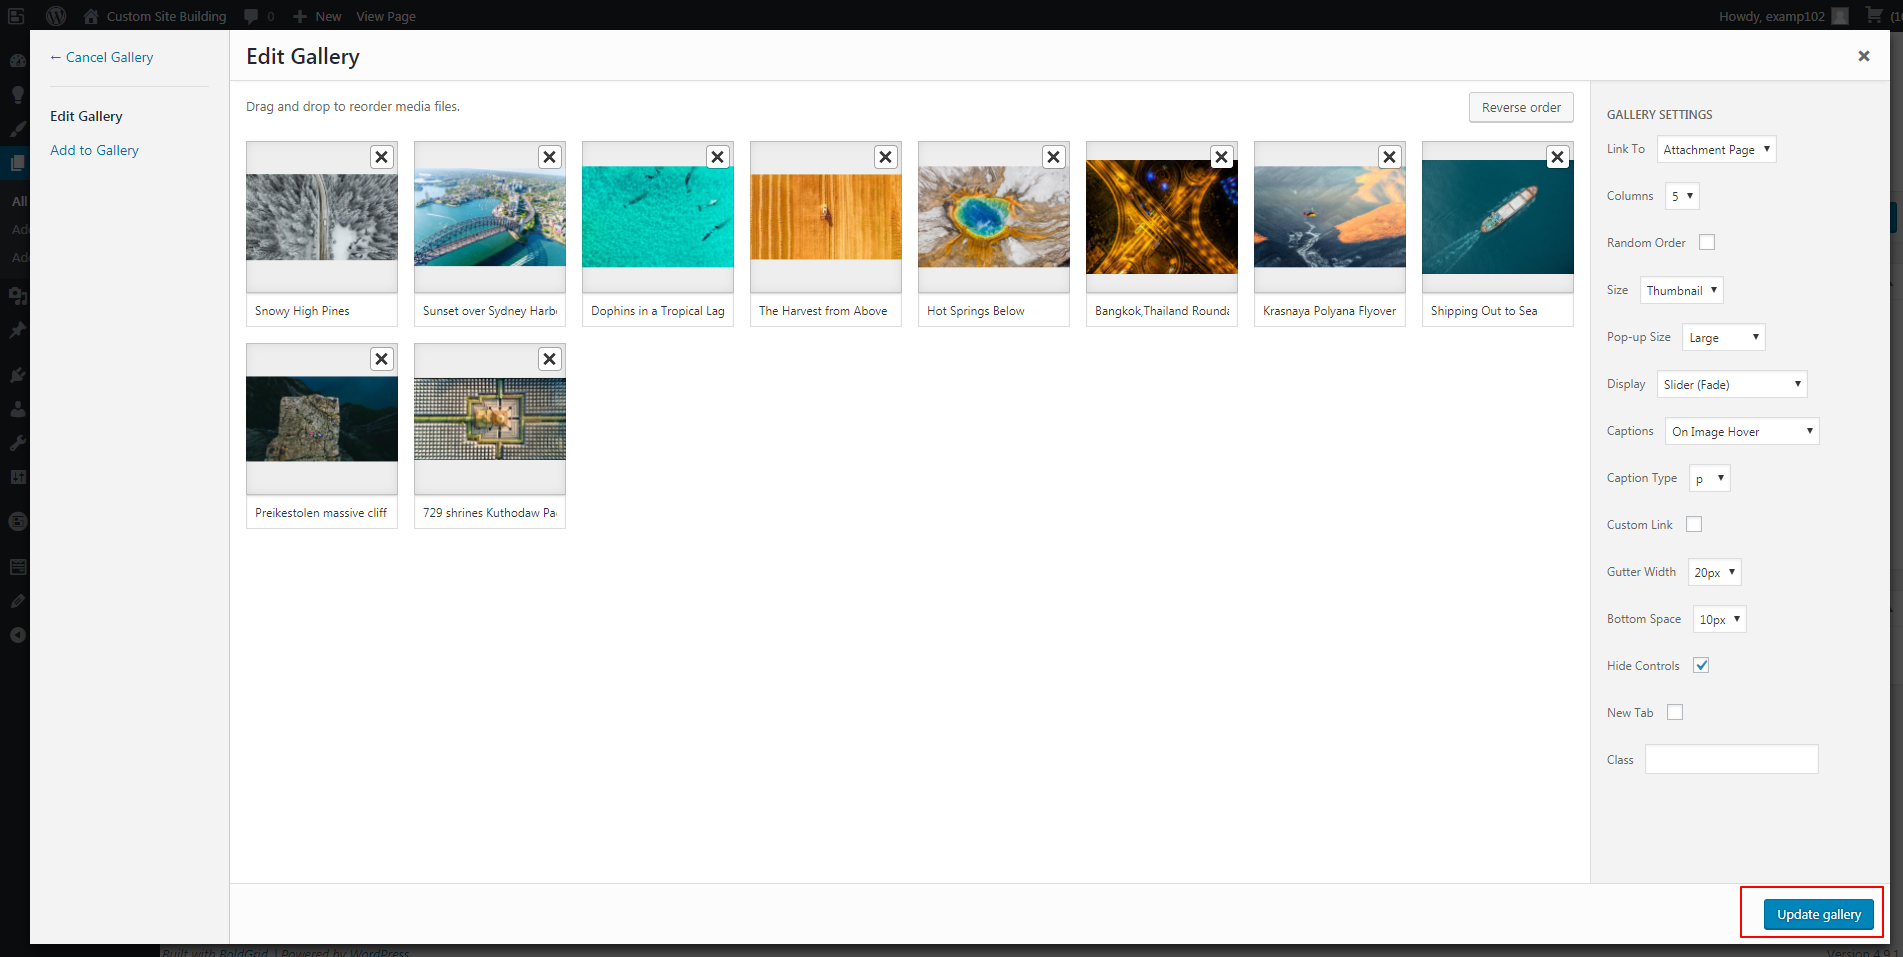
 From this menu, you can edit the caption of the image by clicking on the text below a selected picture. You can easily change the order of the images by simply clicking on “reverse order” in the top right corner.
To the right of the images you will find the “gallery settings” menu. “Link to” has three options for you to link the image gallery: the current page or “attachment page,” a “media file” or to nothing at all (“none”). Depending on the number of images you have, consider how many columns you will need to display them. By default, BoldGrid selects three columns. But, you can have up to nine. Because we have ten images in our example page, we will select five columns by clicking the downward-facing carrot and choosing “5” from the drop-down menu.
If you have not sorted your images into a particular order, you can check the box next to “random order” to sort them arbitrarily. You can change the size of the images as well from thumbnail (default), to medium, large, or full size. “Size” will default to thumbnail (recommended), as that will display well when opening the page. However, to increase the size of images in your galleries use the “pop-up size” option. By default, BoldGrid selects “Large” as the default “pop-up size.” But, we recommend full size for images with high pixel counts that have great detail.
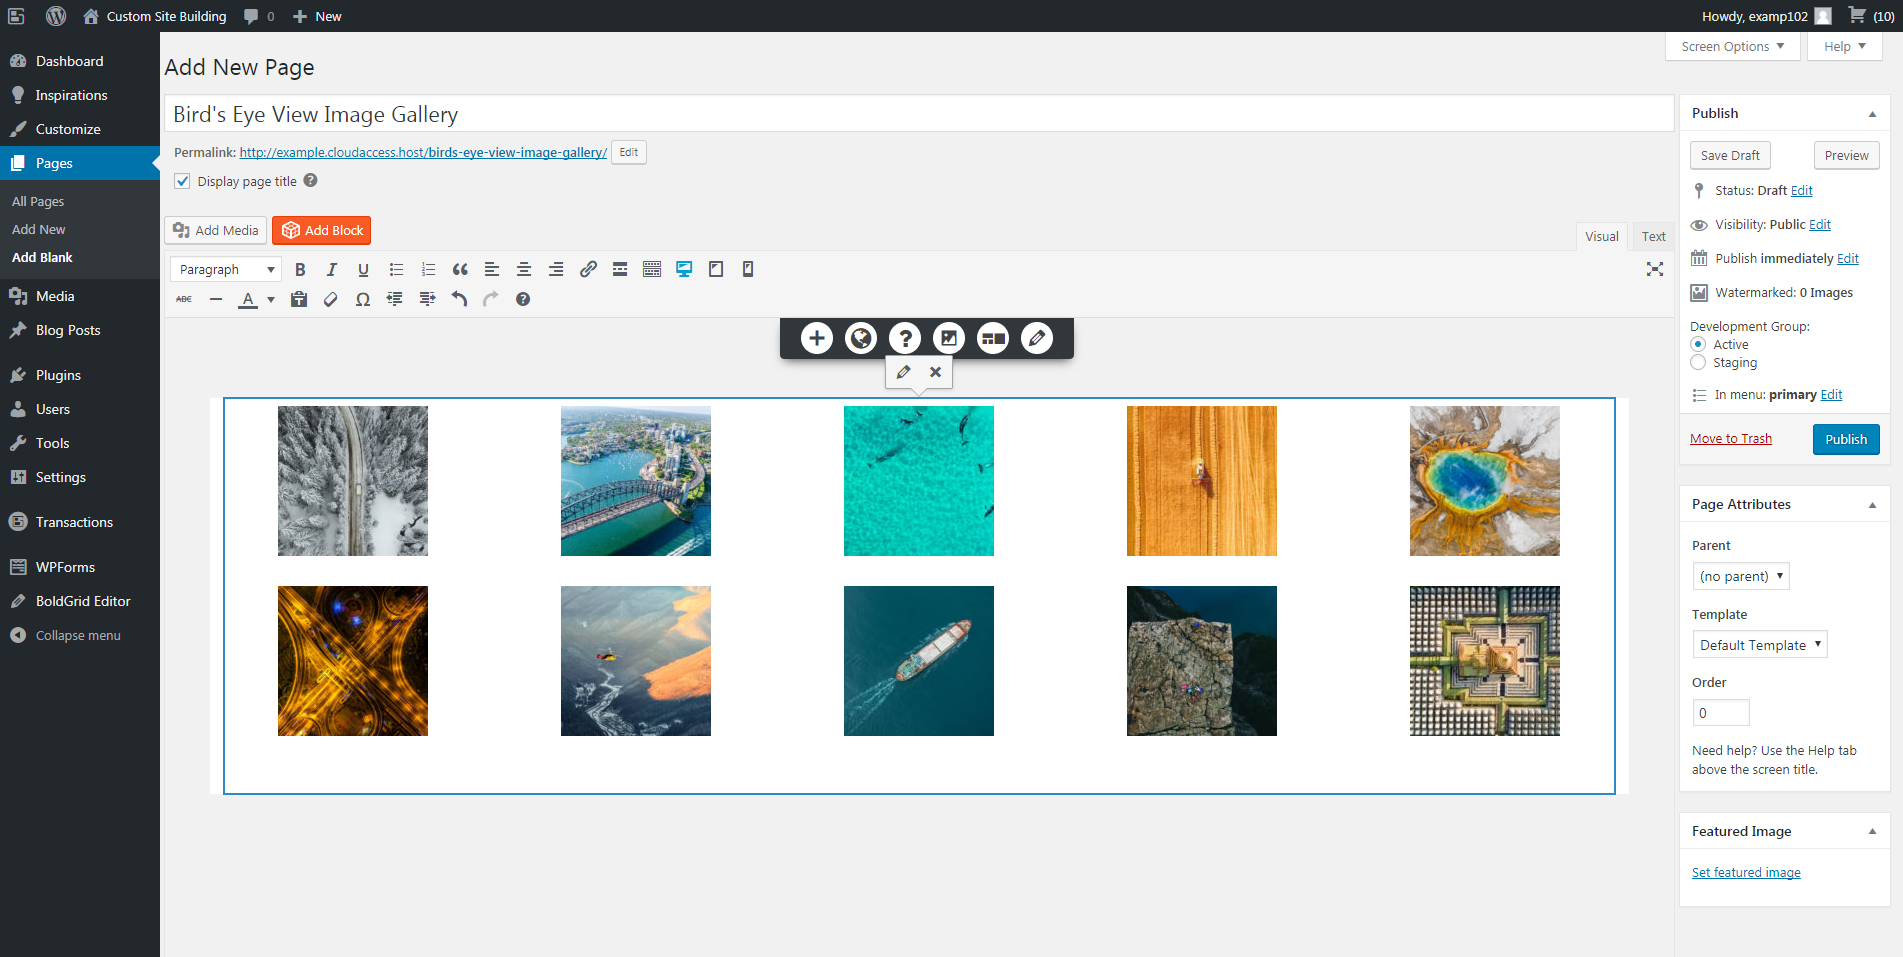
The “display” setting choices include: “masonry,” “slider(fade),” “slider(slide),” “slider(slide auto start),” “slider(fade auto start),” and “coverflow.” Masonry creates a grid layout, similar to Pinterest, and demonstrated in the below example.
 Slider(fade) will show your first image only, with others stacked beneath it in the gallery. It will fade to the next image in the gallery when a user clicks on the arrow. As a result, you should carefully consider the order of your images.
Slider(slide) will also display only the first image, but instead of fading to the next picture it will slide to it with a click on the arrows. Slider(slide auto start) and slider(fade auto start) also have similar looks and functions to the above options, but start the slideshow on their own without user interaction.
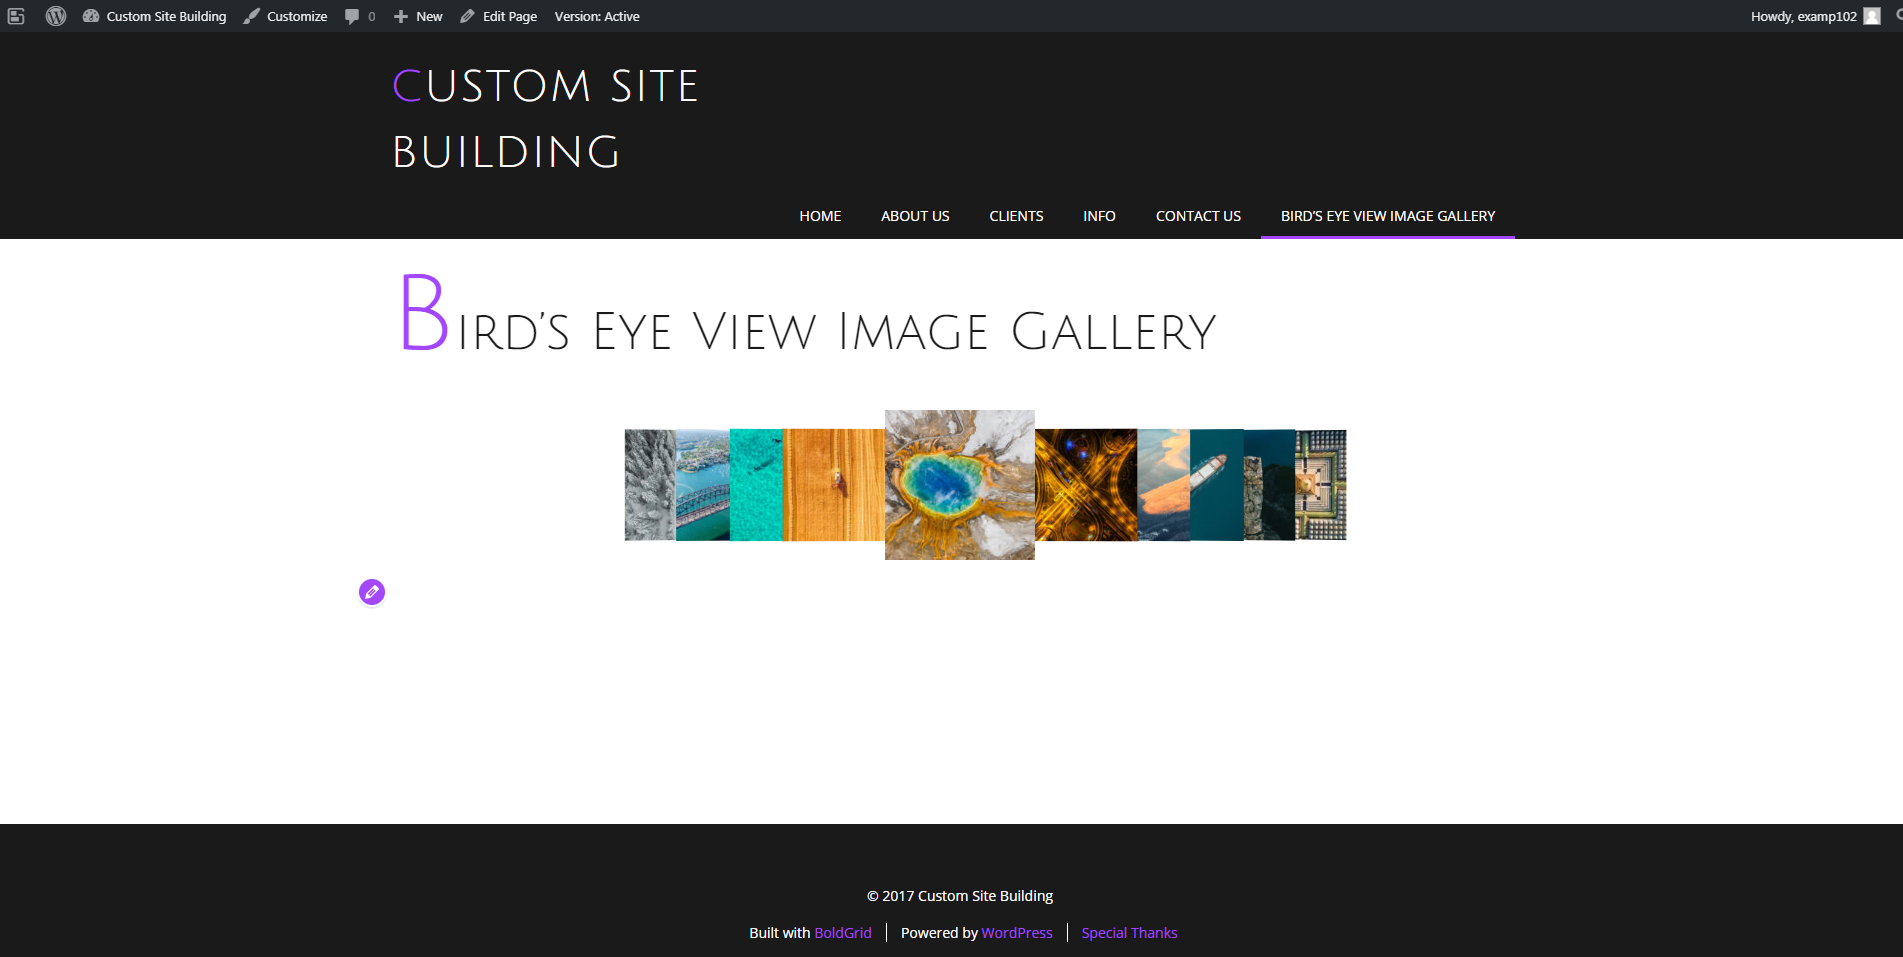
Coverflow will display all the images in a row, slightly over top of one another, in a carousel layout. You simply click on the image instead of an arrow to view. Look below for a visual of this format.
 Other Image Gallery Options
The display you choose will change the other settings options in the gallery editor, but we will note a few. “Captions” on images have five options: “on image hover,” “show below image,” “show on image,” “show on image pop-up,” or “hide” the caption altogether. For SEO purposes, you can choose to style the “caption type” as either a paragraph (“p”) or a header (“h1-h6”). For image captions, we suggest paragraph as the style.
If you would like to make this image gallery a “custom link,” just click the white box next to that setting. “Gutter width” defines the space between the images from side to side. “Bottom space” describes where you can increase or decrease the space above or below images.
“Hide controls” will remove the arrows on either side of slide displays. “New tab” just opens your image gallery in another web browser tab by clicking the white box.
Finally, if you want to help identify the class of this gallery for SEO purposes, we suggest writing it in the box next to “class.” Just type “gallery” (or something similar) to help crawlers identify it.
When you are done customizing your gallery settings, click “update gallery” in the bottom right corner.
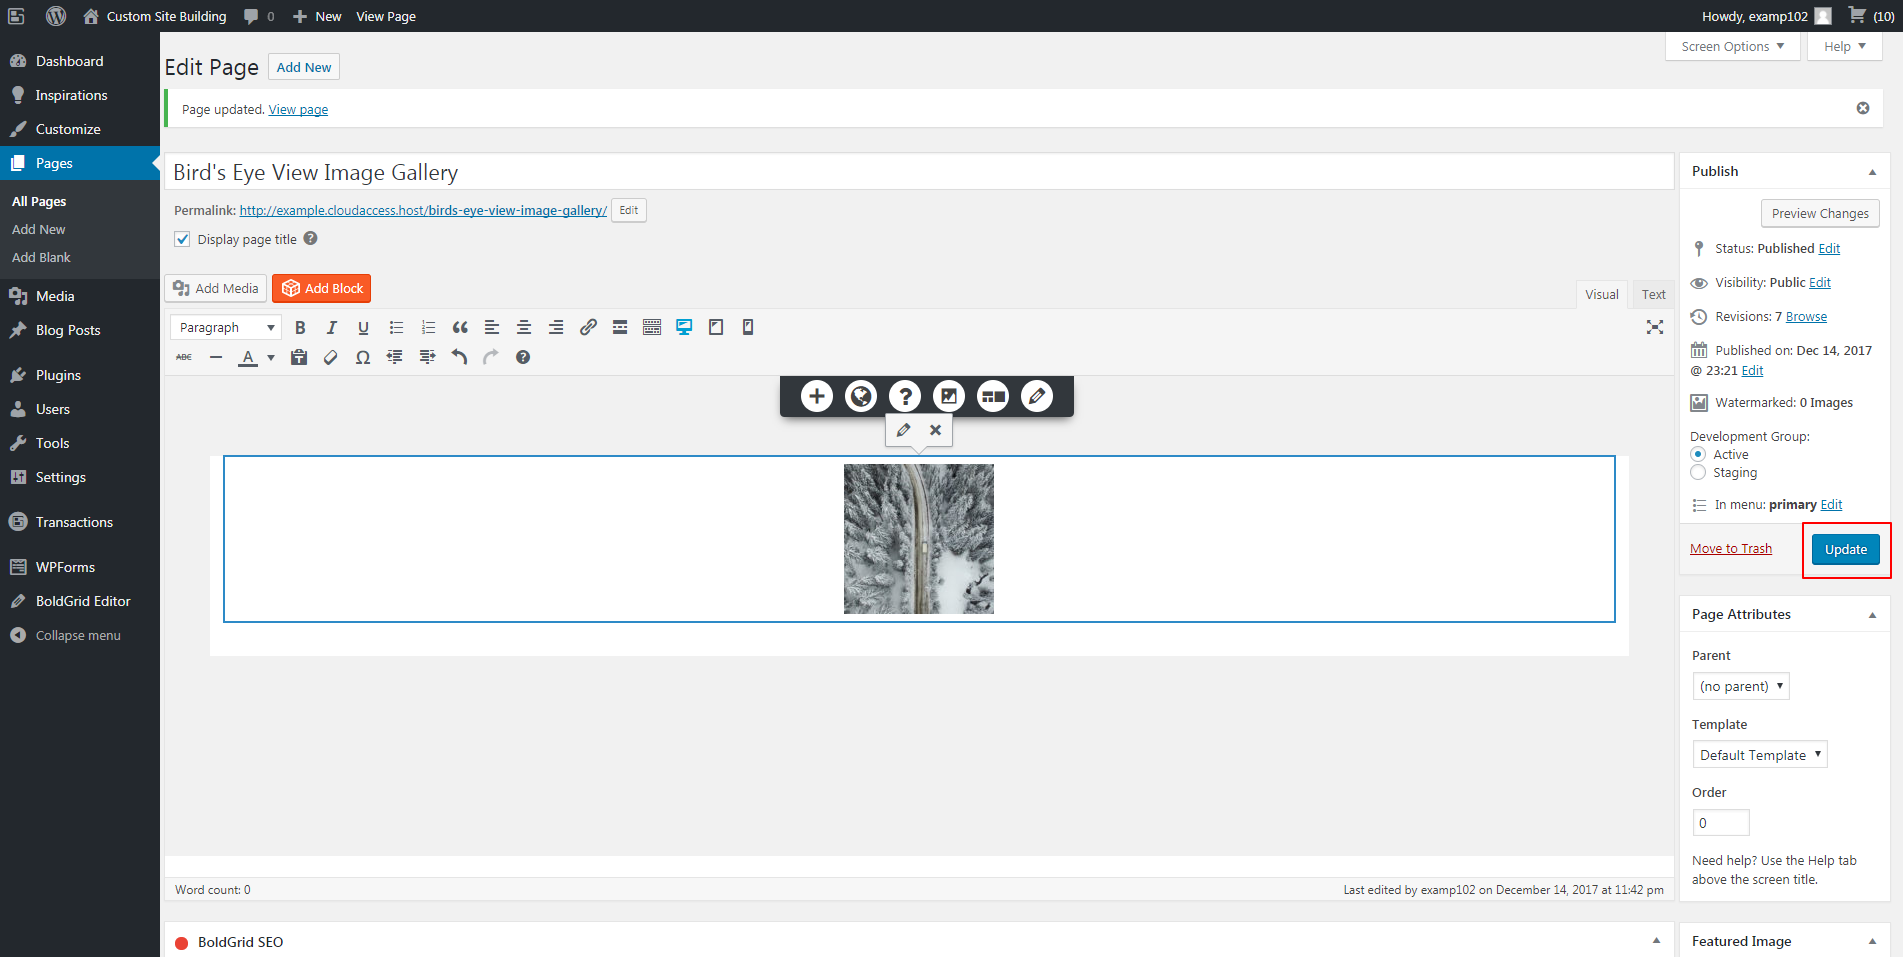
 Doing so takes you back to the Page Editor where you simply click the blue “update” button towards the top right. Next, click “preview changes” to see how your new gallery will look on your site.
 If you have a site or would like to build one to show off your photographic work quickly and easily, then get started creating image galleries with BoldGrid’s Image Gallery Plugin today!
Create Your Image Gallery Page
Start by logging into your WordPress website to view your dashboard. Then, click or hover over “pages” and select “add new.” Next, add a blank page and give it a title.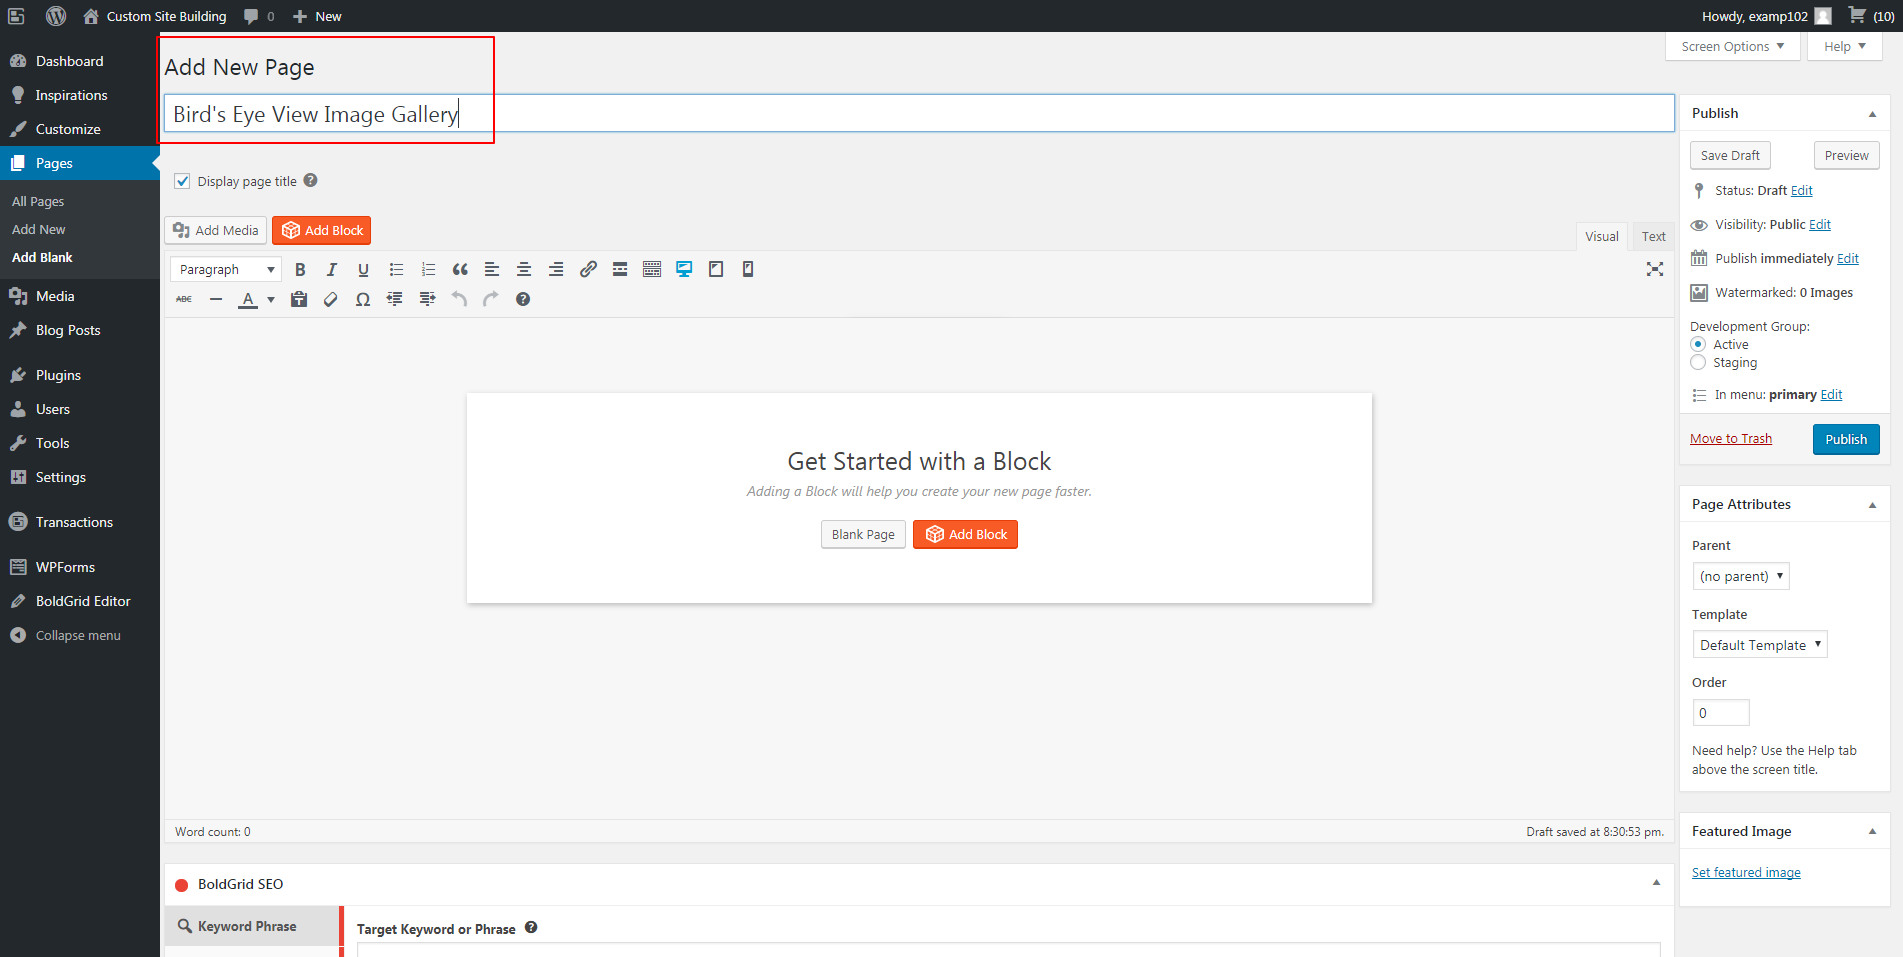 Click “blank page” from the left-center of the page editor to have a clean slate. Then, click the “add media” button next to the orange “add block” button in the top left corner above the toolbar. This will open your media library (as shown below) where you will click “create gallery.”
Begin selecting all the images you would like to add to your image gallery. The most recently selected image will have a blue box and check mark surrounding the image. Any previously selected images will be grayed out with the checkmark. When you have selected all the pictures, click “create a new gallery” in the bottom right corner.
Editing Your Image Gallery with BoldGrid
Now you can begin editing the gallery using the available options.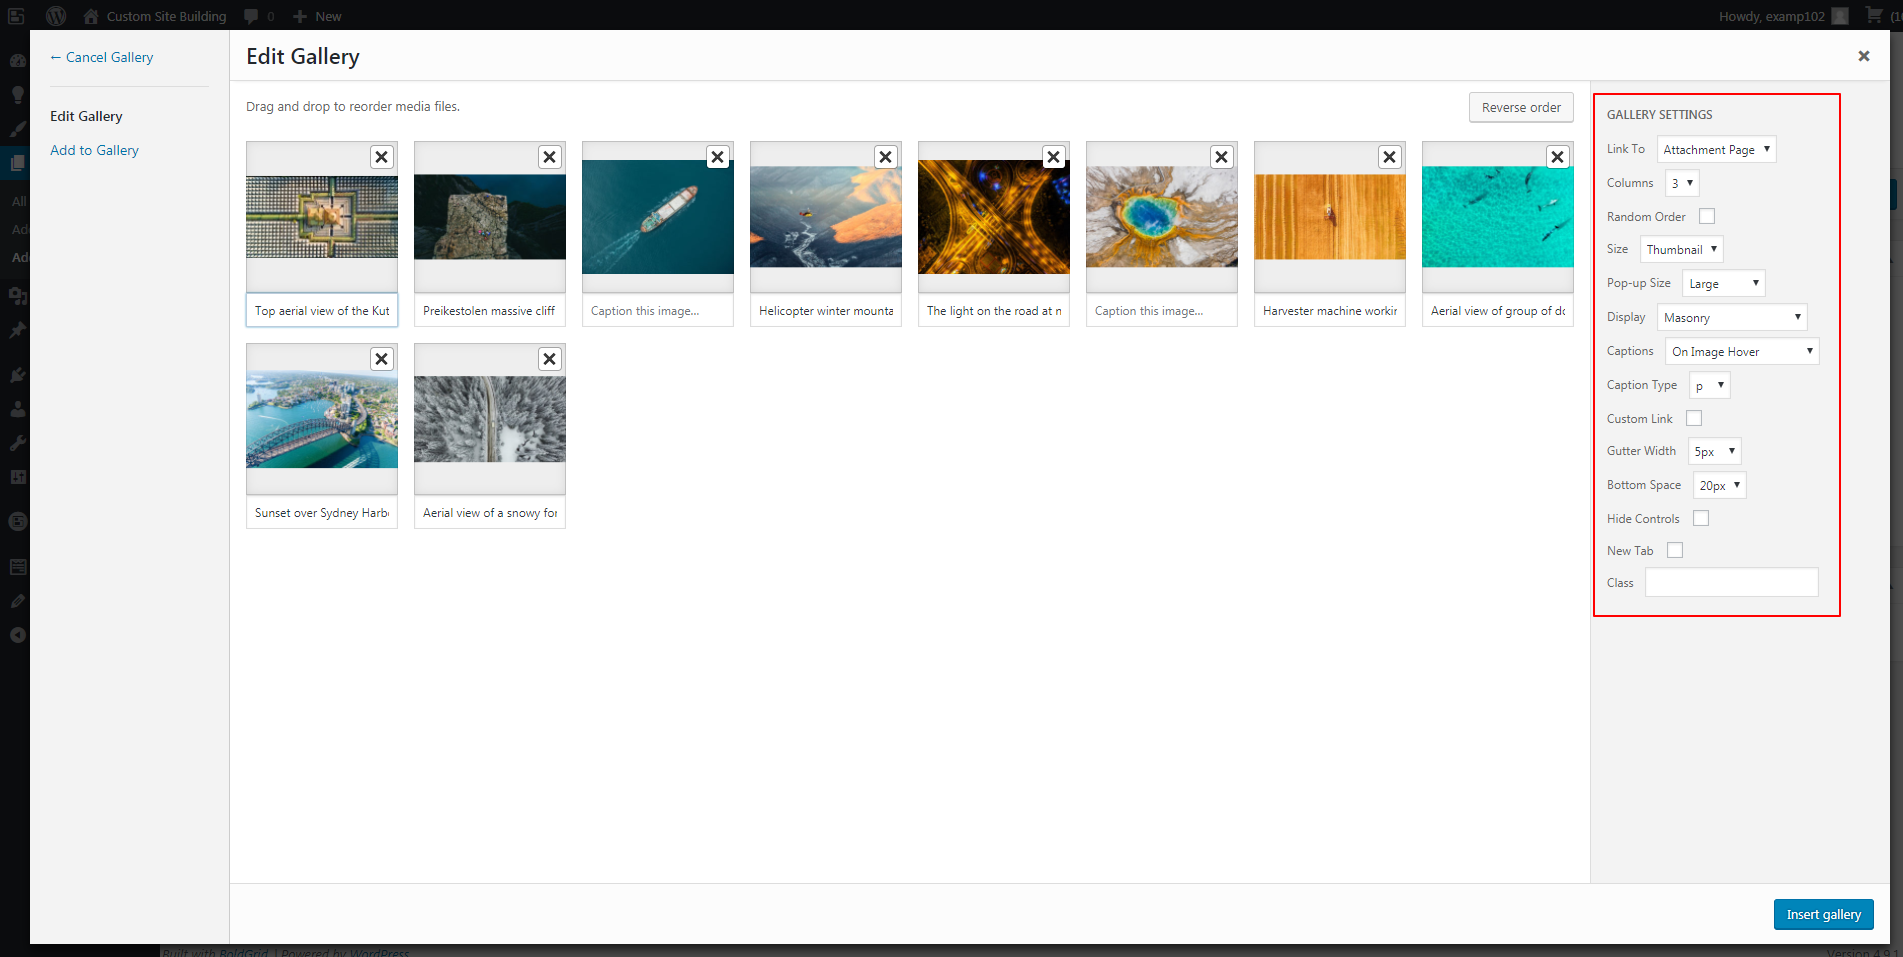 From this menu, you can edit the caption of the image by clicking on the text below a selected picture. You can easily change the order of the images by simply clicking on “reverse order” in the top right corner.
To the right of the images you will find the “gallery settings” menu. “Link to” has three options for you to link the image gallery: the current page or “attachment page,” a “media file” or to nothing at all (“none”). Depending on the number of images you have, consider how many columns you will need to display them. By default, BoldGrid selects three columns. But, you can have up to nine. Because we have ten images in our example page, we will select five columns by clicking the downward-facing carrot and choosing “5” from the drop-down menu.
If you have not sorted your images into a particular order, you can check the box next to “random order” to sort them arbitrarily. You can change the size of the images as well from thumbnail (default), to medium, large, or full size. “Size” will default to thumbnail (recommended), as that will display well when opening the page. However, to increase the size of images in your galleries use the “pop-up size” option. By default, BoldGrid selects “Large” as the default “pop-up size.” But, we recommend full size for images with high pixel counts that have great detail.
 Slider(fade) will show your first image only, with others stacked beneath it in the gallery. It will fade to the next image in the gallery when a user clicks on the arrow. As a result, you should carefully consider the order of your images.
Slider(slide) will also display only the first image, but instead of fading to the next picture it will slide to it with a click on the arrows. Slider(slide auto start) and slider(fade auto start) also have similar looks and functions to the above options, but start the slideshow on their own without user interaction.
Coverflow will display all the images in a row, slightly over top of one another, in a carousel layout. You simply click on the image instead of an arrow to view. Look below for a visual of this format.
 Other Image Gallery Options
The display you choose will change the other settings options in the gallery editor, but we will note a few. “Captions” on images have five options: “on image hover,” “show below image,” “show on image,” “show on image pop-up,” or “hide” the caption altogether. For SEO purposes, you can choose to style the “caption type” as either a paragraph (“p”) or a header (“h1-h6”). For image captions, we suggest paragraph as the style.
If you would like to make this image gallery a “custom link,” just click the white box next to that setting. “Gutter width” defines the space between the images from side to side. “Bottom space” describes where you can increase or decrease the space above or below images.
“Hide controls” will remove the arrows on either side of slide displays. “New tab” just opens your image gallery in another web browser tab by clicking the white box.
Finally, if you want to help identify the class of this gallery for SEO purposes, we suggest writing it in the box next to “class.” Just type “gallery” (or something similar) to help crawlers identify it.
When you are done customizing your gallery settings, click “update gallery” in the bottom right corner.
 Doing so takes you back to the Page Editor where you simply click the blue “update” button towards the top right. Next, click “preview changes” to see how your new gallery will look on your site.
 If you have a site or would like to build one to show off your photographic work quickly and easily, then get started creating image galleries with BoldGrid’s Image Gallery Plugin today!