This article is a comprehensive guide on how to use the Post and Page Builder, a free WordPress Page Builder plugin. By the end of this article you will know how each control works, making it easy to modify starter content or Blocks, or make entirely unique page layouts from scratch.
Adding engaging content is the most important aspect of building a WordPress website. This content usually takes the shape of either text or images. There is also the task of ensuring all your content is laid out properly. You want to be sure it flows correctly and works well together so your users have a good experience when on your website.
Working with a good WordPress page editor can help tremendously, and the Post and Page Builder by BoldGrid gives you a fast, easy way to create professional pages for all your content.
How to Use the Post and Page Builder
The Post and Page Builder uses the grid system Bootstrap for content organization. While reading this guide we recommend you follow along with your own content – you can add a BoldGrid Block to your page if needed. This will help ensure you see all the controls we are discussing.
This is a high level overview of the content organization structure, and in the next section of this article we will go into more detail on what each of these mean.
- A Section is the largest container and can contain one or more rows
- A Row is the next largest container and can contain one or more columns
- Each Column can contain an element, or be empty
- Examples of Elements are text, images, and buttons
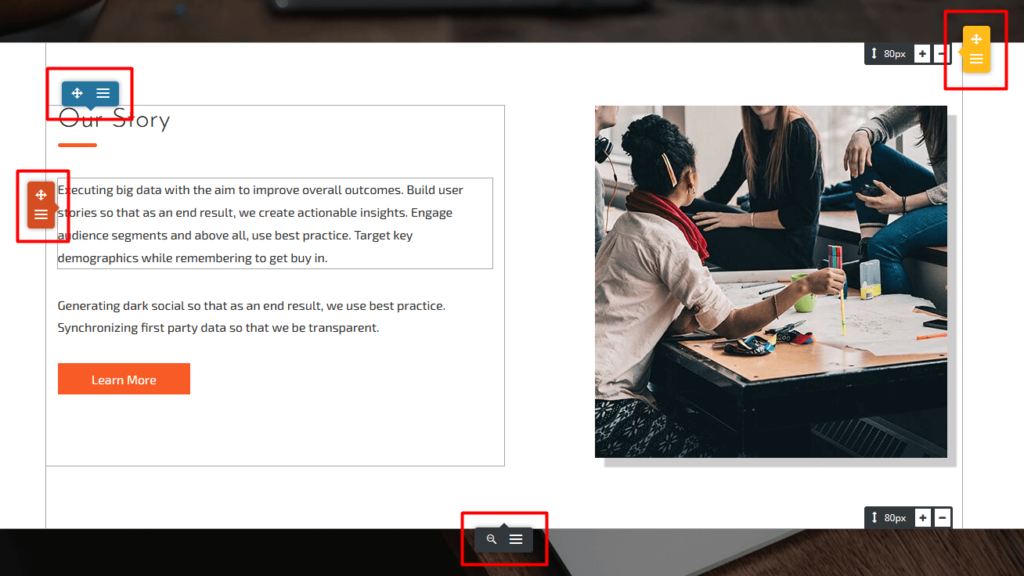
BoldGrid makes it easy to use this grid system by adding extra controls that appear on hover, called Drag Handles or Popovers. Once you click into the section you want to work with, these popovers will appear.
- Black is for a section, it is found at the bottom
- Yellow is for a row, it appears in the upper right
- Blue is for a column, it appears at the top of the column its currently controlling
- Orange is for a specific element that exists within a column, in this example its selecting the text paragraph
- On the upper and lower right sides there are Directional Arrows change the row height
Content Organization
Sections > Rows > Columns > Elements
 Sections are the outermost area.
Sections are the largest containers and are referred to as Blocks in the Post and Page Builder. Within a container, there may be one or more rows, columns, and elements.
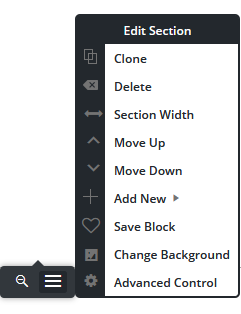
Sections have a black popover at the bottom with two buttons. The left Magnifying Glass icon takes you to a screen that allows you to drag the sections up and down your page, rearranging the page any way you want in seconds. The right button brings up a menu that allows you to perform tasks related specifically to that section. Learn more about working with sections.
| Clone | Creates a duplicate of the existing section. |
|---|---|
| Delete | Removes the entire section and all its content. |
| Section Width | Choose between a fixed container or full-width so the content touches the sides of the screen. |
| Move Up | Swaps the section with the one above it. |
| Move Down | Swaps the section with the one below it. |
| Add New | Hovering here will give you two options – add a new row to the current section, or add an entirely new section. |
| Save Block | Saves the section as a Block in your Block Library. |
| Change Background | Brings up the background panel to use a color, image, or pattern. |
| Advanced Control | Adjust padding, margin, border, animation, and more. |
Sections > Rows > Columns > Elements
 Rows are inside of sections.
Rows are the first layer of content inside a section. There can be one or more rows within a section, and each row can contain one or more columns. Rows can be moved vertically up and down within the section they are located.
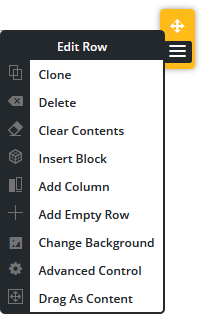
Rows are controlled by yellow drag handles. The drag handle contains two buttons. The top one is a movement handle. Click and hold your mouse left mouse button to drag the row where you want within the section. The lower button has a menu with several configuration options for that row. Learn more about working with rows.
| Clone | Creates a duplicate of the existing row. |
|---|---|
| Delete | Removes the entire row and all its content. |
| Clear Contents | Removes all content but does not remove the row itself. |
| Insert Block | Opens the Add Block screen |
| Add Column | Adds an additional column inside the row. Be sure to adjust on all screen sizes. |
| Add Empty Row | Adds a new empty row above the current row, in the same section. |
| Change Background | Brings up the background panel to use a color, image, or pattern. This background will only be applied to this specific row. |
| Advanced Control | Adjust padding, margin, border, animation, and more. |
| Drag as Content | Drag and drop the row inside a column, making what’s called a Nested Row. |
Sections > Rows > Columns > Elements
 Columns are inside of rows.
Columns are the next level of content that reside inside a row. A row can have one or more columns. Columns contain one or more elements, or can be left empty if the design calls for it. Columns can be moved horizontally within its row.
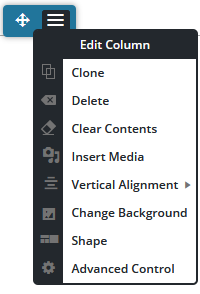
Columns are controlled by the blue drag handles. The left button is the directional button – clicking your left mouse button and holding it will allow you to drag the column left or right, swapping it out with the ones next to it. The other button has a menu with other options for you to configure the column. Learn more about working with columns.
| Clone | Creates a duplicate of the existing column. |
|---|---|
| Delete | Removes the entire column and all its content. |
| Clear Contents | Removes the content but does not remove the column. |
| Insert Media | Opens the Media Library to select or upload an image |
| Vertical Alignment | Sets the alignment of the column to either top, center, or bottom of the row. This alignment is relative to the content in the rest of the columns in the row. |
| Change Background | Brings up the background panel to use a color, image, or pattern. This background will only be applied to this specific column. |
| Shape | Style this column with a shape, examples are shown below. |
| Advanced Control | Adjust padding, margin, border, animation, and more. |
Sample Column Designs
The Post and Page Builder comes with over 30 Column Shapes for you to select from, or click the orange Customize Design button to modify any starting design to be uniquely yours.
Some shapes will span the entire width of the column, so backgrounds of two columns touch, and some have space on either side so the background is contained. Since the WordPress editor will update in real time, it’s easy to try different design settings to see what works.

Sections > Rows > Columns > Elements
 Elements are inside of columns.
Elements are the innermost level of content and live inside a column, and each column can have as many elements as you need. Example elements are text, buttons, icons, and images.
Columns are controlled by the orange drag handles. The top button is a directional button that allows you to click and drag the element where you want it. The bottom button has a menu with configuration options specific to the element.
If the element is a nested row, a third option is shown – a down arrow. Clicking this down arrow will focus the editor on the nested row to enable you to work with the inside columns.
How to Add Page Elements
Now that you understand how the content is organized, the next step in learning how to use the Post and Page Builder is working with actual content. The editor is drag and drop so you can easily move content around as needed.
When adding or editing page elements you will use the black toolbar above the Visual Editor, what we call the DropTab.
The available options in the DropTab will change based on where your cursor is. If you are in an empty section you will see 4 icons – a + sign, globe (global options – will depend on your theme), question mark (ways to get help), and a picture (sets the section background).
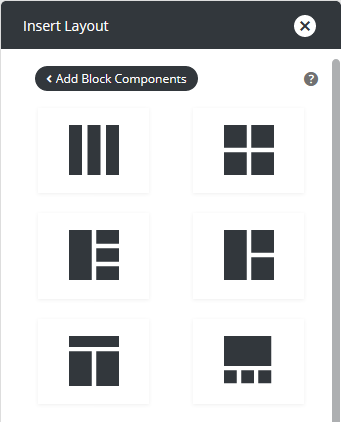
To add a new page element, click the + sign to open the Add Block Component panel. Below the image is a short explanation of each Block Component.

Layout and Formatting
- Block opens the Add Block screen where you will find an endless supply of professionally designed BoldGrid Blocks
- Layout opens starter Grid Layouts, as shown below
- Section adds a new empty section to the top of the screen
Design
- Blockquote adds a text section, stylized by the theme
- Button opens the Button Design panel
- Divider opens the Horizontal Line panel
- Icon opens the Change Icon panel
- List creates an unordered list
- Content and Section Sliders are Premium elements and will only be visible if the Post and Page Builder Premium plugin is activated
Media
When you select the type of Media you want to use, click the + sign to add it to the top of the page or click and hold the Four-way Arrow to drag and drop into a specific location
- Audio opens Create Audio Playlist screen
- Embed opens the Insert from URL screen
- Gallery opens the Create Gallery screen
- Image opens the Add Media screen
- Map opens the Google Map screen
- Video opens the Create Video Playlist screen
Widgets
When you select your desired Widget, click and hold the Four-way Arrow to drag and drop into a specific location or
- click the + sign to add it to the top of the page.
- The standard WordPress widgets, including Post List, Single Post, Recent Comments, and Categories are now available from the Editor
- Additional plugins will add new widgets, such as weForms and WooCommerce
How to Update Page Content
To modify an existing element on your page or post, first click your mouse on the item to wish to change. The available options in the DropTab will change based on what was clicked. All icons are listed below, but it’s impossible to have them all show in the DropTab at once.
![]()
- The Image icon sets the Background for the current area – on an element, column, row, or section
- The Layout icon opens the Column Shape panel
- The T icon opens the Text Setting panel
- The Gear icon opens a design popup based on the element clicked (icons or buttons for example)
- The Camera icon opens the Media Library
- The Magic Wand icon opens the Image Filters panel
- The Line icon opens the Horizontal Line panel
- The Pencil icon opens the Google Map screen
- The Divider icon opens the Shape Dividers panel
- The Horizontal Line icon opens the Span panel
Working with Colors
The Post and Page Builder includes a palette of up to 6 saved colors that can be used to style elements in the editor. If you are using a BoldGrid theme, this color palette is set in the Customizer. If you are using a non-BoldGrid theme, you can set the palette from the editor.
Congratulations!
You have completed the intro guide on how to use the Post and Page Builder by BoldGrid. Next, you may want to learn the difference between padding and margin to learn about these advanced controls.
SIGNUP FOR
BOLDGRID CENTRAL
200+ Design Templates + 1 Kick-ass SuperTheme
6 WordPress Plugins + 2 Essential Services
Everything you need to build and manage WordPress websites in one Central place.
Juan says:
Hi,
I have a Premium Key, but still have blocks that say Premium Only, and I cannot use them.
Thank you
Brandon says:
Hi Juan,
Thanks for reaching out and thank your for your recent upgrade to BoldGrid Post and Page Builder premium!
In addition to the new Connect Key you received you should also see a new Post and Page Builder Premium plugin available from the “Plugins” section of your BoldGrid Central account. You want to make sure you have this extension installed and activated on your WordPress site as well.
Juan says:
Hi Brandon,
I do have the Post and Page Builder Premium plugin installed (v.1.1.1), and active.
Thank you.
Brandon says:
Thanks Juan,
When you visit Settings -> BoldGrid Connect Key from your WordPress dashboard does it display the “Premium BoldGrid Connect Key“? If it’s still displaying the standard “Connect Key” you’ll need to log in to your BoldGrid Central account “Connect Keys” section and Copy/Paste the new Premium Connect Key into your website. If you’re still having trouble with this you can create a new forum topic so that we can take a deeper look into your issue. Be sure to include the URL to your website.
Thanks Juan!
Shay says:
How can I redirect a menu page to a website? For example, I want the “RSVP” menu tab to redirect visitors to an event ticketing website.
Brandon says:
Hi Shay,
You can add a new “Custom Link” menu item and set its URL to the URL of the page you would like to link to.
Rob says:
Can you create blocks from an existing website? Example: I have two text blocks stacked on a slider. I had a dream that I just shift-clicked those three items and then selected “create new block” from a pop-up menu. Was it a dream or did it really happen? Thanks!
Rob says:
It wasn’t a dream but a different app. I realize now I can “save block” in post and page builder – YAY!
Brandon says:
Yes Rob! You can surely save any block in Post and Page builder using the “save block” tool and reuse them over and over in your content. You can even export your saved blocks to a completely different WordPress website!
Dan says:
So now that I’ve created a post with this plugin and got everything the way I want it, how can I turn it into a Blog Post template so that when I blog on this topic, I can choose to use this format every time? It took me hours to create this and I don’t want to do that every time. Thanks.
Brad says:
How to Turn Your Customized Post into a Reusable Blog Post Template
Creating a blog post template that you can reuse for future posts is a fantastic way to save time while maintaining a consistent look and feel for your content. Here’s how you can achieve this using BoldGrid’s features:
Documentation and Further Assistance: For detailed instructions on saving and reusing blocks within BoldGrid, refer to our guide on “Adding and Saving BoldGrid Blocks”. This guide will walk you through the process of creating a block library and adding these saved blocks to your new posts.
For more information and step-by-step instructions, please visit our documentation at: https://www.boldgrid.com/support/page-builder/saving-blocks/
This method ensures you maintain a consistent aesthetic and structure across your blog posts while significantly cutting down the time required to format each new post. If you need further assistance or have any questions, our support team is always here to help.
Tanner says:
Greetings! Quick question that’s completely off topic. Do you know how to make your site mobile friendly? My web site looks weird when browsing from my iphone. I’m trying to find a template or plugin that might be able to correct this issue. If you have any suggestions, please share. Many thanks!
Brandon says:
Hi Tanner!
Our Crio Pro WordPress theme is built on the world famous BootStrap Framework which means it’s optimized for the best mobile experience right out of the box. This theme is also 100% Compatible with BoldGrid Post and Page Builder.
Linda says:
The title page is showing as well as the h1 coding for the title I want the page to show, not the one that I can recognize it in the editing pages. How to avoid the double showing of words? Example if I’m not clear – Edit page is called two beds, the h1 tag says two beds made for you. When I publish, I see two beds and then below it is two beds made for you. How to eliminate the first two beds. In another website there’s a place to click to display the page site but the one I’m using doesn’t show that option that I could unclick it. Thanks
Brandon says:
Hi Linda,
You can hide your page title from the sidebar of your Page and Post builder editor. Click the “Edit” tab on the page/post you’re working with and find Page Attributes under the right sidebar, select the “Page: Title::” attribute and switch its toggle to “Hide“.
I hope this helps!
Linda says:
Thank you. I found it under Page Attributes, Page Title, then Hide.
Brandon says:
Awesome Linda! I’m happy you were able to get this resolved. Be sure to reach back out if you have any other questions for us.
Burl says:
After reading everyones issues, I am getting the feeling I screwed up by choosing Dreamhost and WordPress, I am not impressed with how all these operate.
I am better off with a real wysiwyg and real host.
I need to create pages from my template and so far wordpress dont allow that.
Brandon says:
Hi Burl,
I’m sorry to hear you’re having trouble getting you’re WordPress site up and running. If you don’t mind starting a new forum topic and including the link to your website we can take a look at your current setup and give our best suggestions on how to go about eliminating some of your concerns.
Burl says:
After much irritation and much frustration and determination and the fact I paid and would like to see something out of my money, I think I have stuff figured out.
I was used to wysiwyg editors, I could never grasp coding, I understand it, but can not keep it my head or understand what goes where and when.
Brandon says:
I definitely understand Burl. Have you installed our Crio Pro WordPress theme along with BoldGrid Post and Page Builder, our drag and drop editor for WordPress? Our Post and Page builder plugin comes out of the box with pre designed block templates and you can create your own templates, no coding required.
Burl says:
After trying both of those and different other builder plugins, I have come to the conclusion that the WordPress visual editor is the best to stay with a consistent and even theme.
I am confused of why some of my pages have the title at the top and some do not.
I am not comfortable putting up my site just yet, but if you or someone would look at it, mostly the links. Keep in mind when, and if you do look at it, I am not close to finished, or even a 1/4 of the way into the project.
Thank you
Brandon says:
Hi Burl, You may have missed this but if you don’t mind starting a new forum topic and including the link to your website we can take a look at your current setup and give our best suggestions on how to go about eliminating some of your concerns.
Tessa says:
Can I make reusable blocks in Post and Page Builder? I don’t mean just saved blocks, but blocks that, e.g., appear on each page and can all be updated simultaneously.
Jesse says:
Hi Tessa-
“Reusable” blocks that update across different pages or posts aren’t a feature of the Post and Page Builder, but I have had success with this in the past by using the free Reusable Content Blocks plugin.
Fadil says:
How do I add row in a column?
Jesse says:
Hi Fadil-
It is possible to add new rows into a column using HTML, but for most layouts it shouldn’t be necessary. Can you describe what kind of layout you’re trying to achieve?
Mark says:
Hi Jesse, I’m interested in this question.
I have a row with 2 columns, and in one of the columns I want to have 2 buttons side-by-side. Maybe there’s some simple way of doing this, but my first thought was to put a little row with 2 columns *inside* that big column. (The article mentions “nested rows”, but I can’t find those in the “Add elements” toolbox.)
Brandon says:
Hi Mark, So what you could do is create 4 columns inside of the row with similar width. Place your buttons inside two of the columns and leave the other two as empty space. Then you can adjust each column until you feel the placement is correct. You can add elements like padding, margin, and spacing to your columns by selecting the column and choosing Advanced Controls from the drop-down.
Another thing you could do is try locating one of our pre-made blocks, (by clicking the blue “Add Block” button towards the top of the page builder), with a similar button placement and use that as a base for your own design.
Mark says:
Thanks Brandon, I appreciate the response! Here’s a picture of the particular layout I’m looking for:
https://imgur.com/a/QaPyxaf
If this was a 4-column layout, the tricky part is that I have a picture spanning the left 2 columns, and a paragraph spanning the right 2 columns above the buttons.
If this isn’t easy within the bootstrap grid system, I’ll probably just stack the buttons vertically.
Brandon says:
Thanks Mark,
I think we might have a solution for you. If you could post your question in the Support Forum thread with a link to your website we can better assist you there.
Aquilla says:
How do I insert a post onto a specific page?
Jesse says:
Hello Aquilla,

You can insert a single post onto a page using the Single Post Widget block component. To find it, click the Add Block Component “+” plus sign, then scroll down to the “Single Post” option. Here’s a screenshot to help:
Ed says:
Hi, I don’t have the option of ‘Single post’. I only have the ‘Recent Post’ (which just adds the title of the post) option. Has Boldgrid removed it? I need to insert a single post into the Home page, to use it as a News block but I can’t and now I have to just copy-paste the ‘news’ into another page, it will be helpful if I can add the single post. Is there any solution to this problem?
Brandon says:
Hi Ed,
Thanks for reaching out! I think you may be using the “Recent Post” component when you actually want to be using the “Post List” component. This is a Premium feature so you would at least need BoldGrid Post and Page Builder Premium installed and activated on your site.
You may also be able to use a plugin like Recent Post Widget With Thumbnails to create this functionality in your pages.
I hope this helps!
Tannis says:
doesnt tell me how to start
Jesse says:
Hello Tannis-
Check out these tutorials on installing the Post and Page Builder, installing the premium extension, and how to set up the Post and Page Builder.