Add New Pages Faster with BoldGrid
WordPress Page Builder
BoldGrid makes adding a New Page on your WordPress website simple and quick. Want to see how?
 You can create a page by selecting “Add New” (see image above). You have the option to choose a blank page by clicking that plus sign. Alternatively, you can select “Add Blank” from the left-hand sidebar to skip previewing other pre-built pages and just get started. When you choose a blank slate, you receive a clean page, without pre-existing formatting or design elements, and ready for you to edit. Choose the Title for your page then begin designing by inserting content via text, images, or Blocks from the top (see image below).
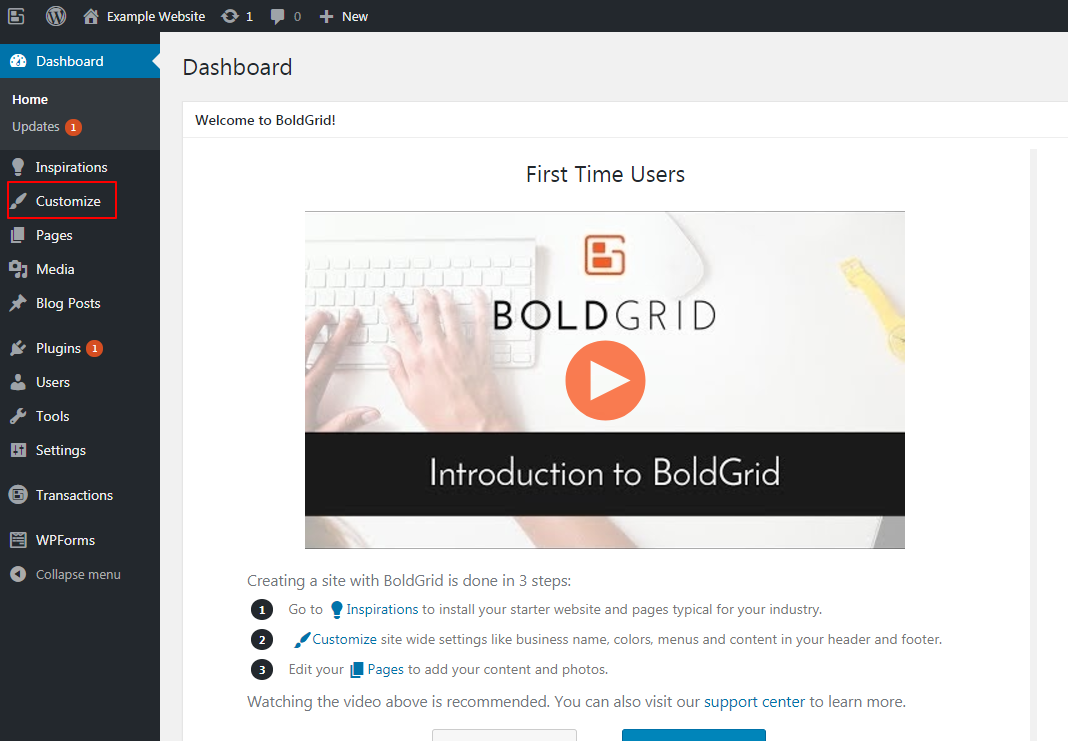
 The Customizer provides another way to add pages to your menus. Start by clicking “Customize” from the left-hand sidebar.
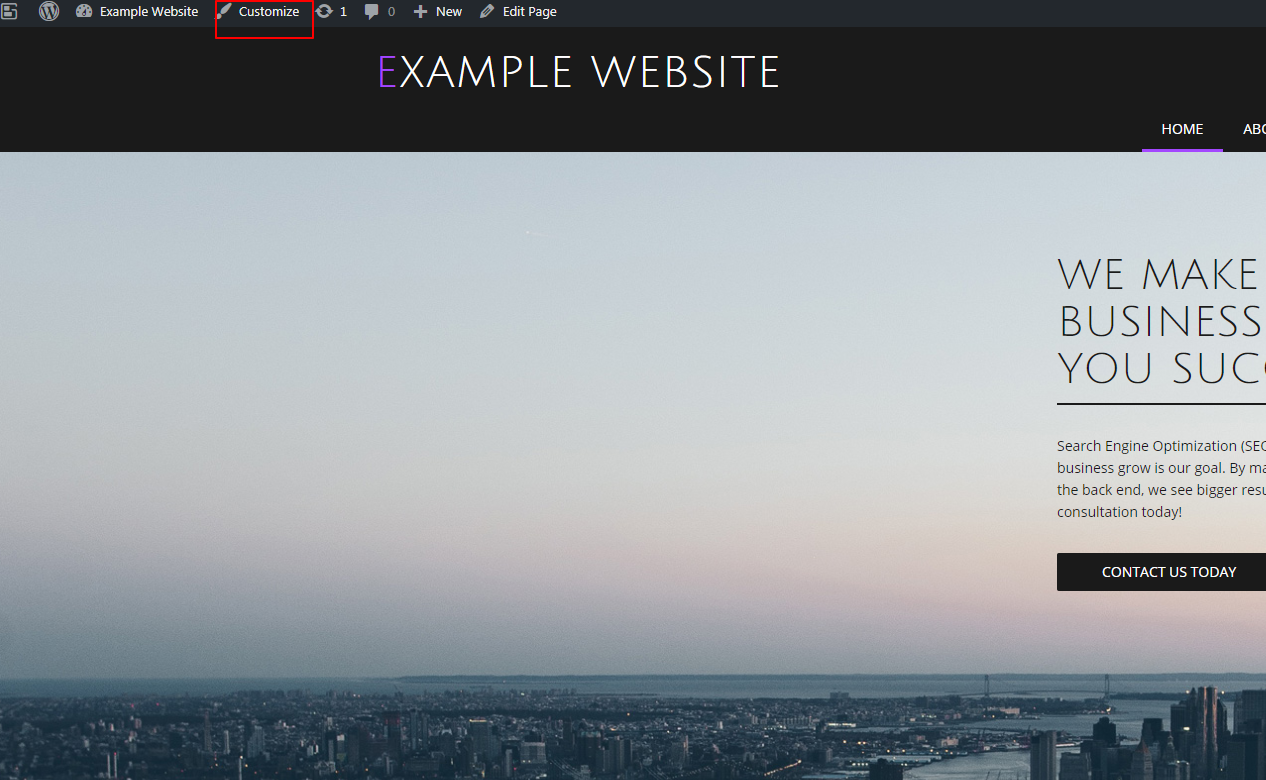
 Alternatively, if logged in as an Administrator, you can also click the “Customize” tab at the top of the page.
 This will bring you to the BoldGrid “Customizer” page. Select “Menus.”
 From there, select “Primary.”
 Customizer now displays a list of your website’s pages that currently populate the main navigation menu. In the example below, you see Home, About Us, and Contact Example listed under “Primary.” Also, note that we have selected to display these items on the Primary Menu and Header Upper Right. You can see this selection per the check boxes under “Location.” Click “Add Items” to see Custom Links, Pages, Posts, Categories, and Tags available for adding to the menu.
 To add the “Blocks” page, we first click on the drop-down menu titled “Pages.” From there, click on the plus sign and select “Blocks.” The selected page immediately appears below the other primary menu pages. The plus sign also becomes a check mark, verifying the page’s addition to the menu. To make this addition permanent, click “Save” and “Publish” and it will become visible to visitors on the site.
 You can change the order of menu items in the Primary Menu by dragging and dropping them. For the Header Upper Right, you can not only reorder but add that page beneath one of the existing pages as well. This creates a drop-down menu effect. Just click the carrot to see your page listed.
Create a new Page
To start, while on your WordPress site’s Dashboard, click “Pages,” then “Add New” from the left sidebar. You have the option here to create a blank page or choose from one of our pre-designed Block pages.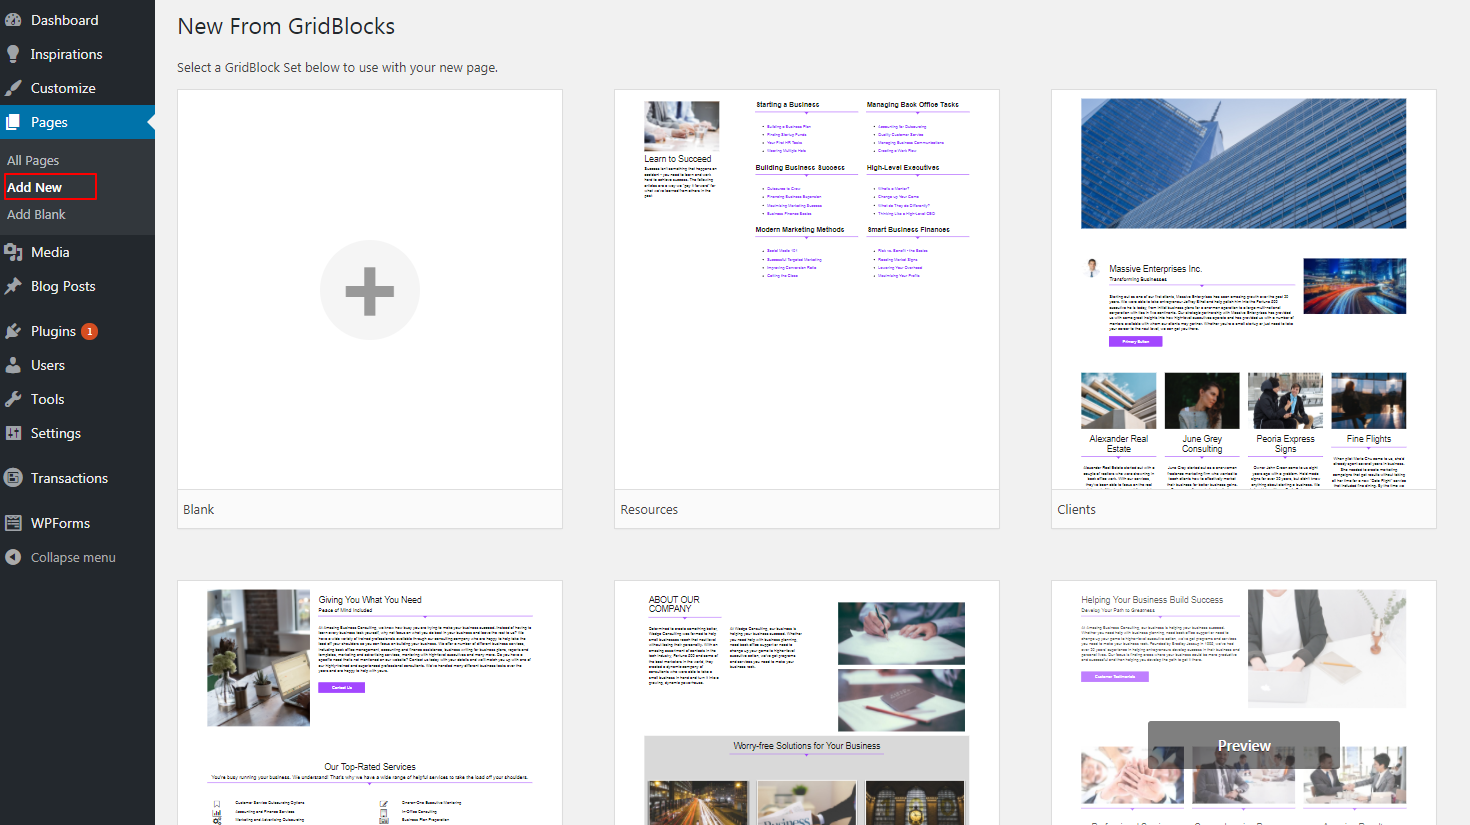 You can create a page by selecting “Add New” (see image above). You have the option to choose a blank page by clicking that plus sign. Alternatively, you can select “Add Blank” from the left-hand sidebar to skip previewing other pre-built pages and just get started. When you choose a blank slate, you receive a clean page, without pre-existing formatting or design elements, and ready for you to edit. Choose the Title for your page then begin designing by inserting content via text, images, or Blocks from the top (see image below).
Add Blocks
Selecting a Block page allows you to choose from various categories of template pages based on commonly used main menu navigation pages. These include “Home,” “About Us,” “Testimonials” and others. You will find these in the “Add New” section. They provide a framework for you to start designing your page. From there, you can customize Blocks, making them as unique as you like. Change images, content, colors, and more to match the theme of your website and brand. If already familiar with Blocks, you probably know how to save a custom Block page. This powerful feature lets you reuse pieces of previous pages and posts to give your site a uniform and familiar look that will appeal to site visitors. A real time saver! Whether you build your page from scratch or use the Blocks feature, to share your page with the world just hit “Publish” in the top right corner.Add Your New Page to Menus
Now that you have created a new page, you may want to add this page to your main menu (or any other menu on your site, for that matter). The easiest way — and we love making things easier here at BoldGrid — is to use our new “In menu” feature. In the “Publish” meta box on the right side of the screen, you will see a section labeled “In menu” with a number of checkboxes beneath it. Simply check or uncheck the box corresponding to the desired menu on your site, press the blue “Update” button, and BoldGrid will add that page to the menu(s) you selected. The Customizer provides another way to add pages to your menus. Start by clicking “Customize” from the left-hand sidebar.
 Alternatively, if logged in as an Administrator, you can also click the “Customize” tab at the top of the page.
 This will bring you to the BoldGrid “Customizer” page. Select “Menus.”
 From there, select “Primary.”
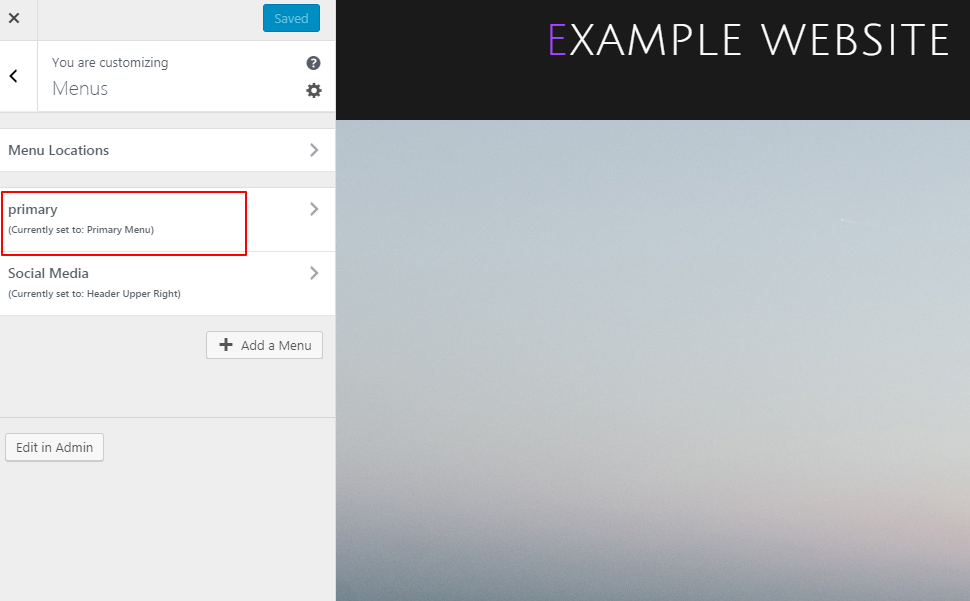 Customizer now displays a list of your website’s pages that currently populate the main navigation menu. In the example below, you see Home, About Us, and Contact Example listed under “Primary.” Also, note that we have selected to display these items on the Primary Menu and Header Upper Right. You can see this selection per the check boxes under “Location.” Click “Add Items” to see Custom Links, Pages, Posts, Categories, and Tags available for adding to the menu.
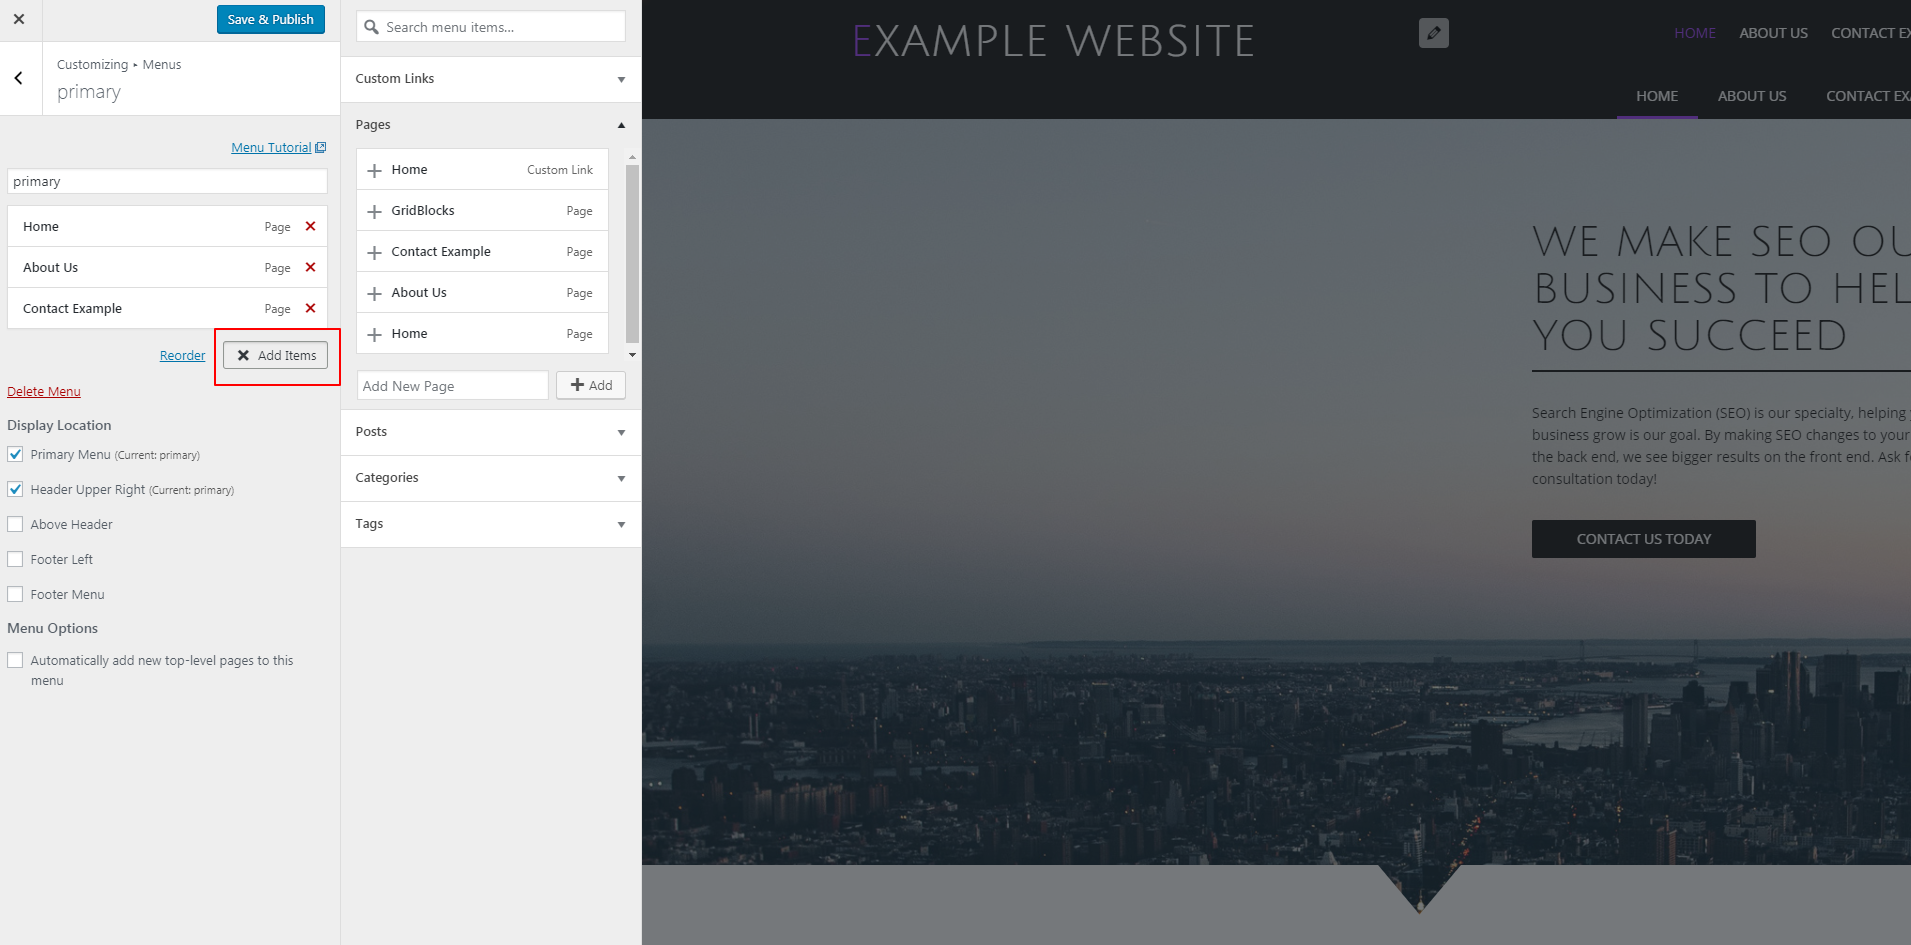 To add the “Blocks” page, we first click on the drop-down menu titled “Pages.” From there, click on the plus sign and select “Blocks.” The selected page immediately appears below the other primary menu pages. The plus sign also becomes a check mark, verifying the page’s addition to the menu. To make this addition permanent, click “Save” and “Publish” and it will become visible to visitors on the site.
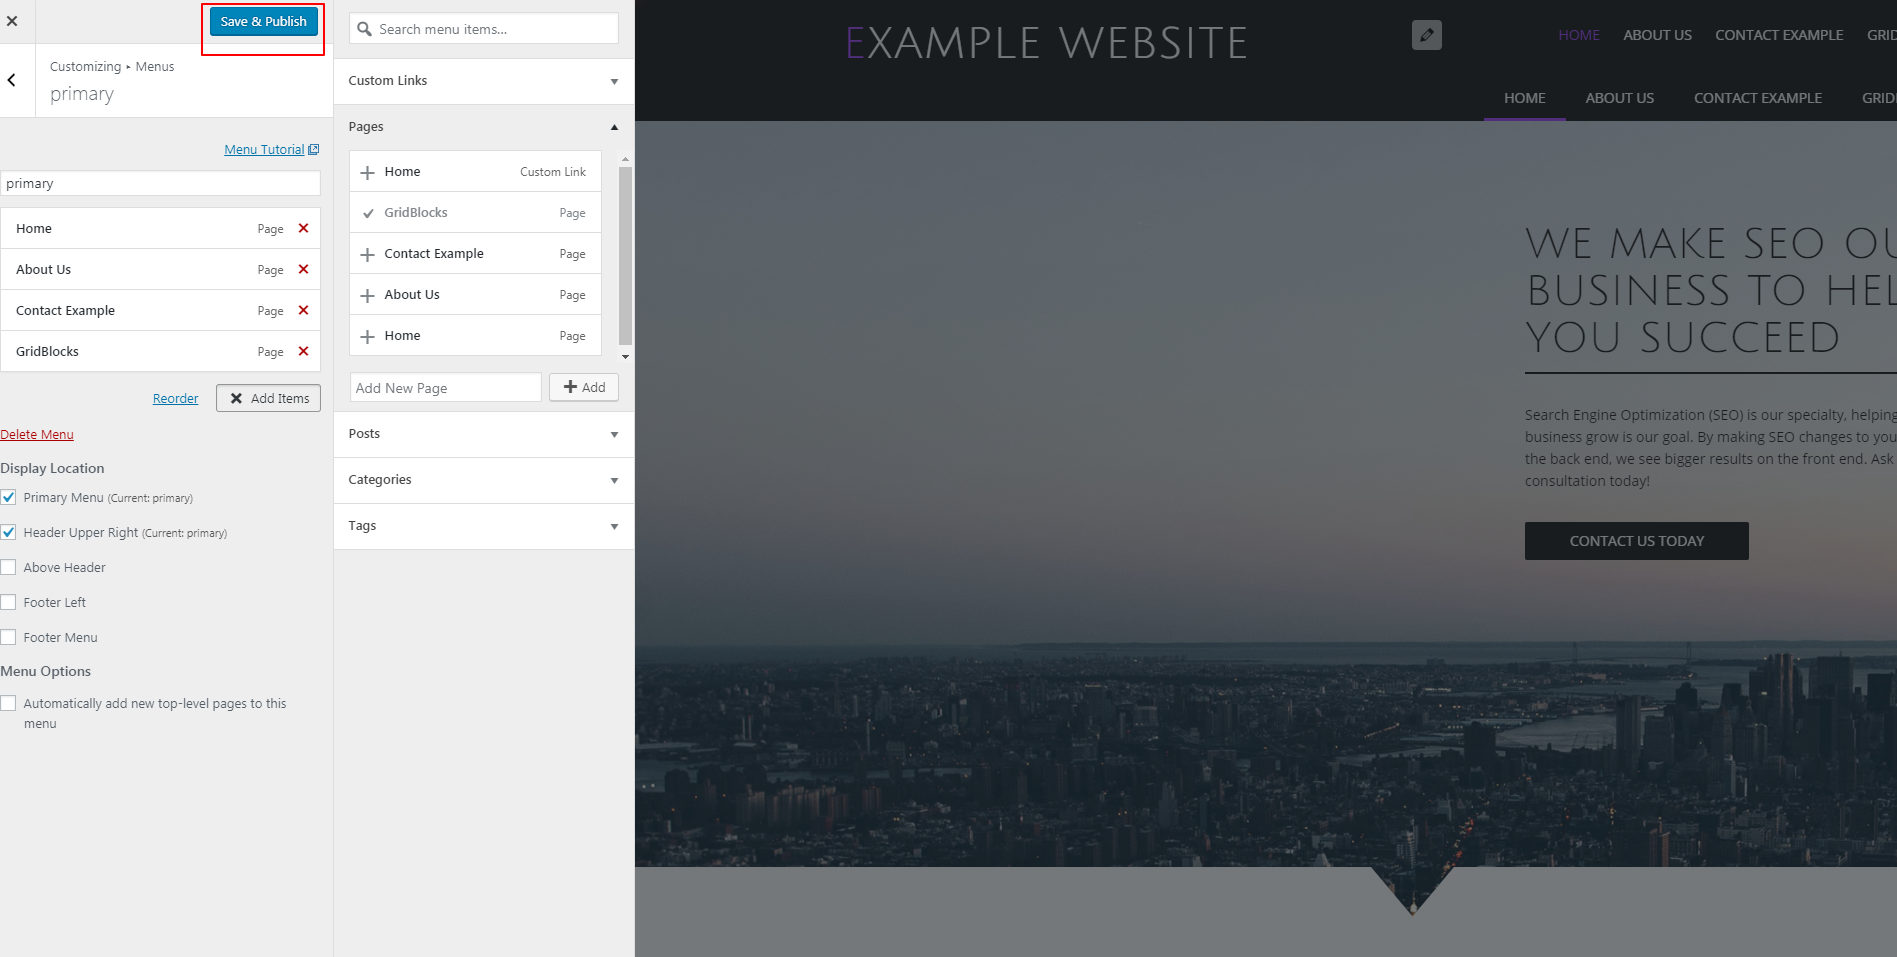 You can change the order of menu items in the Primary Menu by dragging and dropping them. For the Header Upper Right, you can not only reorder but add that page beneath one of the existing pages as well. This creates a drop-down menu effect. Just click the carrot to see your page listed.