Customize the WooCommerce Shop Page without Plugins
WordPress Tutorials
If you are using WordPress and WooCommerce to sell online, you may have noticed it’s difficult to work with the main Shop page. This page is provided (and required) by WooCommerce for your online store to work properly, but this doesn’t mean you are locked into a single design.
When searching the internet for help, most of the time an additional WooCommerce specific plugin is recommended. While some may find these plugins helpful, it’s important to know you can customize the WooCommerce Shop page without one.
In this article we will show you how to hide or move elements around to create a unique WooCommerce Shop page layout using a few lines of code.
What is the WooCommerce Shop Page?
The WooCommerce plugin adds 4 pages to the dashboard – Cart, Checkout, My Account and Shop, as well as enabling a new custom post type for Products.
The Shop page is the archive page for products, just like the Blog page is the archive page for posts. As new products are added they will automatically appear on the main Shop page, in addition to any assigned category pages.
While the look and feel of the Shop page will vary per theme, the layout is set by WooCommerce hooks. Hooks are specific locations in the code where you can add or remove elements, like the product title or price. The Shop page will generally look something like this:
In this example we are using BoldGrid’s newest WordPress theme Crio, but as the code provided in this article is standard WooCommerce code it should work with any theme. The code can be added in your child theme’s functions.php file, or using a plugin like Code Snippets. This lightweight plugin can be used to add several types of code for any reason, it is NOT specific to WooCommerce.
Customize the WooCommerce Shop Page Layout
Now that you have a better understanding of what the shop page is, it’s time to customize the WooCommerce shop page. We can decide the order in which the product elements appear, or if we want them to appear at all.
Since our store is new and we only have two products, the top row with the sorting dropdown seems unnecessary. Luckily only 2 lines of code are needed to properly remove them.
// removes Showing all x results text
remove_action( 'woocommerce_before_shop_loop', 'woocommerce_result_count', 20 );

// removes Sorting dropdown
remove_action( 'woocommerce_before_shop_loop', 'woocommerce_catalog_ordering', 30 );
Next we want to hide the Sale circle as we’re going for a streamlined look. Let’s remove it with another line of code:
// remove Sale circle
remove_action( 'woocommerce_before_shop_loop_item_title', 'woocommerce_show_product_loop_sale_flash', 10 );
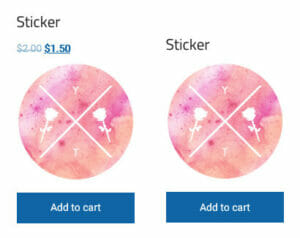
Now it’s time to decide where – and if – we want the product title, price to show. You can move one or both elements above the product image by adding the needed code from below. You can also hide the Add to Cart button if desired, but we do not recommend this as you want as few clicks as possible in route to checkout.
Each line of code is preceded by a comment line explaining what it does. Please copy and paste only the parts you’d like to use.
// remove Product Title
remove_action( 'woocommerce_shop_loop_item_title', 'woocommerce_template_loop_product_title', 10 );

// remove Product Price
remove_action( 'woocommerce_after_shop_loop_item_title', 'woocommerce_template_loop_price', 10 );

// move Product Title above Product Image
add_action( 'woocommerce_before_shop_loop_item', 'woocommerce_template_loop_product_title', 10 );
remove_action( 'woocommerce_shop_loop_item_title', 'woocommerce_template_loop_product_title', 10 );

// move Product Price above Product Image
add_action( 'woocommerce_before_shop_loop_item', 'woocommerce_template_loop_price', 10 );
remove_action( 'woocommerce_after_shop_loop_item_title', 'woocommerce_template_loop_price', 10 );

// remove Add to Cart button
remove_action( 'woocommerce_after_shop_loop_item', 'woocommerce_template_loop_add_to_cart', 10 );
Example layouts:
How to Rename the WooCommerce Shop Page
The last modification we want to make is renaming the WooCommerce Shop heading to Merch. In the Dashboard navigate to All Pages and then hover over Shop until you see Quick Edit and click it.
From here you can change the name of the page and the slug, if desired. The title is what will appear on the page itself and the slug appears in the URL. It might make sense to keep the slug Shop or change to Store and have a more unique heading on the page, like the store slogan.
Use a WordPress Testing Environment
While adding this code is easy, we still highly recommend cloning your site to a test environment before making changes like this to your website. This way you can also test various layouts to see what works best before taking it live.
BoldGrid’s Cloud WordPress service will create a free WordPress install in less than a minute. Using a WordPress backup plugin you can make a backup of your website (it’s important to keep a recent backup of your site anyway!) and import to the Cloud WordPress install.
Here you can make changes and experiment with your site safely. If anything accidentally breaks you can simply login to BoldGrid Central, delete the install, and create a new one.
WooCommerce Customization Complete!
We hope you have a better understanding of how you can customize the WooCommerce Shop page with a few lines of simple code. If you have any questions, please let us know in the comments.


