Forum Replies Created
- AuthorPosts
 Joseph WKeymaster
Hi Rosh, our team is happy to answer any questions you have about working with our WordPress website builder!
The best place to find your Connect key information is through your BoldGrid Central account under the Connect Keys area of that dashboard.
I hope that helps you locate the information you need and please let us know if there is anything else that we can do to help!
Joseph WKeymasterHi Sam!
The WordPress Plugin uploader is only able to upload the entire plugin directory and cannot be used just for individual files. When attempting your upload select the entire Zip file with the file browser tool and upload all of it to your website. WordPress will take care of the rest and ensure that all of the files contained in that Zip are installed in the correct location.
Please let us know if you have any other questions for us!
Joseph WKeymasterHi Malick!
This is certainly a strange situation and right now I am not entirely sure where the source of the conflict is coming from.
Since you’re a DreamHost customer, and therefore a BoldGrid Premium customer, I recommend submitting a premium support ticket so our team can take a more hands-on approach to troubleshooting.
The easiest way to submit a premium ticket is directly from your main WordPress Dashboard page, using the BoldGrid Feedback widget. Alternatively, you can submit one in your BoldGrid Central Account.
Thank you for your understanding Malick and I hope that our Premium team will be able to get this sorted out soon!
Joseph WKeymasterHi Crizzo!
The Custom CSS editor found in the Customizer is the correct location to input that code and I see the hyphen and word wrap rules applied to your Site Title, but not the media query CSS used to reduce the font size of the title on mobile display sizes. The word Entertainment is your Site Title looks like it is still breaking, despite the custom CSS rule, because the font size makes the word too large to display completely in your header.
Is that CSS currently added through the Customizer? If so then it looks like we might need to created a more targeted set of CSS selectors in order to get the Title font sized reduced.
Hopefully once all of the Custom CSS is implemented your title will start behaving as expected and I hope that we will be able to get this sorted out for you soon!
Joseph WKeymasterHi Crizzo, I am happy to hear that you were able to get that box removed from your home page!
The CSS snippet found in that troubleshooting section should be copied into the Custom CSS area located in the Crio theme Customizer. Once that code is added your headings should no longer break or hyphenate on mobile devices.
If you also want to reduce the font size used for the Site Title on mobile devices then adding this CSS should be able to help you with that.
@media (max-width: 767px) {
  h1.site-title {
    font-size: 36px;
  }
}
The font size of 36px in that code can also be increased or decreased depending on how large you want the site title to appear on mobile devices. Please let us know if you have any other questions for us!
Joseph WKeymasterHi Cheryl, thank you for using our WordPress theme Crio to design your website!
It is possible that the problem you are seeing with the Recent Posts widget is related to a recent bug we identified in the Crio theme framework.
For some reason, if page titles are disabled using the Customizer controls located under Design > Pages > Title then the Recent Posts widget is unable to display the Post titles in the widget field when viewed on the front end. We are currently investigating this bug and we hope to have a fix for it released in an upcoming version of the Crio theme framework.
Changing that global configuration to show the Page Titles should allow the Recent Posts widget to start displaying the information as expected. If you want to hide the Page Title for a particular page then you can use the Page Attributes settings located on the right side of the screen when editing a page’s content.
I hope that this helps you get your Recent Posts widget working as expected Cheryl and please let us know if there is anything else that we can do to help!
Joseph WKeymasterHi Crizzo, we are happy to answer any questions you have about working with our WordPress themes on your website!
Are your heading elements the ones that are getting chopped up when viewed at the mobile device screen size? If so then I might have a solution for you!
Our Working with Fonts in Crio article has a troubleshooting section that provides some Custom CSS that disables word breaking and auto-hyphens for heading elements.
As for the oval shaped object that needs removing, could you send us a link to the page on your website that contains that element? Once we are able to take a look at that page we should be able to help you figure out how to remove it!
Joseph WKeymasterHi Malick!
I am not entirely sure why adding the overlay to your background images is preventing them from displaying as expected. I attempted to replicate this behavior in my testing environment and so far I have been unsuccessful in recreating the issue, background images with an overlay seem to working fine for me.

I wonder if the problem is somehow related to the minification settings in your website’s caching configuration. Could you try temporarily disabling minification in your cache settings to see if that allows the overlays to start working?
Joseph WKeymasterHi Malick, our team is happy to answer any questions you have about working with our WordPress Page Builder on your website!
I took a look at the markup on the home page of your website and it appears that somehow the inline style rules that set the correct background image for that first section were stripped from it following the update.
When a background image is configured for a section an inline CSS style rule is added to the Section element that tells the browser to use a particular image for the background. I installed the latest version of GeneratePress in a testing environment and was able to configure a Section background image with it, so you might be able to get the background image displaying properly again by resetting the values in the page editor.
Open up the Visual editor for your Home page and use the background option on that first section to configure a different image to use for the background. Once the new image is set Update the page to ensure that the newest settings are used. Then change the background image back to the original selection and Update again.
Hopefully that helps you get your background images working as expected and please let us know if there is anything else that we can do to help!
Joseph WKeymasterHi JC, we are happy to answer any questions you have about BoldGrid Premium Bundles!
Connect keys, and the Premium subscriptions that are applied to them, can be used on any number of websites within the same business such as Production, Development and Staging environments.
Connect keys are also used to make image licenses purchases through the BoldGrid Connect Image Search and any website configured with that key will have access to the Coins wallet used for these kinds of purchases. Because of this behavior we do not recommend using the same key for sites that you’ll be delivering to a client.
I also added a section in our What are Connect Keys? article that provides this explanation and thank you for helping us improve our documentation!
If you ever have any other questions for us in the future please do not hesitate to ask!
Joseph WKeymasterHi Dawn!
I reworked the code snippet slightly to use a different configuration to change the priority assignments for the filters that might give us some more favorable results.
I also reviewed the CSS code that I previously sent and there was a typo in the beginning of the media query. Here is the updated code for that:
If there are still problems getting the code to work correctly after trying these new configurations could you create a Premium Support ticket with our team so we can get started on investigating the problem more thoroughly?
Thank you for your understanding throughout this whole process Dawn!
Joseph WKeymasterHi Dawn!
I think what is going on with the Code Snippets is that some of the symbols used to display the code in the HTML for my response might not have translated over as expected when copied directly into the snippet form.
We have an alternative way of embedding code and hopefully this one translates into the Code Snippets plugin easier:
The custom CSS included in my previous message can be added with the Custom CSS configuration found under the Advanced section of the Customizer. The following guide from our support center provides some more in depth information on how to access those controls as well.
https://www.boldgrid.com/support/boldgrid-themes/how-to-use-the-custom-css-editor/
The only thing you will need to do once the snippet is activated and the custom CSS code is added is reassign your website navigation menu to use the Primary menu location instead of the current Below Header setting. You can change the menu location assignment by Opening up the Customizer and navigating to the Menus section and selecting the menu that you want to change the location assignment for.
Hopefully the alternative code sharing solution helps you gets the snippet working as expected Dawn and please let us know if you have any other questions for us!
Joseph WKeymasterHi Dawn!
Sorry to hear that there are some problems getting your drop down menus to work as expected in our Venetian WordPress theme and our team will do everything we can to help!
Venetian is one of our Classic themes and uses an older version of our theme framework, which has the unfortunate downside of only being able to render drop downs for menus assigned to the Primary menu location. However we can change where the Primary menu location displays in your header using some custom PHP configurations.
My preferred tool to add custom PHP to websites is the Code Snippets plugin which makes it easy to add custom code without having to create a separate Child Theme. Once you have Code Snippets installed and activated, go to Snippets > Add New in your WordPress dashboard and add the following code to the new snippet.
function venetian_bottom_primary_nav( $configs ) {
    remove_action( 'venetian_columns' , 'venetian_columns' );
    $configs['template']['locations']['header'] = [
        '1' => [ '[menu]secondary' , '[action]venetian_branding_social' ],
        '5' => [ '[widget]boldgrid-widget-2' ],
        '8' => [ '[action]boldgrid_primary_navigation'],
    ];
    return $configs;
}

add_filter( 'boldgrid_theme_framework_config' , 'venetian_bottom_primary_nav' );

function venetian_branding_social() { ?>
    <div class="row">
		<div class="col-sm-4">
			<?php do_action( 'boldgrid_site_identity' ); ?>
		</div>
		<div class="col-sm-8">
			<div class="row">
				<?php do_action( 'boldgrid_menu_social' ); ?>
			</div>
		</div>
	</div>
<?php }

add_action( 'venetian_branding_social' , 'venetian_branding_social' );
That code moves the Primary menu location out of the original position and makes it display where the Below Header menu location used to. Once that code is implemented on your website just set your menu back to using the Primary location and it should display in the expected area.
One other thing you will need to do in order to maintain your current design is add some custom CSS as well that will center the menu in your header since the primary menu has a default setting that floats it to the right. The following CSS uses a Media Query to target only the Tablet and Desktop displays which are the screen sizes that expand the menu across the header instead of hiding it behind the mobile hamburger icon.
@media (min-width: 768px;) {
    #site-navigation {
        float: none;
        width: max-content;
        margin: 0 auto;
    }
}
I hope that this helps you get your drop down menus functioning in the correct location Dawn and please let us know if there is anything else that we can do to help!
Joseph WKeymasterHi Heather!
You should be able to target the items in your footer menu directly with this CSS:
.palette-primary .site-footer .menu-items .menu-item > a {
  color: white;
  font-weight: bold;
}
Hopefully that helps you get the colors appropriately for those items and please let us know if there is anything else that we can do to help!
Joseph WKeymasterThank you for contacting us Jude, our team is happy to answer any questions you have about working with our Hifidel WordPress theme!
Hifidel is one of our Classic BoldGrid themes and unfortunately does not have many of the menu alignment features through the theme Customizer found in our newest WordPress theme Crio, so we will use a little Custom CSS in order to help you center those menu items!
The following CSS snippet targets the header area that contains the primary menu on your website and centers the entire site navigation. It also uses a Media Query to target only the screen sizes where your menu items are expanded across the entire header and will not alter your current mobile design.
@media (min-width: 768px) {
 .header-11 {
   display: flex;
   justify-content: center;
 }
}
Hopefully that code helps you create the design you are looking for on your website and please let us know if there is anything else that we can do to help!
Joseph WKeymasterThank you for contacting us Rob, our team is happy to answer about our WordPress templates plugin Inspirations!
Previously you were able to install templates that used our Classic BoldGrid themes, but we have since converted each of those designs into content sets that all use our newest WordPress theme Crio. Turning the original designs in Crio content sets allowed us to provide the same starter designs as before alongside the more powerful theme framework that comes Crio to help create highly customized website designs if desired.
I hope that this helps answer you questions Rob and please let us know if there is anything else that we can do to help!
Joseph WKeymasterHi Cecilia, we are happy to answer any questions you have about working with our WordPress themes!
Do you want to hide the featured images on both the Blog archive and Blog single pages? If so then the following CSS snippet should allow you to hide those images:
article.post .entry-content .wp-post-image {
    display: none;
}
Featured image management is admittedly limited in our Pavillion theme and if you ever decide that you want to try out a theme with more customization options then I hope that you will give our other WordPress theme Crio a shot! The theme framework that Crio is built with has a number of improvements over our Pavillion theme, including the ability to adjust Featured Images on blog pages, and I hope you enjoy using those features is you decide to try it out.
Please let us know if you have any other questions for us!
Joseph WKeymasterThank you for contacting us Lance, our team is happy to answer any questions you have about working with our WordPress theme Crio!
You are correct in that we will need to use some custom CSS to change how auto-hyphens function for your headings and I updated our article on Working with Fonts in Crio with a troubleshooting section that explains how to remove auto-hyphens from your headings.
I hope that information helps you get your headings behaving as expected Lance and please let us know if you have any other questions!
Joseph WKeymasterThank you for contacting us Edouard, our team is happy to answer any questions you have about working our WordPress backup plugin Total Upkeep!
Once the Total Upkeep plugin files are removed from your website the Connect key associated with it is no longer actively used. One thing to keep in mind that the Connected Websites list in BoldGrid Central is simply a history of any website that ever used that and does not necessarily reflect whether or not the connection is currently active.
Please let us know if you have any other questions for us!
Joseph WKeymasterHi Lance, we are happy to answer any questions you have about customizing our Crio WordPress theme!
Adding a Search widget to your header can be accomplished using the Custom Header Layout options available in Crio. I updated our how-to guide for customizing header layouts in Crio with a section that demonstrates how you use those tools to add a WordPress search widget to the header.
I hope that example helps you create the design you are looking for on your website and please let us know if you have any other questions for us!
Joseph WKeymasterSorry to hear about the problems with getting your changes made with the Post and Page Builder properly David and we will do everything we can to help!
This particular issue is not one that we have been able to find a solution for and we lost contact with the users that originally reported the problem. Right now our suspicion is that the issue is somehow related to caching in the WordPress dashboard, but so far that remain an unconfirmed theory.
Would it be possible for you to create a Premium Support ticket with our team so we can work on investigating this problem more thoroughly?
Thank you for your understanding David and we hope to be able to get to the bottom of this soon!
Joseph WKeymasterHi Shiraune, our team is happy to answer any questions you have about working with our Cloud WordPress platform!
Unfortunately FTP access is not enabled for Cloud WordPress installations and the maximum upload file size of 256 MB is a hard limit, and we apologize for any inconvenience this causes you.
However, one thing you could try is reducing the overall backup size by excluding files or folders from the backup, such as the Uploads directory. This might allow you to generate a backup file that is small enough to manually upload through the dashboard.
Please let us know if you have any other questions for us!
Joseph WKeymasterHi Denise, our team is happy to answer any questions you have about working with our Post and Page Builder to design your content!
I looked at the three text boxes on the page you linked and it appears that the first and third ones have a slightly different configuration for managing the content spacing than the second one.
The text content in the second box is flanked by two empty column elements on either side, which are responsible for the left and right indentations there. The first and third ones however do not have these additional columns to manage the spacing and instead have large padding assignments on the text column to create a similar appearance on desktop displays as the second one.
You should be able to create the same design for all of your boxes by first removing the padding assignments on the text columns in the first and third ones. Once the additional padding is removed use the Row controls that surround your text columns to add empty columns and move them to either side of the text block.
Hopefully that helps you create a better looking design for mobile displays Denise and please let us know if you have any other questions for us!
Joseph WKeymasterThat is correct Gigi, it sounds like you have the hang of it!
I would like to mention though that we have a free version of Crio available in the public WordPress repository that you might want to test drive on your website before upgrading to the Pro plan. The Pro upgrade for Crio unlocks additional functionality, like the Attribution control and Custom Header Templates, but many of the core design features including the Color Palette system and Font controls are available in the free version.
I hope that the transition to Crio goes smoothly for you and please let us know if you have any other questions for us!
Joseph WKeymasterYou’re welcome Sun, I am happy to hear those controls worked for you!
We designed Crio to allow you to customize nearly every design aspect of your website and creating a child theme is not generally necessary. That being said, if you would still like to create one then I recommend checking out our guide on creating your child theme to function with our theme framework.
Please let us know if you have any other questions for us Sun!
Joseph WKeymasterHi Gigi!
If you decide to change your theme to Crio and upgrade to the Pro version then there will be some things that need to be reconfigured once the new theme is installed.
Global theme options, like your Color Palette settings, Fonts, Menus, and Header layout, will need updating after activating Crio. However your page content should remain mostly the same since all of that is constructed with the Post and Page Builder and is largely independent of the theme aside from things like color selections and font choices.
One thing I recommend doing before transitioning to Crio is to clone your existing website to a Cloud WordPress staging environment so you can test out the process there before making a final decision. Once you have the Cloud installation configured to your liking you can use Total Upkeep again to deploy your staging build to your production environment.
Please let us know if you have any other questions for us Gigi!
Joseph WKeymasterThank you for contacting us Sun, our team is happy to answer any questions you have about working our WordPress themes on your website!
We recently added the Header Column Width adjustment tool to our Crio theme that allows you to control how much space each of your header elements takes up on the page and create the design you are looking for.
The column controls each move in increments of one Bootstrap column width, so decreasing the left column by two increments and then increasing the right one by two will produce the 4 // 8 column markup outlined in the HTML included in your previous message.
I hope that these column controls provide you with the functionality you need to achieve your design goals and please let us know if there is anything else that we can do to help!
Joseph WKeymasterHi Gigi, our team is happy to answer any questions you have about working with our products on your website!
The Premium subscription required to remove the attribution links that appear in your website’s footer varies depending on which one of our themes you are using to handle the styling of your website.
If you are using one of our Classic WordPress themes, such as Venetian, then you will need to purchase a Premium Connect key in order to unlock the ability to hide the attribution in that theme.
However, if your website uses our latest theme Crio then you will need to upgrade to Crio Pro to manage the attribution display in your footer.
We are more than happy to help you determine which Premium product is required to remove the attribution and all we need is a link to your website to figure out the correct one.
Please let us know if there is anything else that we can do to help Gigi!
Joseph WKeymasterHi Heather!
I took a look at the mobile version of your page an noticed some very familiar Custom CSS there that is used to fix background image resizing issues typically associated with iOS devices. It looks like whoever was previously working on your website found that article and added the fix to correct some image problems on iPhones.
Fortunately our development team is working on implementing an improved fix for this particular problem in an upcoming update for our Crio theme. Once the update is released you will be able to remove that custom code and you background image will remain fixed as expected.
I hope that this helps explain what is going on with your background image and please let us know if there is anything else that we can do to help!
June 15, 2021 at 2:57 pm in reply to: How can I use the featured images of my blog posts as header image? #39282Joseph WKeymasterThank you for contacting us Anna, our team is happy to answer any questions you have about working with our products!
Our WordPress theme Crio has a setting that allows you to use the Featured Image for your Posts as background for the Post Title when viewing a specific Post. If you are using Crio then you can locate that control by navigating to Design > Blog > Posts > Featured Images. We also have an article in our support center that provides some additional information on working with Featured Images in Crio that I hope will be a good reference for you!
I hope this helps you create the design you are looking for Anna and please let us know if you have any other questions for us!
Joseph WKeymasterThank you for contacting us Saad, our team is happy to help you troubleshoot the Site Check error reported by Total Upkeep.
It sounds like the fatal error reported in the Total Upkeep Site Check is preventing you from access the dashboard and the best way to restore your access is to deactivate the plugin the encountered that error, in this case weForms.
Since you cannot access the dashboard to disable that plugin you will need to either use FTP/File Manager or WP-CLI to turn that plugin off.
The next thing I recommend is making sure all of your plugins, themes and core files are updated to their latest version. I also suggest making a backup of your website before running any of these updates in the unlikely event that something happens during the update process. That way, you will have something to restore from should any issues occur. It is possible that the error was caused by some kind of incompatibility with an older core version, theme, or plugin file and running the updates will ensure that you have the most stable versions of everything operating on your website.
Were there any recent changes on your website that might help explain what caused the error to trigger? Any additional information you can provide about this issue will help our team determine a solution and get fix released in an upcoming update.
Hopefully deactivating that plugin gets your website functioning as expected again and please let us know if you ever have any additional questions for us!
Joseph WKeymasterHi Anita, we are happy to answer any questions you have about working with our WordPress theme Crio on your website!
The background color of the input fields on the comment form is pulled from the Color Palette selections made in the website Customizer, specifically the last color slot in the palette. The Crio theme framework refers to that specific palette item as the Neutral Color and is expected to be some form of black or white color option. You should be able to make the background of those input fields more readable by changing that final palette color to white.
The Allowed HTML tags and attributes help text is intended to give users a clear understanding of what HTML elements are permitted in comment submissions, but I completely understand the desire to hide that content on your website. We have a guide in our support center that demonstrates how to use Custom CSS to hide that information from your comment form.
The Leave a Reply text above the comment form is part of the default configuration and unfortunately there isn’t a way to change that text directly through the theme Customizer, however that content can be modified by using a WordPress PHP filter.
My preferred way of adding PHP to my websites is with the Code Snippets plugin since it allows my custom PHP to persist through theme updates without having to create my own child theme to manage my customizations. Code Snippets also allows you to control where the script is run on your website (Admin area, Front end, or both) and I recommend choosing to only run the code on the frontend to prevent any possible typos from triggering a fatal error on your website that is difficult to reverse. I tested the provided code on my own site and did not have issues so you should be safe, but it never hurts to be careful!
Create a new snippet with the following code to change the Leave a Reply text to show up as Comment instead.
function change_comment_form_title( $defaults ) {
    $defaults['title_reply'] = __( 'Comment' );
    return $defaults;
}
add_filter( 'comment_form_defaults', 'change_comment_form_title' );
I hope that this helps you achieve the design you are looking for on your website Anita and please let us know if there is anything else that we can do to help!
Joseph WKeymasterThank you for contacting us Malick, our team is happy to answer any questions you have about working with Latex code in the Post and Page Builder!
I located a plugin called WP QuickLaTex in the public WordPress repository that seems like it should give you the functionality you are looking for on your website.
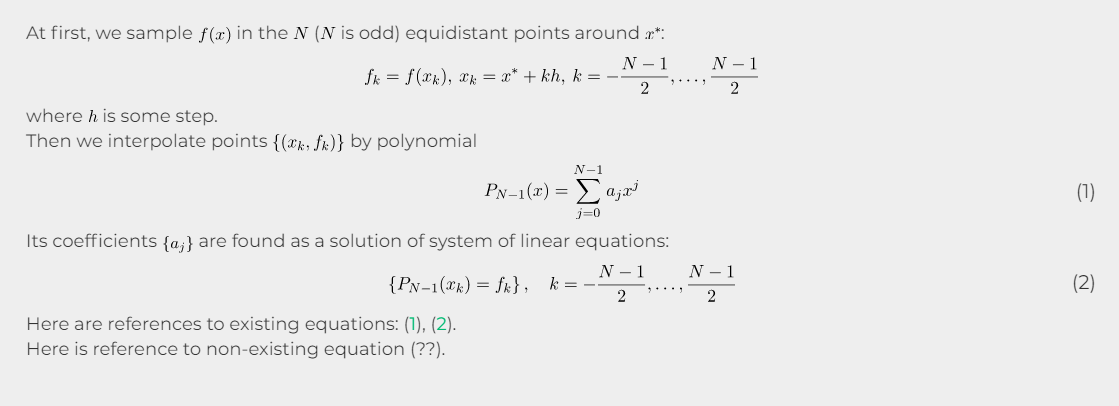
After activating the plugin I pasted the example code from their Getting Started page into one of my page sections and the formulas rendered with the expected formatting. Here is the example code I used:
[latexpage]
At first, we sample $f(x)$ in the $N$ ($N$ is odd) equidistant points around $x^*$:
\[
   f_k = f(x_k),\: x_k = x^*+kh,\: k=-\frac{N-1}{2},\dots,\frac{N-1}{2}
\]
where $h$ is some step.
Then we interpolate points $\{(x_k,f_k)\}$ by polynomial
\begin{equation} \label{eq:poly}
   P_{N-1}(x)=\sum_{j=0}^{N-1}{a_jx^j}
\end{equation}
Its coefficients $\{a_j\}$ are found as a solution of system of linear equations:
\begin{equation} \label{eq:sys}
   \left\{ P_{N-1}(x_k) = f_k\right\},\quad k=-\frac{N-1}{2},\dots,\frac{N-1}{2}
\end{equation}
Here are references to existing equations: (\ref{eq:poly}), (\ref{eq:sys}).
Here is reference to non-existing equation (\ref{eq:unknown}).
This is how the formulas displayed on the frontend when previewing the page:

I hope that plugin helps you get your LaTex formulas working as expected and please let us know if there is anything else that we can do to help!
Joseph WKeymasterThank you for contacting us Todd, our team is happy to answer any questions you have about working with our Vacation WordPress theme on your website!
Unfortunately there isn’t an option to change which element is used to display the Tagline through the Vacation theme Customizer, however we can use a PHP filter to modify the settings for that element in the theme configuration. The following snippet will change your Tagline to use an H1 instead of an H3:
function modify_site_description($configs){
$configs['template']['tagline'] = '<h1 class="site-description %s">%s</h1>';
return $configs;
}
add_filter( 'boldgrid_theme_framework_config' , 'modify_site_description' );
My preferred way of adding PHP to my websites is with the Code Snippets plugin since it allows my custom PHP to persist through theme updates without having to create my own child theme to manage my customizations. Code Snippets also allows you to control where the script is run on your website (Admin area, Front end, or both) and I recommend choosing to only run the code on the frontend to prevent any possible typos from triggering a fatal error on your website that is difficult to reverse. I tested the provided code on my own site and did not have issues so you should be safe, but it never hurts to be careful!
I hope that filter helps you improve your website’s ADA compliance Todd and please let us know if there is anything else that we can do to assist you!
Joseph WKeymasterYou’re welcome Mike! If you ever have any other questions for us in the future please do not hesitate to ask!
Joseph WKeymasterHi Mike, we are more than happy to help you work with the Footer controls in Crio!
In order for Footer Colum 1 to start displaying text you will first need to add a Widget to that footer area.
Navigate to Widgets > Footer Column 1 in your website Customizer. Once you have the Footer Column 1 controls opened you should see the Add a Widget button and clicking that button will allow you to select which kind of widget you want to add to that area of your footer.

You can select from a variety of different widgets, including navigation menus or blog post lists, but if you just want to add some text to your footer then you should be able to use the Text or Custom HTML options to accomplish that.
I hope that this helps you get your content added to your footer and please let us know if you have any other questions for us!
Joseph WKeymasterHi Tim!
I’m not entirely sure about the templates you referred to in your previous post, are the templates a feature of the Kingster theme? If that is that case then it is possible that there is some kind of conflict created between our Post and Page Builder and the Kingster theme functionality. I looked through the Kingster marketing materials and it seems like that theme has its own integrated page builder, which suggests that there is some kind of incompatibility between the Kingster builder and ours.
I would try deactivating both the Post and Page Builder and its Premium extension to see if that helps mitigate the error messages you are getting.
It is also likely that the error codes you received are generated by the Kingster theme and contacting their support team with that information might provide some additional insight into what is creating those errors.
I hope that this helps you figure out the source of the errors you are seeing and please let us know if you have any other questions for us!
Joseph WKeymasterThank you for sending us that information Tim!
That particular error message is not something that we have seen before and I am not sure exactly what it means, but we will do everything we can to help you troubleshoot this issue.
Does the error only occur when the Post and Page Builder is used for editing that page content or does it still happen when the plugin is deactivated?
Joseph WKeymasterHi Alessandro!
The missing Publish button after changing the font settings is definitely a strange error and it could be related to an out of date plugin or theme installed on your website.
Looking at your website’s source code, it appears that you are using version 1.20 of our Grid One theme. The latest version of that them is 1.25.8 and it is possible that updating to the newest version could fix whatever compatibility problem is preventing that button from displaying as expected.
I hope that updating the theme restores the Publish button in your Customizer and please let us know if there is anything else that we can do to help!
Joseph WKeymasterHi Arno, our team is happy to help you get the Call to Action widget in the Venetian WordPress theme recovered on your website!
The default markup used for that widget content is contained in the theme configuration file located in the theme’s directory in your website’s file system if you ever need to find it again in the future. Below is the default markup used in that widget when the theme is first installed on your website.
<div class="row">
<div class="col-sm-12 col-md-12">
<div class="call-to-action">
<h2>$cta_h2</h2>
<h3>$cta_h3</h3>
<p class="p-button-primary">
<a class="button-primary" href="contact-us">CONTACT US</a>
</p>
</div>
</div>
<div class="col-md-6"></div>
</div><!-- .row -->
You can create a new Call to Action widget by opening up your theme Customizer and navigating to the Widgets section there. Once you have the Widgets panel displayed, choose the widget location where you want to display your Call to Action and add a Visual Editor widget to that area. Switch the Visual Editor widget to Text mode and paste the default markup directly into the widget.
I hope that this helps you get the Call to Action widget working on your website again and please let us know if there is anything else that we can do to help!
- AuthorPosts